
Last updated on January 6th, 2026 at 11:02 am
Looking for the best STM32 projects to try? STM32 microcontrollers are powerful, affordable, and perfect for DIY electronics. From oscilloscopes and thermal imagers to robots and drone controllers, these boards make advanced projects possible on a budget. In this guide, we’ll explore the 15 best STM32 projects that show just how versatile these microcontrollers can be.
Table of Contents
List of best STM32 projects
1. DIY Oscilloscope using STM32
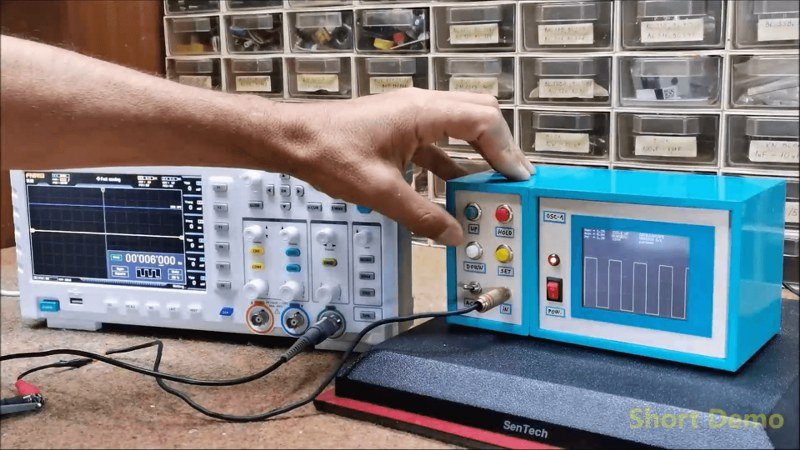
Most commercial oscilloscopes found online are expensive, but this DIY project shows how you can build one at a much lower cost. With this project, you can observe signals up to 500 kHz, making it helpful to visualize and analyze electronic signals.
Mirko used the STM32F103 microcontroller, a budget-friendly option that works with the Arduino IDE. The controller is paired with a TFT color display, five simple buttons, and a few electronic components. It even has a hold button to freeze waveforms for easier analysis and an AC/DC switch to select different input signals.
This device costs around $15 to build, with easily available devices. Whether you’re testing waveforms or learning electronics, this homemade oscilloscope proves you don’t need expensive tools to explore signal analysis.
2. Thermal Imager
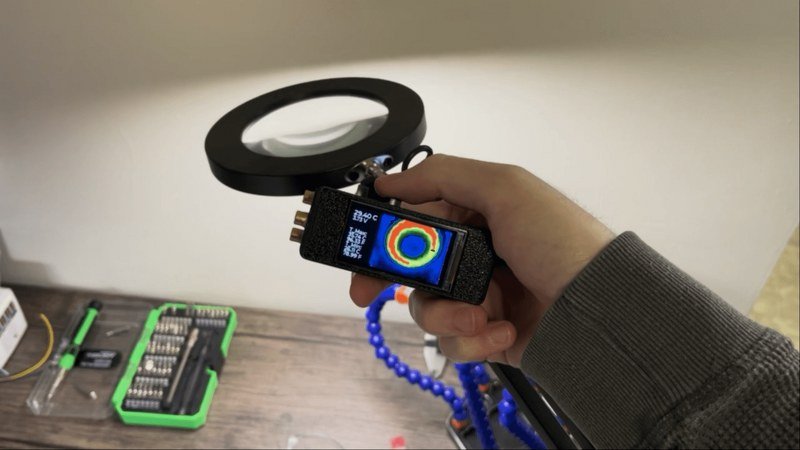
Ever wondered what’s heating up behind the scenes? This creator built OpenTemp—a compact thermal imager and infrared thermometer perfect for troubleshooting electronics, detecting heat loss, or even quick temperature checks.
Powered by an STM32F4 microcontroller and the MLX90640 thermal sensor, this device delivers accurate temperature readings down to 0.2°C. A unique aim-assist system with three laser dots helps pinpoint the exact spot you’re measuring.
The small screen displays live thermal images along with maximum, minimum, and center point temperature readings.
Plus, with the ability to freeze the display, you can easily analyze temperature readings without rushing. The device runs on a rechargeable lithium-ion battery, offering long usage time, and can be recharged via USB-C.
3. DIY STM32 dev board
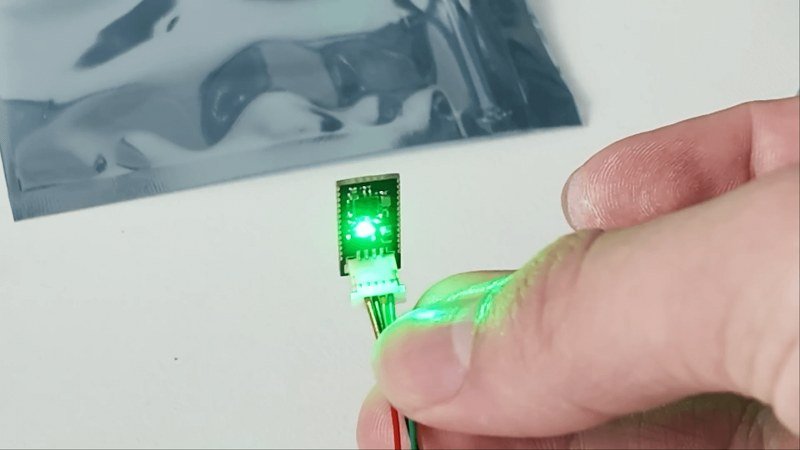
Haase challenged himself to design one of the smallest STM32 development boards without compromising performance. For this, he used this microcontroller, with 22 usable GPIO pins, which is known for its powerful performance in a tiny package.
Instead of using regular pin headers, he went with half-cut castellated holes for a low-profile design. For programming, the board uses a small four-pin connector instead of USB, keeping the size as small as possible.
The PCB design required precision, especially since the microcontroller’s pins are located underneath the chip. Despite facing some soldering difficulties, the board was successfully built and tested. It outperformed popular microcontrollers like the ESP32 in processing speed while taking up much less space, proving that small boards can deliver impressive results.
4. DIY Frequency meter
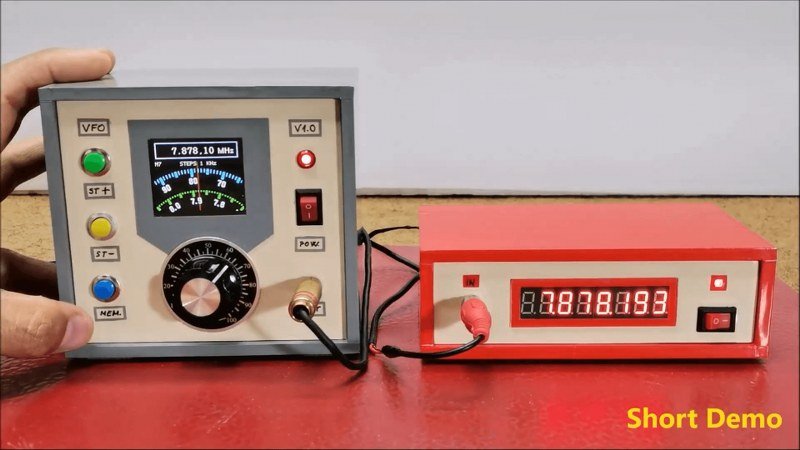
Our next project is a simple yet highly useful frequency meter that can measure the frequency of oscillating signals. This device is packed into a small PVC box with a 7-segment display and a capacitor for input signal conditioning.
The frequency meter is easy to assemble, with the code available from the RCL radio website.
With a frequency range of 0 to 40 MHz, it’s perfect for testing high-frequency radio signals. After testing with different signal generators, the meter showed accurate results with only minor variations — more than acceptable for such an affordable device. This budget-friendly instrument is a great addition to any electronics workbench.
5. Pulse induction metal detector
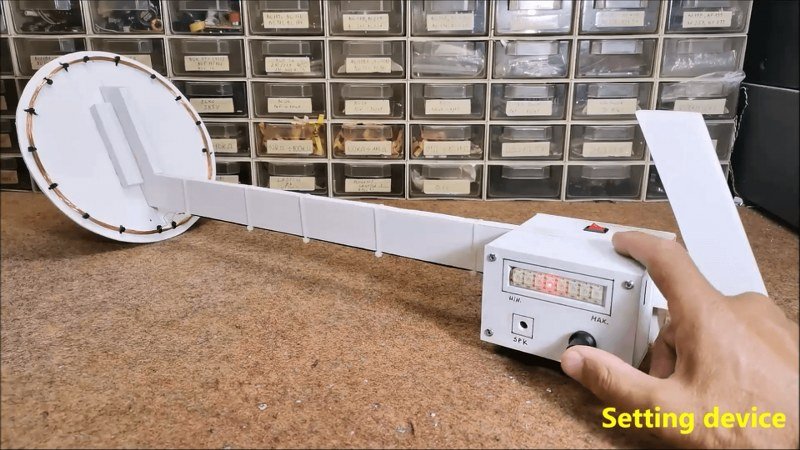
This project is designed to locate metal objects with high sensitivity.
The main sensing element is a custom-made search coil, which automatically calibrates at startup to avoid interference from nearby metal objects. The rotary encoder acts as the primary control interface, allowing users to navigate different modes — from sensitivity adjustments to pulse duration changes for detecting larger or smaller objects.
A strip of eight WS2812B LEDs provides clear visual feedback, while a buzzer gives audio alerts when metal is detected. Power is supplied through three lithium-ion cells, with a voltage regulator ensuring a stable supply for the microcontroller.
During testing, the detector successfully identified metal objects at various depths, making it a handy tool for treasure hunting or locating metal items underground.
6. DIY model rocket
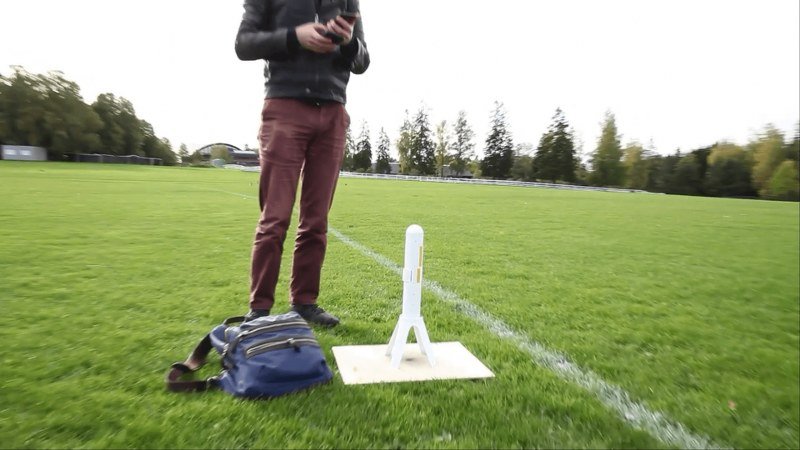
Dmitry made this model rocket with an advanced thrust vector control system designed to achieve actively stabilized flight. Unlike typical model rockets that rely on aerodynamic fins, this rocket uses two servo motors to adjust the angle of the rocket’s motor nozzle, controlling its direction during flight.
An STM32F7 microcontroller handles the orientation estimation using data from a gyroscope, while other onboard sensors like a barometer and accelerometer provide additional flight data. A two-cell lithium polymer battery powers the electronics.
For recovery, the parachute system is uniquely designed to eject from the side of the rocket using spring-loaded doors, triggered by a heated wire cutting through a fishing line latch.
Despite minor oscillations and a failed parachute deployment during the final test flight, the project successfully demonstrated active stabilization — the primary goal of the build.
7. Running videos on STM32
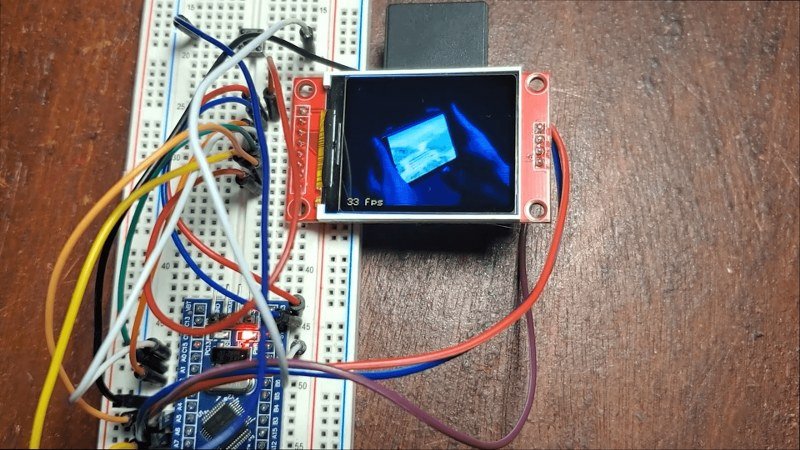
This project demonstrates how to display videos on a small TFT screen with an SD card slot, achieving an average frame rate of 33 frames per second. Despite the small screen size, the results are surprisingly smooth.
The process starts with preparing the images or videos. The images need to be resized to 160×128 pixels and saved in BMP format using any simple photo editing software. The video is also resized, reformatted, and saved as raw pixel data, making it readable by the microcontroller.
Once the media files are ready, they are stored on an SD card, which the microcontroller reads and streams directly to the TFT screen. The display is capable of rendering the frames quickly, resulting in smooth video playback for such a small display.
8. Handheld game console
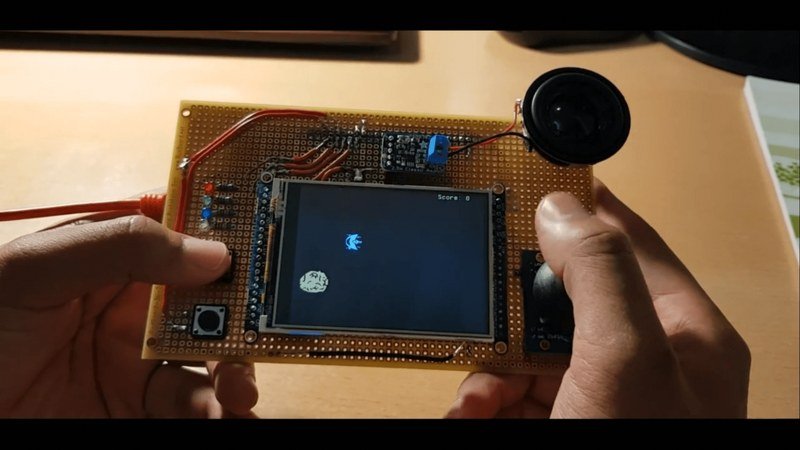
Our next project is a handheld game console built around the STM32F4 Discovery Board, featuring a fun asteroid-shooting game. The console is equipped with a 3.2-inch TFT LCD display, a joystick, buttons, LEDs, and a speaker — making it a complete DIY gaming system.
The game starts with the spaceship placed at a random position, while asteroids appear from different directions. The player uses the joystick to control the spaceship’s movement and buttons to fire rockets at the incoming asteroids.
The joystick works by detecting changes in voltage through two variable resistors — one for the X axis and one for the Y axis — which are continuously read by the ADC at a rate of 40Hz. The two buttons act as digital inputs, with one for firing rockets and the other for game control.
One cool feature is how objects wrap around the screen — when your spaceship flies off one edge, it seamlessly reappears on the other side, giving the illusion of an endless universe.
9. 3-phase induction motor speed control
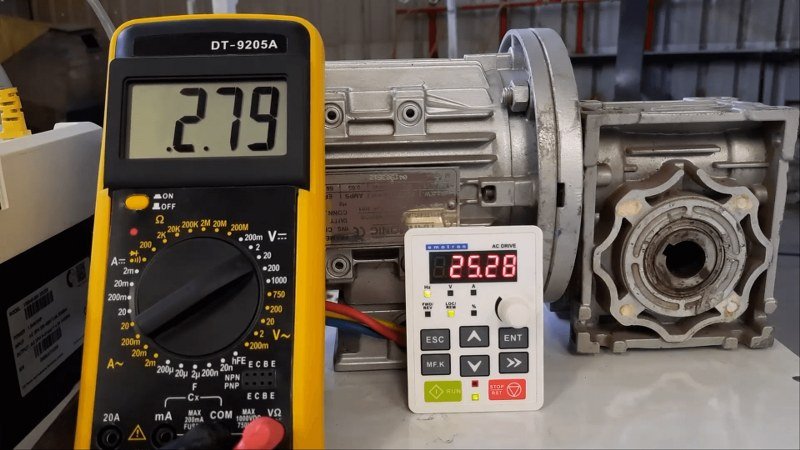
With our next project, you will learn how to control the speed of a 3-phase induction motor using a simple setup. The complete project is made on a breadboard, making it easy to tweak and refine.
First, a PWM signal is generated on the STM32, where the duty cycle is continuously varied between 0% and 100%. This PWM signal is then passed through a low-pass filter, which smooths out the pulses and converts them into an analog voltage.
However, since the STM32 operates at logic-level voltage, an operational amplifier circuit is used to scale the output up to 10 volts, making it compatible with the analog input of the VFD.
With this voltage applied, the VFD adjusts the frequency of the AC motor’s power supply, allowing precise speed control.
10. DIY wooden keyboard
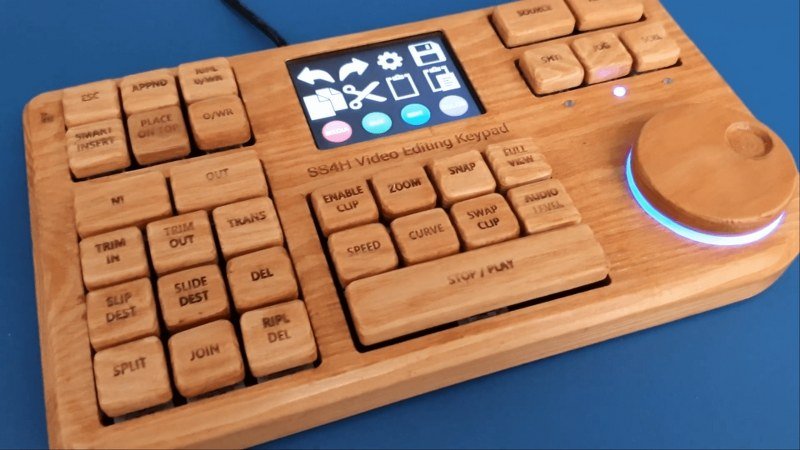
To make video editing more efficient, Sebastian decided to build a custom macro keypad that lets him perform tasks with a single press instead of using complicated shortcuts.
He took inspiration from the DaVinci Resolve Speed Editor but customized it by removing unnecessary features and adding a rotary knob and touchscreen for extra control.
After assembling the electronics, he designed the casing, opting for a wooden finish to give it a premium feel. Using a laser engraver, he added labels to the keycaps, making them look professional and easy to use. Finally, after programming the firmware and fine-tuning the functions, his custom macro keypad was ready.
11. Custom keypad using touch sensors
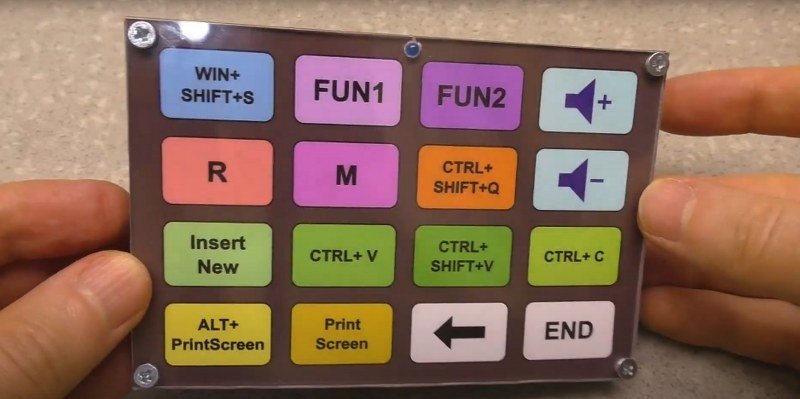
This macro keypad, built by Nesterov, uses touch-sensitive button modules instead of regular mechanical ones. These modules have two power inputs and one logic output.
To power the touch modules, he added a voltage regulator. For the button layout, he cut a transparent acrylic sheet the same size as the board and printed a custom button design, which he placed underneath the acrylic. He also added an LED indicator that lights up when a button is pressed.
To create a tilted panel, he used metal stands, bent them at an angle, and secured everything together. Although not visually perfect, the structure was stable and seemed great to work on.
12. Self-balancing robot
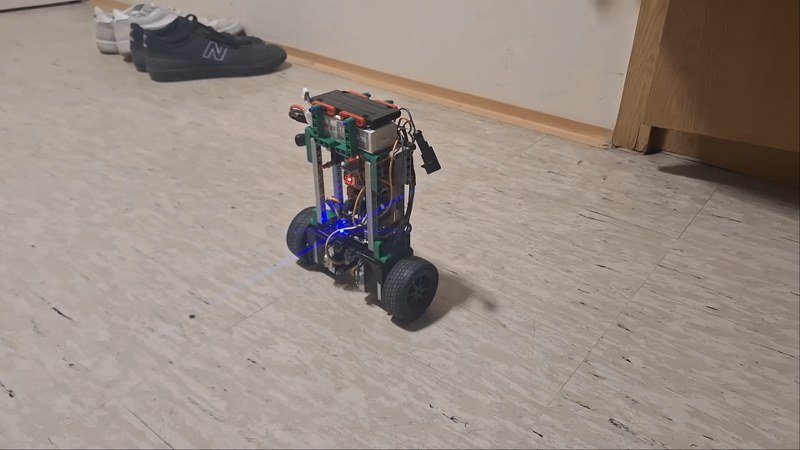
Kamil set out to build a self-balancing robot using an STM32 Blue Pill as the main controller. To measure the angle and maintain stability, he used an MPU6050 sensor, which provides real-time motion data.
Two NEMA 17 stepper motors, driven by TMC2209 drivers, handle the movement, ensuring precise and smooth operation.
With the HAL library, he programmed the system to process sensor data and adjust the motors in real-time, allowing the robot to stay upright. The biggest challenge was fine-tuning the control system to keep the robot balanced.
But in the end, he was able to build a smooth and responsive robot that quickly adjusts to any movement and stays stable, even on slight inclines.
13. Automated brushless motor winding machine
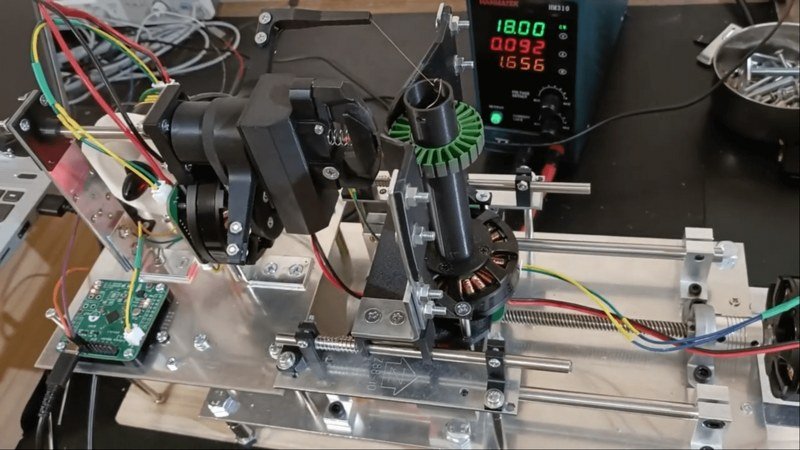
Winding brushless motors manually is slow, tedious, and inconsistent. To overcome this challenge, Yuchi set out to build an automated brushless motor winding machine, making the process faster and more precise.
The machine is powered by four brushless gimbal motors, known for their smooth and precise low-speed performance—perfect for delicate winding operations.
To ensure accuracy, he used the SimpleFOC library to implement closed-loop angle control, allowing the motors to return to their exact position if disturbed.
Maintaining the right wire tension is also crucial for smooth and even winding. For this, one of the motors is dedicated to closed-loop torque control, which prevents loose or uneven windings, both of which can reduce motor efficiency.
The project is fantastic—from the concept to the design—and watching it in action is truly satisfying.
14. Drone flight controller
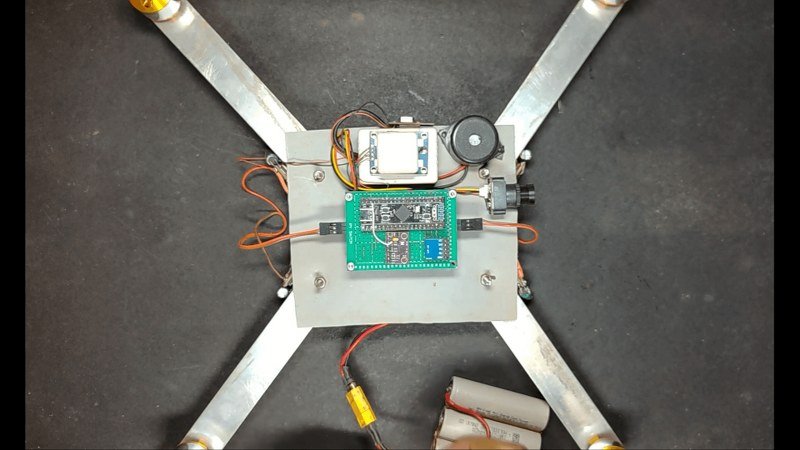
Murali spent two months building a custom drone flight controller from scratch, fine-tuning it through countless test flights.
At its core, the flight controller integrates an MPU6500 IMU for motion sensing, a BMP180 barometer for altitude measurement, and a Neo-6M GPS module, enabling GPS hold and waypoint navigation. But hardware alone wasn’t enough—the key to achieving smooth, stable flight lay in the PID tuning process, an intensive effort that turned raw data into precise control.
Unlike off-the-shelf transmitters, this drone features a custom-built control system using NRF24L01 modules, delivering a 1.5km range with complete customization. The drone itself is built from aluminum square pipes, striking a balance between durability and weight. Equipped with 1000KV brushless motors and 1045 propellers, it achieves an impressive 15+ minutes of flight time.
The journey was challenging—mastering GPS navigation, adjusting flight stability, and perfecting control. But with each hurdle came a lesson, and in the end, the drone soared with precision.
15. Mecanum wheeled robot arm using STM32 with ESP32
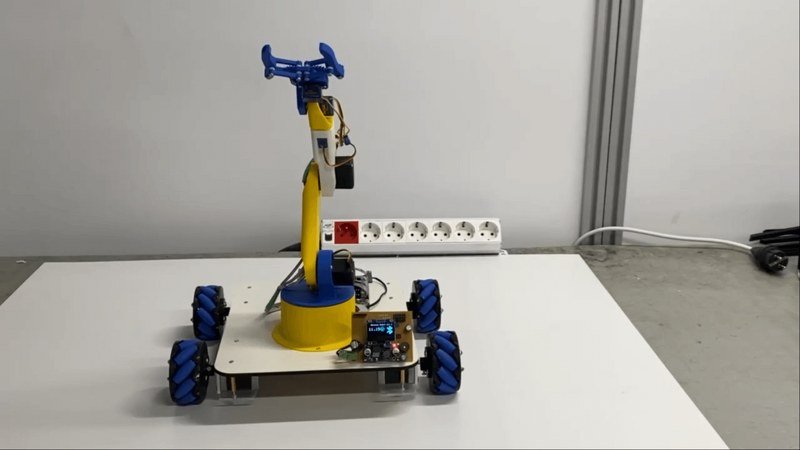
Allaadin built a mecanum-wheeled robotic arm using an STM32 and an ESP32 for control, with an OLED display providing real-time feedback. The robot uses N17 stepper motors for precise movement, with dual 3S batteries—one powering the wheels and the other dedicated to the robotic arm.
Through a mobile app, Murali can control the robot’s direction, rotate and lift the arm, and open or close the gripper. If the Bluetooth connection is lost, the system immediately detects it and stops operation. A reset function restores the arm to its initial state.
One of the standout features is its learning mode. The robot can record multiple positions and repeat them in sequence, making it capable of executing pre-programmed tasks with accuracy.