Last updated on March 14th, 2024 at 12:39 pm
In 2018, the final version of the Raspberry Pi 3 Model was launched, known as Raspberry pi 3 Model B+. Like every other Raspberry Pi board, R-Pi 3 B+ is a single-board computer.
But it has a fast and power-efficient 1.4 GHz processor (1.2GHz in model B) and a faster gigabit Ethernet (it’s limited to 300 Mbit/s by the internal USB 2.0 connection) or dual-channel 2.4 / 5 GHz 802.11ac Wi-Fi (100 Mbit/s).
It also comes with a USB boot, network boot, and Power over Ethernet option that are not present in the B model. Raspberry Pi 3 B+ Pinout with GPIO functions, schematic, and specs are given in detail below.
Table of Contents
Layout

Processor: The BCM2837B0 processor is the main component of this tiny board that helps in carrying out a large set of instructions based on mathematical and logical formulas. BCM2837B0 is a 1.4GHz 64bit ARM quad-core Cortex A53 processor.
RAM: RAM used in R-Pi 3 B+ is 1GB LPDDR2 SDRAM (similar to the previous version)
GPU: It stands for graphics processing unit and is used for performing out the image calculation. The GPU uses OpenGL ES version 2.0, hardware-accelerated OpenVG API, and 1080p30 H.264 high-profile decode. It can provide up to 1Gpixel/s, 1.5Gtexel/s, or 24 GFLOPs of a general-purpose computer.
USB ports: Similar to model B, model B+ also consists of 4 USB ports. Thus removing the hassle of connecting the USB hub in order to increase the ports.
Micro USB power source connector: This connector is used for delivering 5V power to the board. It consumes approx. 170 to 200mA more power than model B. The power connector is also repositioned in the new B+ model and placed next to the HDMI socket.
HDMI and composite connection: Both the audio output socket and the video composite socket reside in a single 4-pole 3.5mm socket which is placed near the HDMI port, and now all the power and audio-video composite sockets are placed on one side of the board which gives it a clean and nice look.
USB hard drive: The board is capable of using an external USB hard drive.
PoE: B+ model comes with a facility of Power over Ethernet (PoE), a new feature added in this device that allows us to power the board using the ethernet cables.
Other changes: The B+ version also comes with other improvements, like the SD memory slot being replaced by a micro SD memory card slot (works similarly to the previous version). The status LEDs on the board now only contain red and green colors and are relocated to the opposite end of the board.
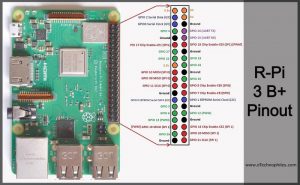
Raspberry Pi 3B+ pinout

GPIO stands for General Purpose Input Output pins. These pins are used to connect the Raspberry Pi board to external input/output devices. Like the previous model, model B+ also consists of a 40-pin GPIO.
A standard interface for connecting a single-board computer or microprocessor to other devices is through General-Purpose Input/Output (GPIO) pins. As these pins don’t have a specific function, they can be customized using the software.
Power pins
The model B+ board consists of two 5V pins, two 3V3 pins, and 9 Ground pins (0V), which are unconfigurable.
5V: The 5V pins are used to directly deliver the 5V supply coming from the mains adaptor. This pin can be used to power up the Raspberry Pi, and it can also be used to power up other 5V devices.
3.3V: This pin is used to provide a stable 3.3V supply to external components and also to test LEDs.
GND: Ground is commonly referred to as GND. All the voltages are measured with respect to the GND voltage.
Input/Outputs pins
A GPIO pin set as input reads the signal received by the Raspberry Pi sent by the device connected to this pin. Any voltage between 1.8V and 3.3V is read as HIGH, and voltage lower than 1.8V as LOW by the Raspberry Pi.
Note: Do not connect a device with an input voltage above 3.3V to any of the GPIO pins, or else it will fry the Raspberry Pi.
A GPIO pin set as an output pin sends the voltage signal as high (3.3V) or low (0V). When this pin is set to HIGH, the voltage at the output is 3.3V and when set to LOW, the output voltage is 0V.
Along with the simple function of input and output pins, the GPIO pins can also perform a variety of specific functions. Some specific pins are:
PWM (pulse-width modulation) pins
- Software PWM is available on all pins
- Hardware PWM is available on these pins only: GPIO12, GPIO13, GPIO18, GPIO19
SPI pins
SPI (Serial Peripheral Interface) is another protocol used for master-slave communication. It is used by the Raspberry pi board to quickly communicate between one or more peripheral devices.
Data is synchronized using a clock (SCLK at GPIO11) from the master (RPi) and the data is sent from the Pi to our SPI device using the MOSI (Master Out Slave In) pin.
If the SPI device needs to communicate back to Raspberry Pi, then it will send data back using the MISO (Master In Slave Out) pin. 5 pins are needed for the SPI communication:
- GND: Connect all GND pins from all the slave components and the Raspberry Pi 3 board together.
- SCLK: Clock of the SPI. Connect all SCLK pins.
- MOSI: It stands for Master Out Slave In. This pin is used to send data from the master to a slave.
- MISO: It stands for Master In Slave Out. This pin is used to receive data from a slave to the master.
- CE: It stands for Chip Enable. We need to connect one CE pin per slave (or peripheral devices) in our circuit. By default, we have two CE pins but we can configure more CE pins from the other available GPIO pins.
SPI pins on R-Pi Model 3B+ :
- SPI0: GPIO9 (MISO), GPIO10 (MOSI), GPIO11 (SCLK), GPIO8 (CE0), GPIO7 (CE1)
- SPI1: GPIO19 (MISO), GPIO20 (MOSI), GPIO21 (SCLK), GPIO18 (CE0), GPIO17 (CE1), GPIO16 (CE2)
I2C pins
I2C is used by the Raspberry Pi board to communicate with devices that are compatible with Inter-Integrated Circuit (a low-speed two-wire serial communication protocol). This communication standard requires master-slave roles between both the devices.
I2C has two connections: SDA (Serial Data) and SCL (Serial Clock). They work by sending data to and using the SDA connection, and the speed of data transfer is controlled via the SCL pin.
- Data: (GPIO2), Clock (GPIO3)
- EEPROM Data: (GPIO0), EEPROM Clock (GPIO1)
UART pins
Serial communication or the UART (Universal Asynchronous Receiver / Transmitter) pins provide a way to communicate between two microcontrollers or computers. TX pin is used to transmit the serial data and RX pin is used to receive serial data coming from a different serial device.
- TX (GPIO14)
- RX (GPIO15)
Schematic (official)
To download the Raspberry Pi 3 Model B+ schematic, click here.

Specifications
- Quad-Core 1.4GHz Broadcom BCM2837B0 64bit CPU
- 1GB LPDDR2 SDRAM
- Dual-channel 2.4GHz and 5GHz IEEE 802.11.b/g/n/ac wireless LAN, Bluetooth 4.2, BLE
- Gigabit Ethernet over USB 2.0 with throughput limited to 300 Mbit/s (3 times faster than model B)
- Extended 40-pin GPIO header
- Full-size HDMI
- 4 USB 2.0 ports
- Full-size HDMI CSI (Camera Serial Interface) camera port for connecting a camera
- DSI (Display Serial Interface) display port for connecting a touchscreen display
- 4-pole stereo output and composite video port
- Micro SD port
- 5V/2.5A DC power input
- Power-over-Ethernet (PoE) support (requires separate PoE HAT)
Ways to program the Raspberry Pi 3 model B+
You can control the GPIO of Raspberry Pi 3 B+ using many programming languages. Some of the popular languages along with learning material is given below:
- Using Python
- With C/C++ using standard kernel interface via libgpiod
- With C/C++ using 3rd party library pigpio
- Using Scratch 1.4
- Using Scratch 2
- Using Processing3
Prefer Book? Read this article on Best Raspberry Pi Books for beginnersWhere to buy?
You can get the original Raspberry Pi 3 B+ board from different stores. But if you want to get it from Amazon, we recommend the following sellers:


FAQs
Can Raspberry Pi 3 run Windows?
Yes, it supports Windows 10 IoT Core.
Can Raspberry Pi 3 run Minecraft?
The Model 3B+ cannot run Minecraft as it only has 1GB RAM. To run it smoothly, you need at least 2GB of RAM.
What is the difference between Raspberry Pi 3 A and 3 B?
The Raspberry Pi 3 Model B offers faster processing, built-in Wi-Fi and Bluetooth, Ethernet connectivity, and a slightly larger form factor compared to the Raspberry Pi 3 Model A, which is smaller, lacks built-in wireless connectivity and Ethernet and operates at a slightly lower clock speed.