
A joystick module is widely used in gaming, robotic control, and interactive projects. It allows users to provide directional input by tilting the joystick in different directions. In this tutorial, we will explore how a joystick module works and how to interface it with an Arduino to create a real-time ball control system for an interactive Galaxy Fighter game.
Table of Contents
What is a joystick module?
A joystick module is an input device that detects directional movement and outputs corresponding electrical signals. It consists of two potentiometers for the X and Y axes and a push-button switch for additional control. The module translates physical movements into voltage variations that can be processed by a microcontroller.
Joystick module pinout
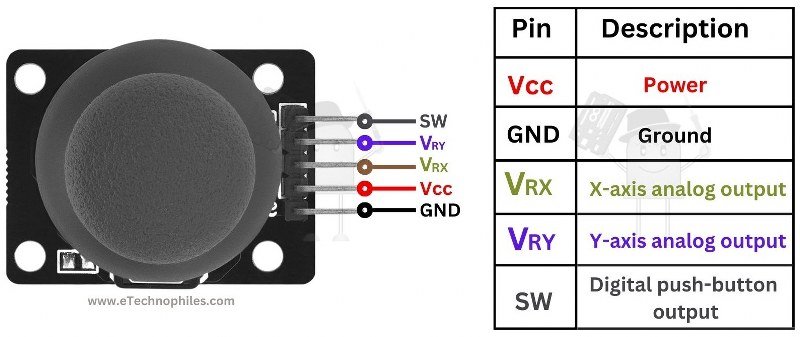
A typical joystick module consists of the following pins:
- VCC – Power supply (3.3V to 5V)
- GND – Ground
- VRX – Analog output for X-axis movement
- VRY – Analog output for Y-axis movement
- SW – Digital output for the push-button switch
Key specifications of the joystick module
Below is a table with the specifications of a typical joystick module:
| Parameter | Specification |
|---|---|
| Operational Voltage Range | 3.3V – 5V |
| X-Axis Resistance | 10k Ohm |
| Y-Axis Resistance | 10k Ohm |
| Switch Type | Normally Open (NO) |
| Output Type | Analog (VRX, VRY) and Digital (SW) |
Construction of the joystick module
The joystick module consists of two main parts:
Potentiometers (X and Y Axes)
- These measure the movement of the joystick in both horizontal (X) and vertical (Y) directions.
- Moving the joystick changes the resistance, which alters the output voltage.

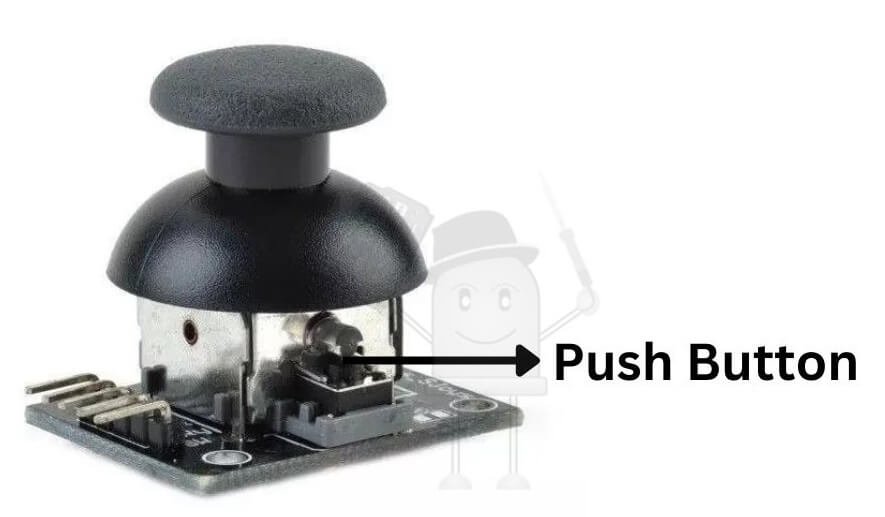
Push-Button Switch
- Pressing the joystick activates the built-in push-button switch.
- It provides a digital output (LOW when pressed, HIGH when released), enabling additional control features.
How does a joystick module work?
A joystick module operates by detecting movements along the X and Y axes using potentiometers. The voltage variations are read by an Arduino’s analog inputs, allowing directional control. The push-button switch provides an additional digital input that can be used for triggering actions.
When the joystick is at rest, both VRX and VRY outputs provide a middle voltage (around 2.5V at 5V supply). Moving the joystick forward, backward, left, or right changes the voltage, which can be mapped to on-screen movement in applications like gaming or robotics.
Joystick module with Arduino interfacing

To interface the joystick module with an Arduino, follow these steps:
1. Make the circuit connections as shown below:
- VCC to 5V pin on Arduino
- GND to GND
- VRX to A0 on Arduino
- VRY to A1 on Arduino
2. Upload this program to your Arduino board:
Program
void setup() {
  Serial.begin(9600);        // Initialize serial communication
  pinMode(2, INPUT_PULLUP);  // Joystick button (SW)
}

void loop() {
  int xValue = analogRead(A0);       // Read X-axis value(connect it to X on Joystick)
  int yValue = analogRead(A1);       // Read Y-axis value
  int buttonState = digitalRead(2);  // Read button state (pressed or not)

  // Send data to Processing in a format: X,Y,Button
  Serial.print(xValue);
  Serial.print(",");
  Serial.print(yValue);
  Serial.print(",");
  Serial.println(buttonState);

  delay(10);  // Small delay for stability
}
Program explanation
void setup() {
  Serial.begin(9600);        // Initialize serial communication
  pinMode(2, INPUT_PULLUP);  // Joystick button (SW)
}
Serial.begin(9600);
- Initializes serial communication at 9600 baud (bits per second).
- This allows the Arduino to send data to a computer or another device.
pinMode(2, INPUT_PULLUP);
- Sets digital pin 2 as an input with an internal pull-up resistor.
- The joystick has a button (SW pin) that connects to digital pin 2.
- When not pressed, the pin reads HIGH (1) due to the pull-up resistor.
- When pressed, it connects to GND, making the pin LOW (0).
void loop() {
  int xValue = analogRead(A0);       // Read X-axis value (connect to X on Joystick)
  int yValue = analogRead(A1);       // Read Y-axis value
  int buttonState = digitalRead(2);  // Read button state (pressed or not)
analogRead(A0);
- Reads the X-axis position of the joystick (value range: 0 to 1023).
- Center position is around 512.
analogRead(A1);
- Reads the Y-axis position (same range as the X-axis).
digitalRead(2);
- Reads the button state.
- Returns 1 (HIGH) when not pressed.
- Returns 0 (LOW) when pressed.
  Serial.print(xValue);
  Serial.print(",");
  Serial.print(yValue);
  Serial.print(",");
Serial.println(buttonState);- Sends data in the format:
X,Y,Button- Example output:
523,489,1
1023,255,0- Serial.print(xValue); → Prints X-axis value.
- Serial.print(“,”); → Prints a comma for separation.
- Serial.print(yValue); → Prints Y-axis value.
- Serial.print(“,”); → Another separator.
- Serial.println(buttonState); → Prints button state and moves to a new line.
  delay(10);  // Small delay for stability
}- Adds a 10-millisecond delay between readings.
- Prevents excessive serial data transmission and stabilizes the output.
4. Monitor the joystick values in the Serial Monitor.
5. Move the joystick and observe how the X and Y values change.
6. Press the joystick button to see the digital output change.
Project 1: Real-time ball control on screen
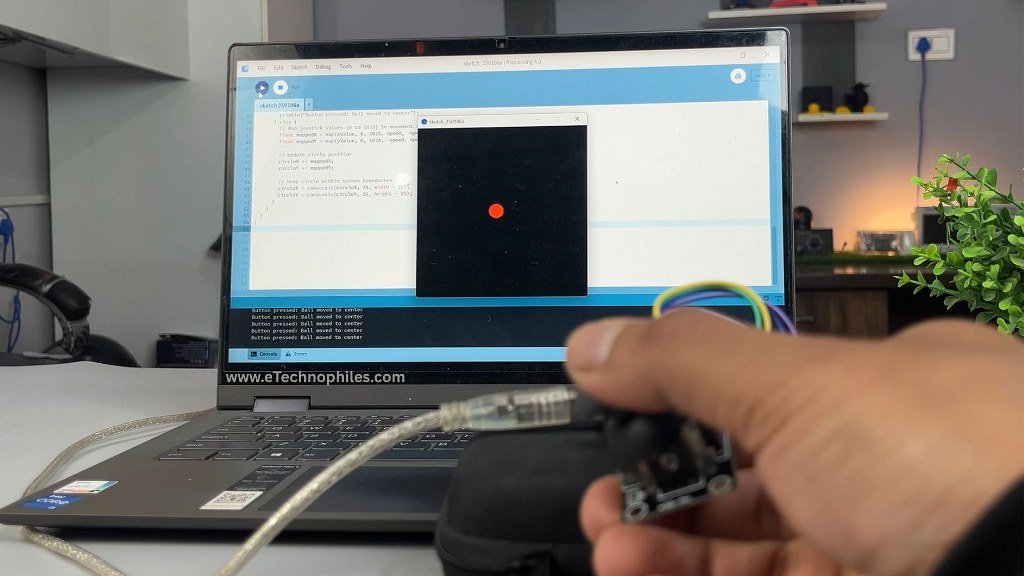
This project demonstrates how the joystick controls a ball on the screen in real-time.
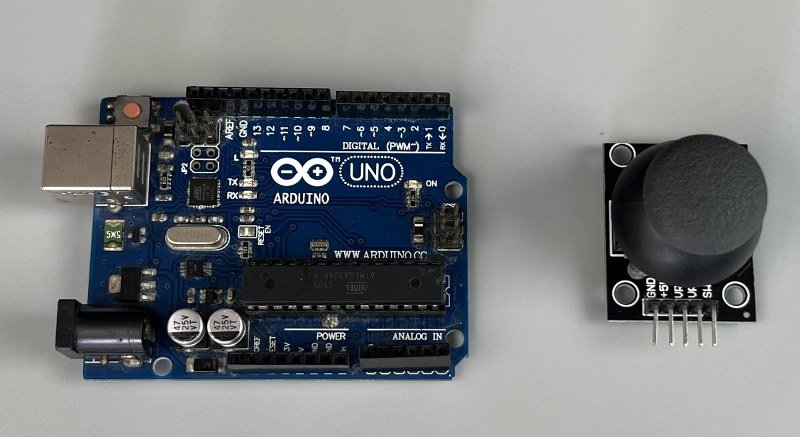
Components required:
- Arduino UNO
- Joystick Module
- Jumper Wires
Circuit diagram
Processing code
import processing.serial.*;  // Import the Serial library

Serial myPort;  // The serial port
float circleX, circleY;  // Circle position
float speed = 5;  // Speed factor for movement

void setup() {
  size(600, 600);  // Set window size
  circleX = width / 2;  // Start circle at the center
  circleY = height / 2;

  // Connect to Arduino
  myPort = new Serial(this, Serial.list()[0], 9600);
  myPort.bufferUntil('\n');  // Read until newline
}

void draw() {
  background(0);  // Clear the screen
  fill(255, 0, 0);
  ellipse(circleX, circleY, 50, 50);  // Draw the circle
}

void serialEvent(Serial myPort) {
  String data = myPort.readStringUntil('\n');  // Read serial data
  data = trim(data);  // Remove extra whitespace
  if (data != null) {
    String[] values = split(data, ',');  // Split the data into X, Y, Button

    if (values.length == 3) {
      int xValue = int(values[0]);
      int yValue = int(values[1]);
      int buttonState = int(values[2]);

      if (buttonState == 0) {
        // Move the ball to the center when the button is pressed
        circleX = width / 2;
        circleY = height / 2;
        println("Button pressed: Ball moved to center");
      } else {
        // Map joystick values (0 to 1023) to movement speed
        float mappedX = map(xValue, 0, 1023, speed, -speed);
        float mappedY = map(yValue, 0, 1023, -speed, speed);

        // Update circle position
        circleX += mappedX;
        circleY += mappedY;

        // Keep circle within screen boundaries
        circleX = constrain(circleX, 25, width - 25);
        circleY = constrain(circleY, 25, height - 25);
      }
    }
  }
}
Project 2: Galaxy fighter game

This project builds upon the real-time ball control to create an interactive game where a spaceship moves based on joystick input.
Processing code
import processing.serial.*;  // Import the Serial library

Serial myPort;  // Serial port for joystick
float playerX, playerY;  // Player position
float playerSize = 40;   // Size of the player's aircraft
boolean isGameOver = false; // Game state flag

ArrayList<Enemy> enemies;  // List of enemies
ArrayList<Bullet> bullets; // List of enemy bullets
ArrayList<PlayerBullet> playerBullets; // List of player bullets
int spawnTimer = 0;        // Timer for spawning enemies

void setup() {
  size(600, 600);  // Game screen size
  myPort = new Serial(this, Serial.list()[0], 9600);
  myPort.bufferUntil('\n');

  initializeGame();  // Initialize game variables
}

void draw() {
  if (isGameOver) {
    // Show "Game Over" screen
    background(0);
    fill(255, 0, 0);
    textAlign(CENTER, CENTER);
    textSize(50);
    text("Game Over", width / 2, height / 2);
    textSize(20);
    text("Press button to restart", width / 2, height / 2 + 40);
    return;
  }

  background(0);  // Black background

  // Draw player aircraft
  fill(0, 255, 0);
  noStroke();
  triangle(playerX, playerY, playerX - 20, playerY + 40, playerX + 20, playerY + 40);

  // Update and draw enemies
  for (int i = enemies.size() - 1; i >= 0; i--) {
    Enemy e = enemies.get(i);
    e.update();
    e.show();
    if (e.isOffScreen()) {
      enemies.remove(i);  // Remove enemies that leave the screen
    }
  }

  // Update and draw enemy bullets
  for (int i = bullets.size() - 1; i >= 0; i--) {
    Bullet b = bullets.get(i);
    b.update();
    b.show();
    if (b.isOffScreen()) {
      bullets.remove(i);  // Remove bullets that leave the screen
    } else if (b.hitsPlayer(playerX, playerY, playerSize)) {
      // Trigger Game Over if bullet hits the player
      isGameOver = true;
      break;  // Exit the loop
    }
  }

  // Update and draw player bullets
  for (int i = playerBullets.size() - 1; i >= 0; i--) {
    PlayerBullet pb = playerBullets.get(i);
    pb.update();
    pb.show();
    // Check if the bullet hits any enemy
    for (int j = enemies.size() - 1; j >= 0; j--) {
      if (pb.hitsEnemy(enemies.get(j))) {
        enemies.remove(j);  // Remove the enemy
        playerBullets.remove(i);  // Remove the player bullet
        break;
      }
    }
    if (pb.isOffScreen()) {
      playerBullets.remove(i);  // Remove player bullets that leave the screen
    }
  }

  // Spawn new enemies periodically
  spawnTimer++;
  if (spawnTimer > 60) {  // Spawn every 60 frames
    enemies.add(new Enemy());
    spawnTimer = 0;
  }
}

void serialEvent(Serial myPort) {
  String data = myPort.readStringUntil('\n');
  data = trim(data);
  if (data != null) {
    String[] values = split(data, ',');
    if (values.length == 3) {  // Ensure data includes X, Y, and button state
      // Update player position based on joystick input
      float xValue = map(float(values[0]), 0, 1023, 0, width);
      float yValue = map(float(values[1]), 0, 1023, height - 100, height);
      int buttonState = int(values[2]);  // Button state (0 = pressed, 1 = released)

      if (isGameOver && buttonState == 0) {
        // Restart the game if button is pressed during Game Over
        initializeGame();
        return;
      }

      if (!isGameOver) {
        playerX = constrain(xValue, 20, width - 20);  // Keep player on-screen
        playerY = constrain(yValue, height - 100, height - 20);

        // Shoot a bullet when the button is pressed
        if (buttonState == 0) {
          playerBullets.add(new PlayerBullet(playerX, playerY));
        }
      }
    }
  }
}

// Initialize or restart the game
void initializeGame() {
  // Reset player position
  playerX = width / 2;
  playerY = height - 60;

  // Clear all enemies and bullets
  enemies = new ArrayList<Enemy>();
  bullets = new ArrayList<Bullet>();
  playerBullets = new ArrayList<PlayerBullet>();

  // Reset game state
  spawnTimer = 0;
  isGameOver = false;
}

// Enemy Class
class Enemy {
  float x, y, size;
  float speed;  // Speed of the enemy

  Enemy() {
    x = random(20, width - 20);
    y = -40;
    size = 40;
    speed = 1;  // Slower vertical speed
  }

  void update() {
    y += speed;  // Move downward
    if (frameCount % 90 == 0) {  // Shoot bullets less frequently
      bullets.add(new Bullet(x, y + size / 2));
    }
  }

  void show() {
    fill(255, 0, 0);
    rectMode(CENTER);
    rect(x, y, size, size);
  }

  boolean isOffScreen() {
    return y > height;
  }
}

// Bullet Class (Enemy Bullets)
class Bullet {
  float x, y, size;

  Bullet(float startX, float startY) {
    x = startX;
    y = startY;
    size = 10;
  }

  void update() {
    y += 5;  // Move downward
  }

  void show() {
    fill(255, 255, 0);
    ellipse(x, y, size, size);
  }

  boolean isOffScreen() {
    return y > height;
  }

  boolean hitsPlayer(float px, float py, float pSize) {
    return dist(x, y, px, py) < (size + pSize) / 2;
  }
}

// PlayerBullet Class
class PlayerBullet {
  float x, y, size;

  PlayerBullet(float startX, float startY) {
    x = startX;
    y = startY;
    size = 8;
  }

  void update() {
    y -= 7;  // Move upward
  }

  void show() {
    fill(0, 0, 255);
    ellipse(x, y, size, size);
  }

  boolean isOffScreen() {
    return y < 0;
  }

  boolean hitsEnemy(Enemy e) {
    return dist(x, y, e.x, e.y) < (size + e.size) / 2;
  }
}