Last updated on June 27th, 2025 at 12:54 pm
It is typically recommended to test the car battery using a multimeter at least twice a year or every 6,000 miles. Such a procedure might help you detect diminished capacity before outright failure.
A fully charged, healthy battery should read 12.6 volts or higher. A battery at 12.4 volts would still start your vehicle, but it means that it’s only 75% charged. If the multimeter shows 12.0 volts or lower, the battery is weak and might continue to lose its charge.
Below, you will find out how to test the car battery the right way.
Table of Contents
Steps to test a car battery using a multimeter
Step 1: Turn off the ignition and any accessories.
Before doing anything, make sure to turn off the ignition and other accessories (like the radio or lights). You can turn the headlights on for 2 minutes to remove the surface charge, but don’t forget to turn them off before testing.
Step 2: Locate the battery.
You would usually be able to find it as soon as you open the hood, but if the battery location is not that obvious, consult the owner’s manual. The element might have a plastic cover which would have to be removed.

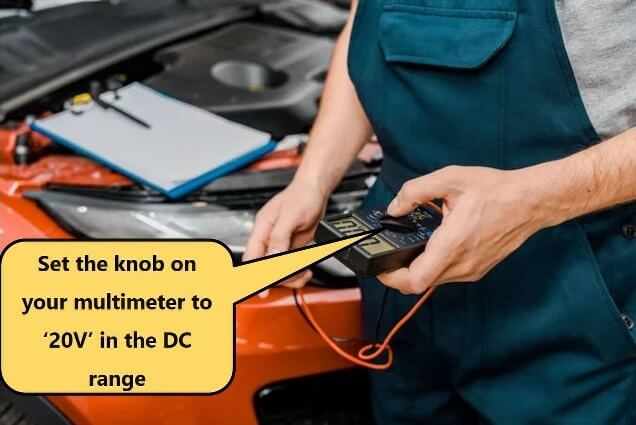
Step 3. Set the knob on your multimeter to ‘20V’ in the DC range
It has a V with a straight line next to it. This will allow you to measure between 0 and 20V, which is just the right range for a car battery.

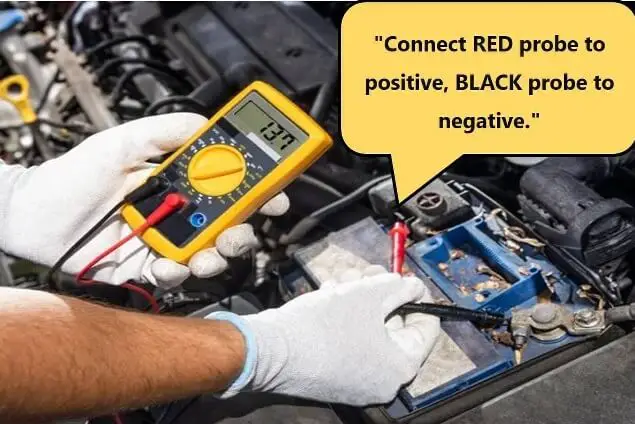
Step 4: Connect the probes/leads to the battery terminals
Multimeters have two probes. The red one is used for positive and the black probe – for negative. That’s why when testing your car battery, you would want to make sure that the red probe is touching the positive terminal (usually red and marked +) and the black probe is touching the negative terminal (black and marked -).
If the reading that you’re getting has a ‘-‘ in front of it, then you have mixed up the probes.

Step 5: Check the readings
If the multimeter shows 12.6V, then you have nothing to worry about. But if the numbers are lower than that, you might have to take the battery out.
Steps to follow if the battery is undercharged
Step 6: If the Voltage is less than 12.6V, disconnect the battery
In case you’re an experienced DIYer, you shouldn’t face any difficulties when disconnecting the battery. All you would have to do is loosen the nut on the negative terminal, remove the negative connector, and repeat the same with the positive terminal.
Ensure that the cables are entirely out of the way and that they do not come in contact with the battery until you’re finished.
You should be able to lift the battery after removing the nuts that are holding the securing clamp in place.
Step 7: Use a battery charger to fully charge it.
Allow the battery to rest overnight. Test it in the morning while it’s still disconnected. If it managed to hold the 12.6V, then something in your car is draining the battery, and you might want to have a professional check that.
How to get a reading on the crank cycle
Now that you have determined the resting voltage, you might want to go the extra mile and measure the battery on the crank cycle. You would need a second person for this as someone has to start the ignition.
As soon as the engine starts, the voltage will drop for a moment. But it should not fall below 10V. If that does happen, then your battery is prone to failure.
While the motor is running, the multimeter reading should stay between 14V and 14.5V. If the voltage drops below that, it means that either the battery is unreliable or the alternator is going bad.
You can also use the multimeter to test the alternator, by the way. Turn on all of the car’s electrical equipment and take a look at the reading – if it drops below 13.5V, then the alternator might need to be replaced.
Things to bear in mind when testing a car battery
- To get an accurate reading, make sure to leave the car overnight (or even for a few days). If you have recently been driving the vehicle, the multimeter might give you a higher reading which would simply be wrong. What you need to test is the ‘resting voltage’.
- Once you expose the battery, be extra careful not to put anything metal on top of the element. If your wrench or another tool touches the terminals, it will cause a short.
- If there is dirt or corrosion at the battery’s terminal, it might keep the multimeter from taking an accurate reading. To get rid of the buildup, you can use fine-grit sandpaper (don’t forget to wear gloves).
- The outside temperature can affect the voltage of the battery. If you’re doing the test at 0 degrees and you get about 12.5V, then the battery is fine. 12.588V at 30 degrees is good as well, but if the temperature is about 80 degrees, then the battery has to measure 12.6V and above.
