The Cryptocurrency Price Tracker with OLED Display is a project that uses an ESP32 microcontroller, an Adafruit OLED display, and Wi-Fi connectivity to deliver real-time price information for a number of well-known cryptocurrencies.
This project connects to the CoinGecko API to retrieve the most recent USD pricing for cryptocurrencies like Bitcoin, Ethereum, and Litecoin. It then displays the data on the OLED screen in an understandable and user-friendly way. This project provides users with a practical approach to quickly keep informed about market movements for cryptocurrencies
Components Required
- ESP32 Microcontroller Board
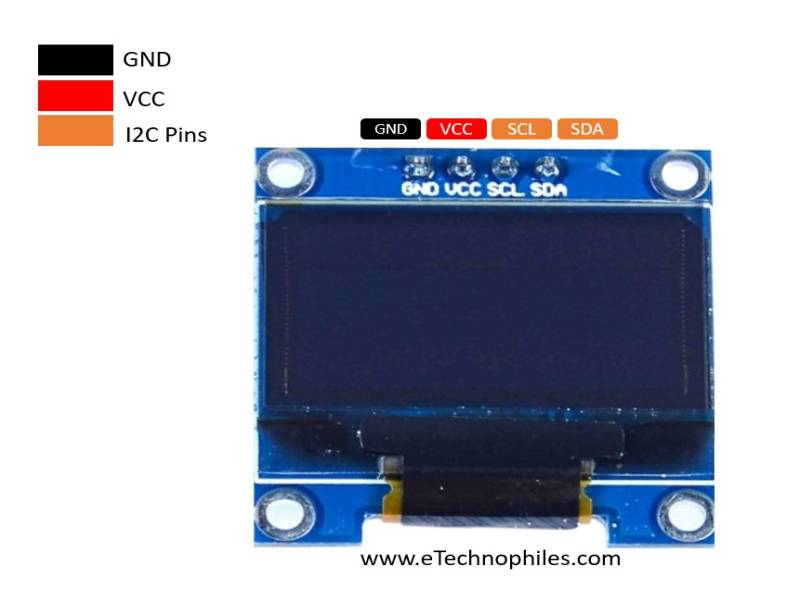
- 0.96 Inch I2C/IIC 4-Pin OLED Display Module

- GND :- Ground
- VCC :- Supply Pin
- SCL :- Serial Clock
- SDA :- Serial Data
Circuit Diagram
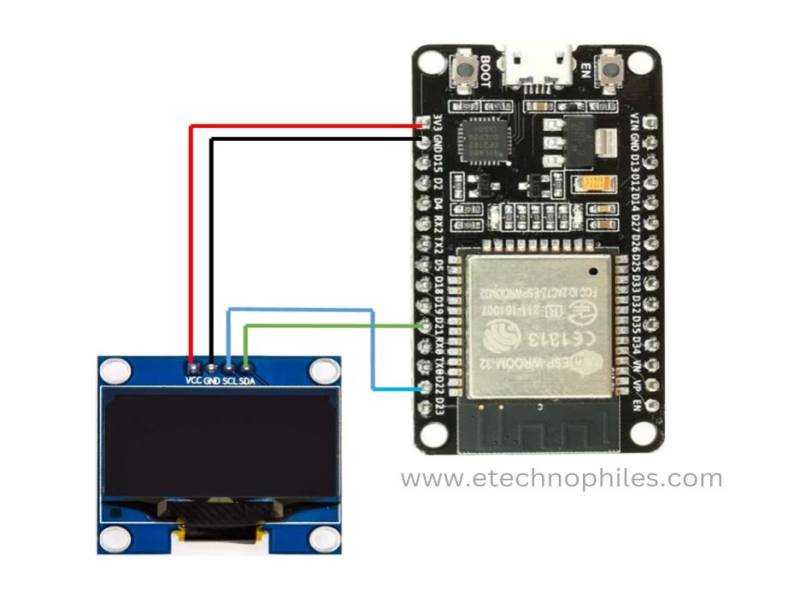
This is a simple circuit diagram of Crypto Ticker.

| OLED Pin | ESP32 Pin |
| VCC | 3V3 Pin |
| GND | GND of ESP32 |
| SDA | GPIO21 |
| SCL | GPIO22 |
Physical Connections
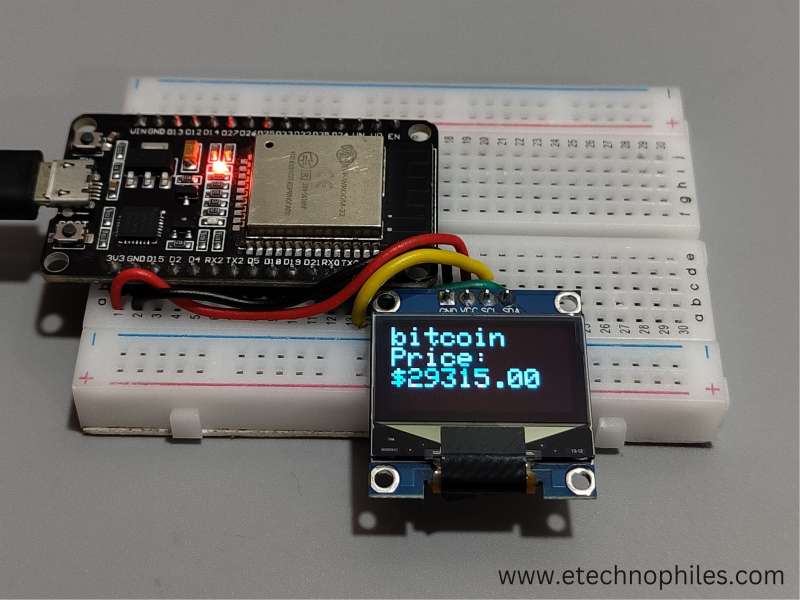
This is a physical connection diagram. We used a breadboard to connect the OLED with ESP32.

Program
#include <Wire.h>
#include <Adafruit_GFX.h>
#include <Adafruit_SSD1306.h>
#include <WiFi.h>
#include <HTTPClient.h>
#include <ArduinoJson.h> // Make sure to install ArduinoJson library from the Library Manager

#define SCREEN_WIDTH 128
#define SCREEN_HEIGHT 64

// Initialize the OLED display
Adafruit_SSD1306 display(SCREEN_WIDTH, SCREEN_HEIGHT, &Wire, -1);

const char* ssid = "TCDEVLOPER2.4";
const char* password = "swastik@96";

// Array of cryptocurrencies you want to track
const char* cryptoSymbols[] = {
  "bitcoin",
  "ethereum",
  "litecoin",
  "ripple",
  "cardano",
  "polkadot",
};

// Number of cryptocurrencies in the array
const int numCryptoSymbols = sizeof(cryptoSymbols) / sizeof(cryptoSymbols[0]);

void setup() {
  // Start Serial for debugging
  Serial.begin(115200);

  // Initialize OLED display with I2C address 0x3C
  if (!display.begin(SSD1306_SWITCHCAPVCC, 0x3C)) {
    Serial.println("SSD1306 allocation failed");
    while (1);
  }

  // Connect to Wi-Fi
  WiFi.begin(ssid, password);
  while (WiFi.status() != WL_CONNECTED) {
    delay(1000);
    Serial.println("Connecting to WiFi...");
  }

  Serial.println("Connected to WiFi");
  display.clearDisplay();
  display.setTextSize(1);
  display.setTextColor(SSD1306_WHITE);
}

void loop() {
  // Loop through all the cryptocurrencies
  for (int i = 0; i < numCryptoSymbols; i++) {
    // Clear the display
    display.clearDisplay();

    // Get crypto price from API
    float price = getCryptoPrice(cryptoSymbols[i]);

    // Display the price on the OLED
    display.setCursor(0, 0);
    display.setTextSize(2);
    display.println(cryptoSymbols[i]);
    display.print("Price:    $");
    display.setTextSize(2);
    display.println(price, 2); // Display two decimal places
    display.display();

    delay(4000); // Delay in milliseconds between each cryptocurrency display
  }
}

float getCryptoPrice(const char* cryptoSymbol) {
  String url = "https://api.coingecko.com/api/v3/simple/price";
  url += "?ids=";
  url += cryptoSymbol;
  url += "&vs_currencies=usd";

  HTTPClient http;
  http.begin(url);

  int httpResponseCode = http.GET();
  float price = 0;

  if (httpResponseCode == 200) {
    String payload = http.getString();
    const size_t capacity = JSON_OBJECT_SIZE(1) + JSON_OBJECT_SIZE(1) + 20;
    DynamicJsonDocument doc(capacity);
    deserializeJson(doc, payload);
    price = doc[cryptoSymbol]["usd"].as<float>();
  }

  http.end();
  return price;
}
Program Explanation
Include Libraries:
#include <Wire.h>
#include <Adafruit_GFX.h>
#include <Adafruit_SSD1306.h>
#include <WiFi.h>
#include <HTTPClient.h>
#include <ArduinoJson.h>
The required libraries for I2C connection, OLED display control, Wi-Fi connectivity, HTTP requests, and JSON parsing are included in this section.
Define OLED Screen Parameters:
#define SCREEN_WIDTH 128
#define SCREEN_HEIGHT 64
These constants define the screen dimensions for the OLED display.
Initialize OLED Display:
Adafruit_SSD1306 display(SCREEN_WIDTH, SCREEN_HEIGHT, &Wire, -1);
This line uses the Adafruit_SSD1306 library to initialize the OLED display.
Wi-Fi Credentials:
const char* ssid = "SSID";
const char* password = "PASSWORD";
These variables hold the SSID and password for your Wi-Fi network.
Cryptocurrency Symbols:
const char* cryptoSymbols[] = {
  "bitcoin",
  "ethereum",
  "litecoin",
  "ripple",
  "cardano",
  "polkadot",
};
The names of the cryptocurrencies you want to track are represented in this array.
Number of Cryptocurrencies:
const int numCryptoSymbols = sizeof(cryptoSymbols) / sizeof(cryptoSymbols[0]);
This variable calculates the number of cryptocurrencies in the array.
Setup Function (setup):
- For debugging purposes, serial communication is initialized.
- The I2C address of the OLED display is used for initialization.
- It makes an attempt to connect to the assigned Wi-Fi network and waits until a connection is made.
- When connected, debug information is printed to Serial.
- The text size, color, and configuration of the OLED display are all set.
Loop Function (loop):
- It iterates through all the cryptocurrencies in the cryptoSymbols array.
- Clears the OLED display for the next cryptocurrency.
- Calls getCryptoPrice to obtain the cryptocurrency’s price via an API.
- Displays the cryptocurrency name and price with two decimal places on the OLED screen.
- Delay of 4 seconds between each cryptocurrency update.
'getCryptoPrice‘ Function:
- Creates the API URL for a certain cryptocurrency symbol.
- Makes an HTTP GET request to retrieve price data.
- The ArduinoJson library is used to parse the JSON response.
- Returns the cryptocurrency’s price as a floating-point number.
Conclusion
In conclusion, the Cryptocurrency Price Tracker project combines IoT technology with real-time cryptocurrency data successfully. It provides customers with a simple and portable way to keep track of the prices of several cryptocurrencies. This project is an example of how IoT can be used for practical purposes in the world of digital currencies.
