Last updated on November 9th, 2024 at 09:31 am
Do you want to use two, three, five (or more)different sensors simultaneously with your Arduino board? This tutorial will show you what’s the right approach for these types of projects.
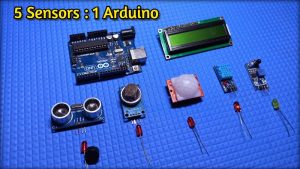
In this project, I am using 5 different sensors with Arduino UNO and printing each sensor’s readings on a 16×2 LCD. We can use more than five but the size of the LCD poses the limitation. So for more sensors, use a bigger display, if you want to see their readings live on it.
Getting the readings is one thing but performing a task based on these readings is another challenge altogether. For this, there are five LEDs connected to UNO. Each sensor is assigned one LED as output. When a certain sensor gives reading more/less than a predefined value, the assigned LED glows.
For example, when there is an object infront of the IR sensor, the first LED glows. When the distance of an object from the HCSR04 is less than 30 cm, the second LED glows and the buzzer beeps. Yes, there is one buzzer as well, for HCSR04.
Watch the video tutorial below:
Table of Contents
Components required
- Arduino UNO
- 16X2 LCD
- Buzzer
- 5 LED
- 220 ohm resistor X 6
- PIR sensor
- LDR
- HCSR04 ultrasonic sensor
- IR sensor
- DHT11
- Gas sensor(optional)
- Jumper wires
Circuit diagram
Connect the components as shown below.

Note: You can also use an MQ2 gas sensor in place of the LDR. Connect its anlog output pin to A4.
Sensors used in this project
1. PIR (Passive Infrared) Sensor
Function: Detects motion by measuring changes in infrared radiation within its field of view.
Common Applications: Security systems, automatic lighting control, occupancy detection.
2. HC-SR04 Ultrasonic Sensor
Function: Measures distance by sending out ultrasonic waves and calculating the time it takes for them to bounce back.
Common Applications: Object detection and avoidance, distance measurement, robotics.
3. LDR (Light Dependent Resistor) Sensor
Function: Changes resistance based on the amount of light falling on it.
Applications: Light-sensitive switches, automatic outdoor lighting systems, brightness control in displays.
4. IR (Infrared)obstacle avoidance sensor
Function: Consists of both a transmitter and receiver module. The transmitter emits infrared light, which bounces off objects and is detected by the receiver. It detects obstacles based on the reflection of the emitted infrared light.
Applications: Obstacle avoidance in robotics, object detection, line following, proximity sensing.
5. DHT11 Temperature and Humidity Sensor
Function: Measures ambient temperature and humidity levels.
Applications: Environmental monitoring, HVAC systems, weather stations.
Program
Upload this program to your board.
/*
 *  multiple_Sensors_With_Arduino
 *
 *  Created on: May 27, 2020
 *      Author:youtube.com/theelectronicguy
 */


#include <SimpleDHT.h>//DHT11 library(Search : simpledht in Library Manager)
#include <LiquidCrystal.h>//LCD library
LiquidCrystal lcd(7, 6, 5, 4, 3, 2);//lcd(RS,En,D4,D5,D6,D7)

#define PIR_SENSOR      A5//pir sensor(pins:1)
/*
   Uncomment when using GAS Sensor
*/
//#define GAS_SENSOR      A4
/*
   Uncomment when using LDR Sensor
*/
#define LDR_SENSOR      A4
//ultrasonic sensor(pins:2)
#define ULT_TRIG        A3
#define ULT_ECHO        A2
#define IR_SENSOR       A1//Ir sensor(pins:1)
#define HT_SENSOR       A0//humidity and temperature sensor(pins:1)

//leds(pins:5)
#define HT_LED          8
#define IR_LED          9
#define ULT_LED         10
#define BUZZER          11// for ultrasonic sensor
//#define GAS_LED       12
#define LDR_LED         12
#define PIR_LED         13

// create a dht11 object
SimpleDHT11 dht11(HT_SENSOR);

void setup() {
  Serial.begin(9600);
  lcd.begin(16, 2);
  lcd.clear();
  // set sensor pins as inputs
  for (int i = HT_SENSOR; i <= PIR_SENSOR; i++)
    pinMode(i, INPUT);
  //set trigger pin as output
  pinMode(ULT_TRIG, OUTPUT);
  // set led pins as output
  for (int i = HT_LED; i <= PIR_LED; i++)
    pinMode(i, OUTPUT);

  // print sensor name on the LCD
  lcd.setCursor(0, 0);
  lcd.print("IS=  ");//IR Sensor data will be displayed at (3,0)
  lcd.print("US=   ");//Ultrasonic Sensor data will be displayed at(8,0)
  //lcd.print("GS=   ");//Gas Sensor data will be displayed at(14,0)
  lcd.print("LDR=  ");//LDR Sensor data will be displayed at(15,0)
  lcd.setCursor(0, 1);// Move cursor to the next line of LCD
  lcd.print("PS=  ");//PIR Sensor data will be displayed at(3,1)
  lcd.print("HS=   ,   ");//Humidity & temperature Sensor data will be displayed at(8,1) &(12,1) respectivel
}

void loop() {
  /*
     read continously from each sensor
  */
  //print digital values from Ir Sensor
  ir_Readings();
  //distance measurement using Ultrasonic Sensor
  us_Readings();
  //read values from gas sensor
  //gas_Readings();
  //read values from LDR sensor
  LDR_Readings();
  //read analog values from pir sensor
  pir_Readings();
  // read temp and humidity from ht sensor
  ht_Readings();
}

void ir_Readings() {
  int x = digitalRead(IR_SENSOR);
  lcd.setCursor(3, 0);
  lcd.print(!x);
  Serial.print("IR=");
  Serial.print(!x);
  Serial.print("\t");
  //IR Sensor input condition for Led to glow
  if (x == 0) {
    digitalWrite(IR_LED, HIGH);
  }
  else {
    digitalWrite(IR_LED, LOW);
  }

}

void us_Readings() {
  long  duration;
  int distance;
  duration = time_Measurement(duration);
  distance = (int)duration * (0.0343) / 2;

  if (distance > 99 || distance < 0)//If distance is negative or greater than 99, then always show distance =0
    distance = 0;

  display_distance(distance);
}

//uncomment when using GAS Sensor
/*void gas_Readings() {
  int x = analogRead(GAS_SENSOR);
  lcd.setCursor(14, 0);
  lcd.print(x);
  Serial.print("GS=");
  Serial.print(x);
  Serial.print("\t");

   //Gas Sensor input condition for Led to glow
  if (x >= 60)
    digitalWrite(9, HIGH);
  else
    digitalWrite(9, LOW);
  }*/

//uncomment when using LDR Sensor
void LDR_Readings() {
  int x = digitalRead(LDR_SENSOR);
  lcd.setCursor(15, 0);
  lcd.print(x);
  Serial.print("LDR=");
  Serial.print(x);
  Serial.print("\t");

  //LDR Sensor input condition for Led to glow
  if (x == 1) {
    digitalWrite(LDR_LED, HIGH);
  }
  else {
    digitalWrite(LDR_LED, LOW);
  }
}

void pir_Readings() {
  int x = digitalRead(PIR_SENSOR);
  lcd.setCursor(3, 1);
  lcd.print(x);
  Serial.print("PS=");
  Serial.print(x);
  Serial.print("\t");

  ////PIR Sensor input condition for Led to glow
  if (x == 1) {
    digitalWrite(PIR_LED, HIGH);
  }
  else {
    digitalWrite(PIR_LED, LOW);
  }
}

void ht_Readings() {
  byte temperature = 0;
  byte humidity = 0;

  dht11.read(&temperature, &humidity, NULL);// <simpledht> library function to read temperature and humidity

  lcd.setCursor(8, 1);
  lcd.print((int)temperature);
  lcd.print("*");//temperature in degree
  lcd.setCursor(12, 1);
  lcd.print((int)humidity);
  lcd.print("%");
  Serial.print("HT=");
  Serial.print(temperature);
  Serial.print("*C,");
  Serial.print(humidity);
  Serial.print("%");
  Serial.println();

  //Temperature and humidity conditions for Led to glow
  if (temperature > 38 || humidity > 37)
    digitalWrite(HT_LED, HIGH);
  else
    digitalWrite(HT_LED, LOW);

  delay(500);

}


int time_Measurement(int duration)
{

  digitalWrite(ULT_TRIG, LOW);
  delayMicroseconds(2);

  digitalWrite(ULT_TRIG, HIGH);
  delayMicroseconds(10);
  digitalWrite(ULT_TRIG, LOW);

  duration = pulseIn(ULT_ECHO, HIGH);
  return duration;
}

void display_distance(int distance)
{
  lcd.setCursor(8, 0);
  if (distance < 10) {
    lcd.print(0);
  }
  lcd.print(distance);
  Serial.print("US=");
  Serial.print(distance);
  Serial.print("\t");

  //distance condition for Led to glow
  if (1 <= distance && distance <= 10) {
    digitalWrite(ULT_LED, HIGH);
    tone(BUZZER, 2000);
  }
  else {
    digitalWrite(ULT_LED, LOW);
    noTone(BUZZER);
  }

  delay(10);
}
If you are using the MQ2 sensor in place of the LDR, there are a couple of changes you need to make in the program above.
1. Uncomment these sections
// #define GAS_SENSOR A4/*void gas_Readings() {
int x = analogRead(GAS_SENSOR);
lcd.setCursor(14, 0);
lcd.print(x);
Serial.print("GS=");
Serial.print(x);
Serial.print("\t");
//Gas Sensor input condition for Led to glow
if (x >= 60)
digitalWrite(9, HIGH);
else
digitalWrite(9, LOW);
}*/2. Comment out these sections
#define LDR_SENSOR A4void LDR_Readings() {
int x = digitalRead(LDR_SENSOR);
lcd.setCursor(15, 0);
lcd.print(x);
Serial.print("LDR=");
Serial.print(x);
Serial.print("\t");
//LDR Sensor input condition for Led to glow
if (x == 1) {
digitalWrite(LDR_LED, HIGH);
}
else {
digitalWrite(LDR_LED, LOW);
}
}
Can I make this without IR sensor and LCD screen. Are they really necessary?
Because we are using PIR sensor anyway for movement detection and if I use Blynk app , I’ll still need LCD screen?
Hi Rajesh,
What is the purpose of using BLYNK app here? Do you want to display the readings on the app?
Even if you don’t use the LCD, the code will still work as it is used here just to display the readings.
hello, thanks for this amazing project.
can you please make a similar one without using the IR sensor and the Ultrasonic sensor?
can i use lm35 in the place of dht11
thank you very much
Excellent info! What I would like to see is more projects that transmit sensor data from one location to another using the HC-12 module!!! Like voltage levels of a remote battery, temperature and a switch closure etc. I know there are a few out there but not those that combine all three together. I am not a code guru, that is why I’m requesting. Most of us are not code gurus, but we learn from those that are! Thank You!