In this project, we will demonstrate how to print or draw Tiranga on a TFT display shield with Arduino. The main goal of this project is to show how to use an Arduino to create colorful stripes, a circle, and spokes on a TFT LCD screen, resulting in a stunning picture.
Watch the video tutorial below
Components required
- Arduino Uno
- 2.4″ inch touch screen TFT display shield
Introduction to 2.4″ inch touch screen TFT display shield
The 2.4-inch touchscreen TFT Display Shield for Arduino UNO Mega is a stunning large touchscreen display shield with an integrated microSD card slot. The color contrast on the LCD is outstanding.
This TFT display is big (2.4′′ diagonal), bright (4 white LED backlights), and colorful (18-bit 262,000 colors). It contains 240×320 pixels with individual pixel control, which is significantly higher resolution than a 128×64 black and white display. As a bonus, this display includes a resistive touchscreen, allowing you to detect finger presses anywhere on the screen.
Given below is the pinout of this 2.4 inch TFT LCD

Circuit diagram
The connection is easy, you just need to put the TFT shield on Arduino Uno.

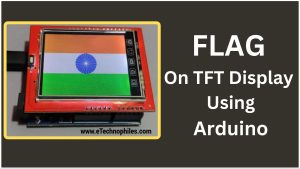
The national on the TFT display will look like this

Program
Upload this program to your Arduino board.
#include <Adafruit_GFX.h>
#include <Adafruit_TFTLCD.h>

#define LCD_CS A3
#define LCD_CD A2
#define LCD_WR A1
#define LCD_RD A0
#define LCD_RESET A4

#define ORANGE    0xFE60
#define WHITE     0xFFFF
#define GREEN     0x07E0
#define NAVYBLUE  0x001F

Adafruit_TFTLCD tft(LCD_CS, LCD_CD, LCD_WR, LCD_RD, LCD_RESET);

void setup() {
  tft.begin();
  tft.setRotation(1);
  tft.fillScreen(WHITE);
}

void loop() {
  int width = tft.width();
  int height = tft.height();

  int stripe_height = height / 3;

  // Draw the orange stripe
  tft.fillRect(0, 0, width, stripe_height, ORANGE);

  // Draw the white stripe
  tft.fillRect(0, stripe_height, width, stripe_height, WHITE);

  // Draw the green stripe
  tft.fillRect(0, stripe_height * 2, width, stripe_height, GREEN);

  // Draw the navy blue circle
  tft.fillCircle(width/2, stripe_height+(stripe_height/2), stripe_height/2, NAVYBLUE);

  // Draw the white spokes
  int spoke_length = stripe_height / 2;
  int spoke_angle = 15; // Start at 15 degrees, to position the first spoke at the top
  for (int i = 0; i < 24; i++) {
    float radians = spoke_angle * (3.14159265359 / 180); // Convert the angle to radians
    int x = width/2 + spoke_length * cos(radians);
    int y = stripe_height + (stripe_height/2) + spoke_length * sin(radians);
    tft.drawLine(width/2, stripe_height+(stripe_height/2), x, y, WHITE);
    spoke_angle += 15; // Increment the angle by 15 degrees for the next spoke
  }

  delay(5000);
}
Program Explanation
Library inclusions:
#include <Adafruit_GFX.h>
#include <Adafruit_TFTLCD.h>
These lines include the libraries required for graphics processing and TFT LCD control. Adafruit_GFX provides graphics functionality, while Adafruit_TFTLCD interfaces with the TFT LCD.
Pin definitions:
#define LCD_CS A3
#define LCD_CD A2
#define LCD_WR A1
#define LCD_RD A0
#define LCD_RESET A4
These lines provide the Arduino pins that will be utilized to control the TFT LCD. Depending on your hardware configuration, these pins may need to be modified.
Color definitions:
#define ORANGE    0xFE60
#define WHITE     0xFFFF
#define GREEN     0x07E0
#define NAVYBLUE  0x001F
These lines define color constants in 16-bit RGB565 format. Each color is represented by a hexadecimal value.
TFT LCD Initialization:
Adafruit_TFTLCD tft(LCD_CS, LCD_CD, LCD_WR, LCD_RD, LCD_RESET);
This line defines the pin connections for the LCD control lines by creating an instance of the Adafruit_TFTLCD class.
Setup function:
void setup() {
  tft.begin();
  tft.setRotation(1);
  tft.fillScreen(WHITE);
}- The TFT LCD display is initialized using tft.begin().
- tft.setRotation(1) rotates the display to portrait (90 degrees).
- tft.fillScreen(WHITE) clears the display by replacing the background color with white.
Loop function:
void loop() {
  // Calculate screen dimensions and stripe height
  int width = tft.width();
  int height = tft.height();
  int stripe_height = height / 3;

  // Draw the colored stripes
  tft.fillRect(0, 0, width, stripe_height, ORANGE);
  tft.fillRect(0, stripe_height, width, stripe_height, WHITE);
  tft.fillRect(0, stripe_height * 2, width, stripe_height, GREEN);

  // Draw the navy blue circle
  tft.fillCircle(width/2, stripe_height+(stripe_height/2), stripe_height/2, NAVYBLUE);

  // Draw the white spokes
  int spoke_length = stripe_height / 2;
  int spoke_angle = 15; // Start at 15 degrees, to position the first spoke at the top
  for (int i = 0; i < 24; i++) {
    float radians = spoke_angle * (3.14159265359 / 180); // Convert the angle to radians
    int x = width/2 + spoke_length * cos(radians);
    int y = stripe_height + (stripe_height/2) + spoke_length * sin(radians);
    tft.drawLine(width/2, stripe_height+(stripe_height/2), x, y, WHITE);
    spoke_angle += 15; // Increment the angle by 15 degrees for the next spoke
  }

  delay(5000); // Delay for 5 seconds before repeating the pattern
}
In the loop function:
- Screen dimensions and the height of each stripe are calculated based on the TFT display’s height.
- tft.fillRect is used to draw three colored stripes (orange, white, and green).
- tft.fillCircle is used to make a navy blue circle in the center of the screen.
- Using trigonometric calculations, a set of white spokes is drawn around the circle.
- Then every 5 seconds pattern will be repeated.