Last updated on January 5th, 2026 at 12:41 pm
The Raspberry Pi is small, affordable, and surprisingly powerful single board computer — which is why people build everything from smart gadgets to robots and creative DIY devices with it. Here’s a collection of some of the most interesting Raspberry Pi projects you can explore or try yourself.
Latest projects of 2026(video):
List of Raspberry pi projects
January 2026:
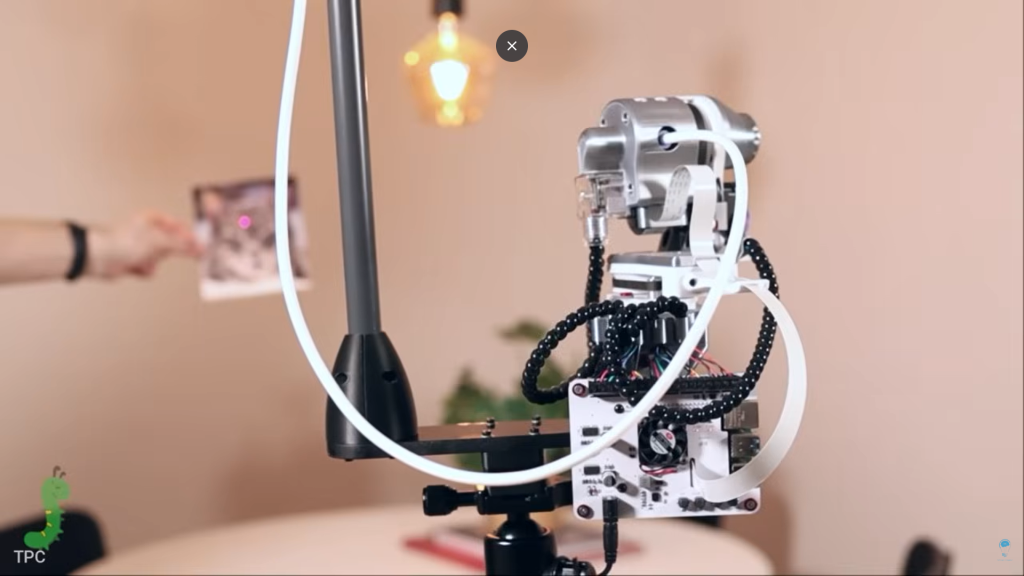
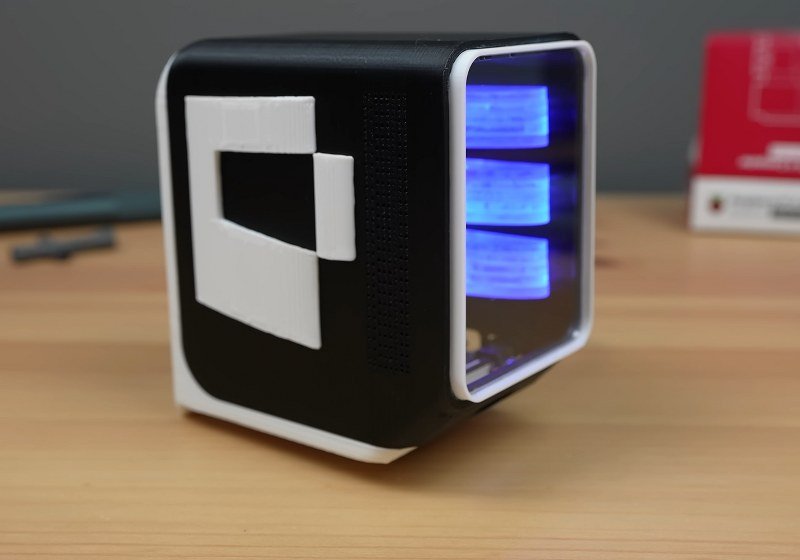
Transparent computer
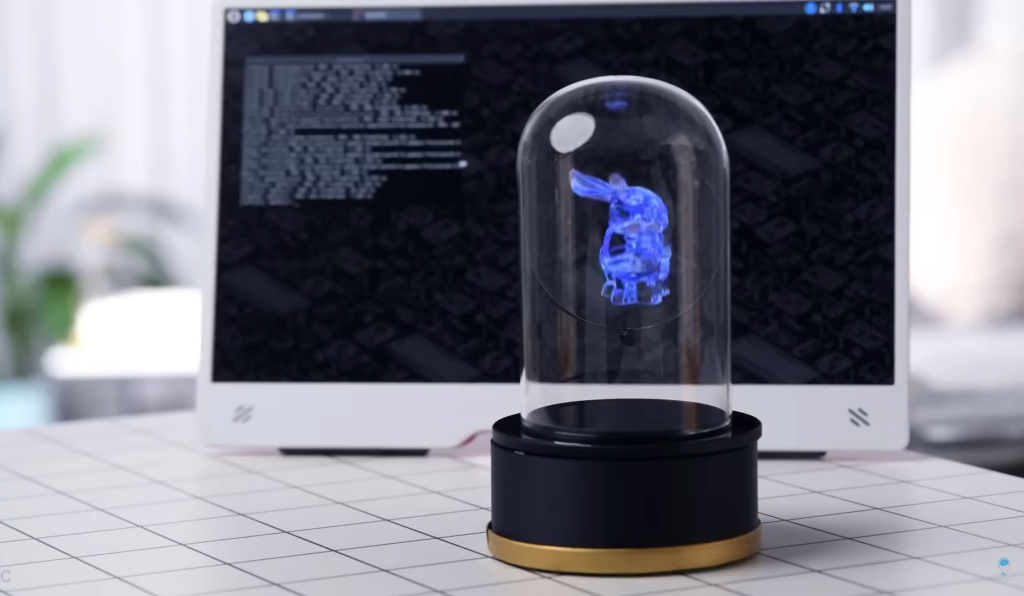
This project turns a Raspberry Pi 5 into a striking desktop using the classic Pepper’s Ghost illusion. A circular LED screen inside a glass dome projects onto a transparent acrylic sheet set at a 45–60° angle, producing the effect of a floating display. The screen connects via DSI and is powered by USB-C; a privacy film hides the physical screen from most viewing angles to strengthen the illusion. The Pi is cooled with a heatsink and optional fan, and all electronics are housed in a matte-black 3D-printed base finished with a faux-brass rim for a vintage, display-ready look.
**Project link: Transparent computer
LED matrix mask
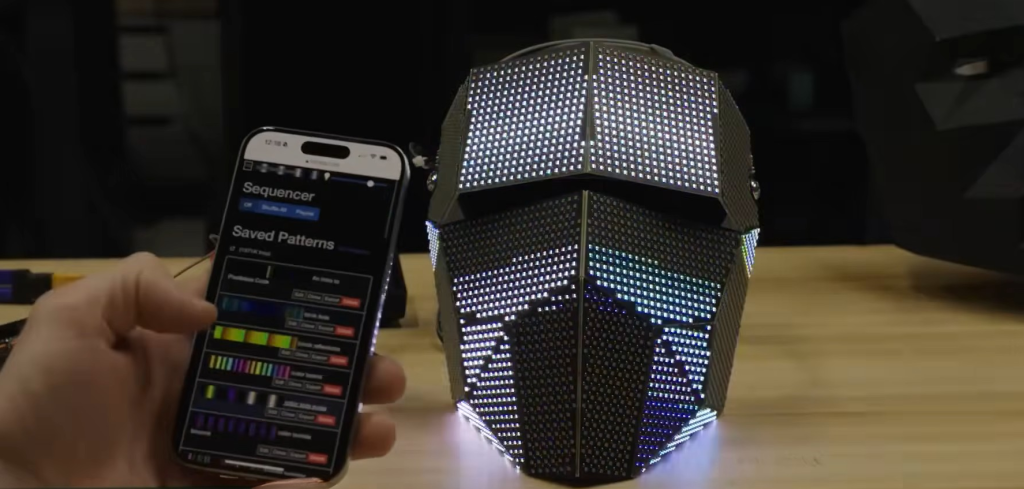
A futuristic wearable that uses thousands of addressable LEDs arranged across curved panels to display dynamic patterns and mapped video. Small LED matrix panels are soldered and angled to fit the mask’s shape, then chained together and mapped so visuals line up across the irregular surface. Initial mapping is handled by a Pixelblaze-style controller for effects, while a Raspberry Pi 5 running a Python script can drive images and video for fully custom visuals.
**Project link: LED matrix mask
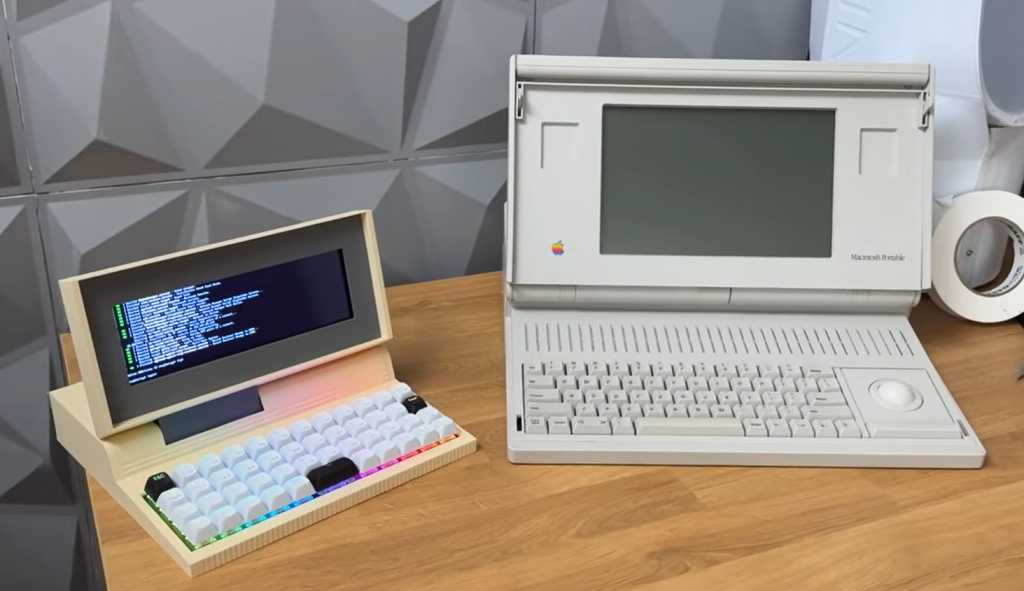
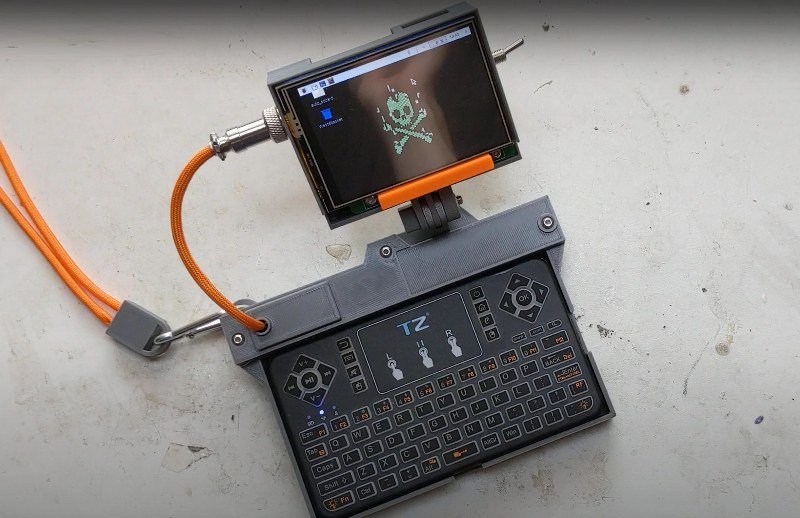
Pilet-style portable mini-computer
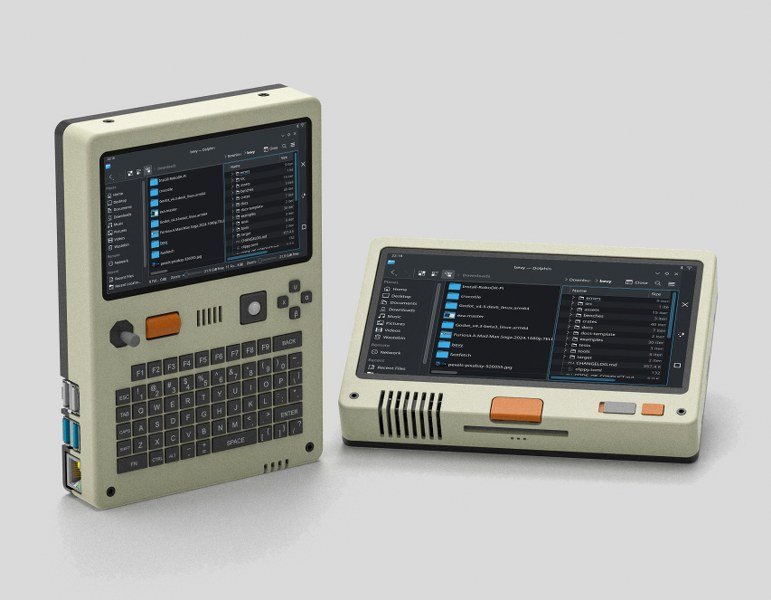
Pilet is an open-source retro-futuristic mini-computer powered by the Raspberry Pi 5, designed for portability and versatility. Available in 5-inch and 7-inch variants, it offers a thumb-friendly keyboard running QMK, a trackball, scroll wheel, and gaming buttons, plus an open hardware/software stack for easy modification. A custom battery management module ensures stable power delivery even under the Pi 5’s high current demands, enabling multi-hour mobile use.
**Project link: Pilet-style Portable Mini-Computer
AI virtual barrier
An AI-powered deterrent that keeps cats off furniture using computer vision and a water jet. A Raspberry Pi 4B runs OpenCV to detect cats within a user-defined forbidden zone; when triggered, a motorized turret aims and actuates a pressurized water release. Motion is handled by stepper drivers, the water supply by a pressurized container, and a GUI allows calibration, manual control, and testing.
**Project link: AI Virtual Barrier
DIY hot plate
A budget reflow hot-plate controlled by a Raspberry Pi Pico for DIY PCB reflow work. A grounded 400W heating element is switched via a solid-state relay, while an NTC thermistor provides closed-loop temperature feedback. The front panel uses an LCD and rotary encoder for profile selection, and the firmware includes fault detection to cut power if thermistor feedback is lost.
**Project link: DIY Hot Plate
XGO-Rider AI wheel-leg robot
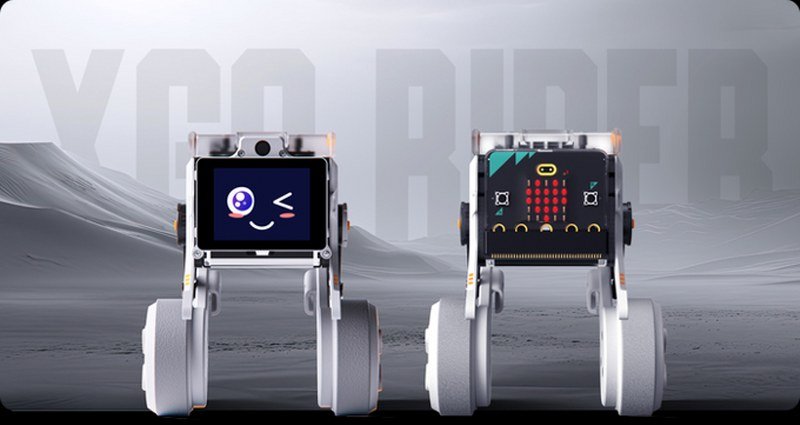
A wheel-legged smart robot integrating voice, vision, and AI features with a Raspberry Pi Compute Module at its core. It supports natural language via ChatGPT integration, gesture recognition, face detection, and skeleton tracking. Hardware includes a 5 MP camera, dual MEMS microphones, chambered speaker, IPS display, dual-band Wi-Fi, Bluetooth 5.0, and expansion ports for add-ons.
**Project link: XGO-Rider AI Wheel-Leg Robot
PiKVM V4 remote KVM
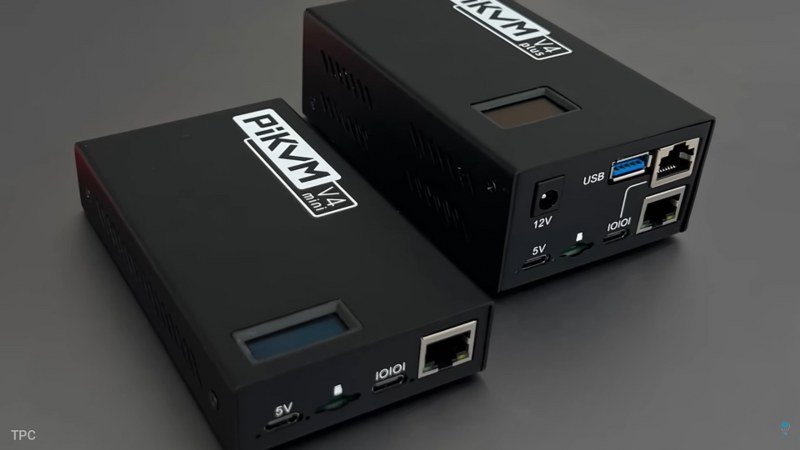
A Raspberry Pi–based remote-control system that captures a PC’s video output and streams it to a browser while relaying keyboard and mouse input back — including BIOS control. The PiKVM V4 Mini offers quiet passive cooling and 1080p streaming; the Plus adds a Mini-PCIe slot for cellular fall-back and extra features. Ideal for remote troubleshooting, reimaging, and headless management.
**Project link: PiKVM V4 Remote KVM
All-in-one Raspberry Pi 5 camera kit

An all-in-one embedded vision camera kit family built around the Raspberry Pi 5 to speed prototyping. Kits remove the guesswork of lens/sensor pairing and come preconfigured for autofocus and high resolution tasks. Pivistation models target projects requiring rapid PoC development, scalable to professional imaging requirements.
**Project link: All-in-one Raspberry Pi 5 Camera Kit
AI designed R-pi case
A project that starts with AI-generated concept art and finishes as a real case refined in Fusion 360. The resulting 3D-printed PLA case includes a clear acrylic front, fluorescent acrylic accents with LEDs, and a rear 40mm fan for active cooling. The design balances aesthetics and airflow while keeping ports easy to access.
**Project link: AI Designed R-pi Case
Dtronics: high quality synthesizer

A compact hardware synthesizer inspired by classic FM synths, built with a Raspberry Pi Zero 2 W to run multiple polyphonic FM engines. The DT-DX offers a backlit display, push encoder, USB/MIDI connectivity, SD card storage, and high-quality stereo outputs via an integrated DAC, making it suitable for live or studio use.
**Project link: Dtronics DT-DX: High quality synthesizer
USB-powered Raspberry Pi Zero board
A power-management HAT for the Pi Zero that supports a single-cell Li-ion battery, USB charging, and solar input. It monitors battery state, performs graceful shutdowns to avoid data loss, and supports automatic restarts, RTC wakeups, and an I²C management interface for the Pi. Field-tested over months, it’s built for off-grid reliability.
**Project link: USB-powered Raspberry Pi Zero board
Lego-AI trash classifier
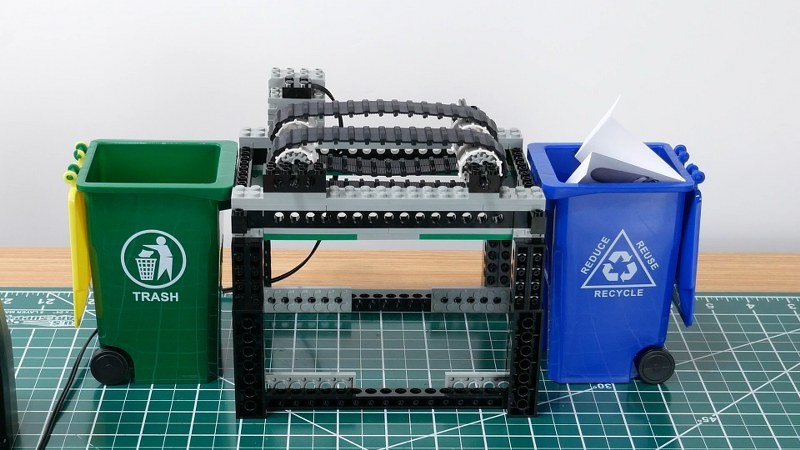
A modernized LEGO Mindstorms system that uses a Raspberry Pi 5 and a camera to classify items for trash vs. recycling. Images are sent to a cloud AI for classification, and the Pi translates results to motor commands that route items into appropriate bins. A Blockly web-interface generates Python control code for easy, real-time operation.
**Project link: Lego-AI Trash Classifier
Compact UPS-style power management board
A UPS-like HAT that protects Raspberry Pi projects from power cuts and deep discharge, featuring a smart charge controller and an on-board battery. It monitors voltages over I²C, supports configurable solar charging, includes an auto boot/shutdown system, RTC wake functionality, and a watchdog timer for resilience.
**Project link: Compact UPS-style Power Management Board
Wideband RF HAT with FPGA control
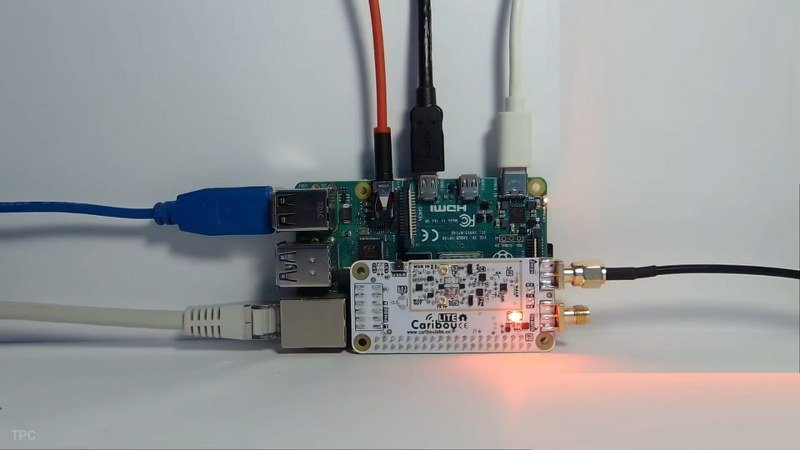
A dual-channel RF HAT that turns a Raspberry Pi into a portable RF testbed, supporting sub-GHz and 30 MHz–6 GHz ranges. It exposes FPGA control, high transmit power, low-noise receive paths, and a PMOD expansion header for GPS, synchronization, or custom interfaces—ideal for signal scanning and prototyping radios.
**Project link: Wideband RF HAT with FPGA Control
Retro-style mini laptop (Bijon build)
A compact retro mini-laptop built with a Raspberry Pi Zero 2 W, a 7-inch LCD, and a 47-key compact keyboard. Power is delivered by an Adafruit PowerBoost module and a small LiPo, all housed inside a 3D-printed hinged case with a simple micro-USB charging port and secure battery mounting.
**Project link: Retro-style Mini Laptop (Bijon build)
Pi-controlled CNC controller
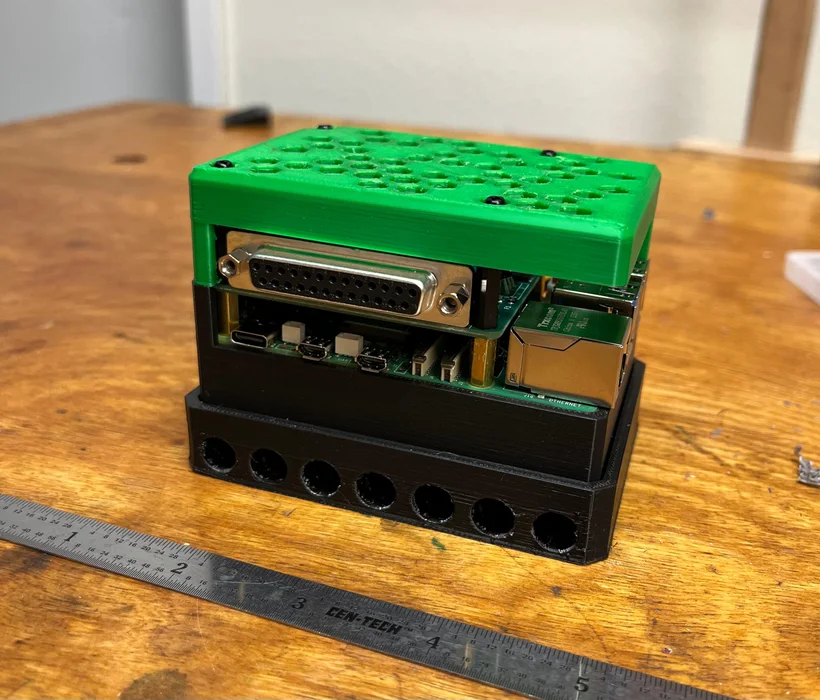
A Raspberry Pi acting as the motion controller for a CNC machine running LinuxCNC. The Pi generates step/direction signals sent through a parallel-port HAT that boosts outputs to 5V and routes them via DB25; breakout boards isolate signals before the drivers, allowing full G-code motion control directly from the Pi.
**To learn more about the above project, click on the link below:
**Project link: Pi-controlled CNC controller
Micro stamping machine with pico
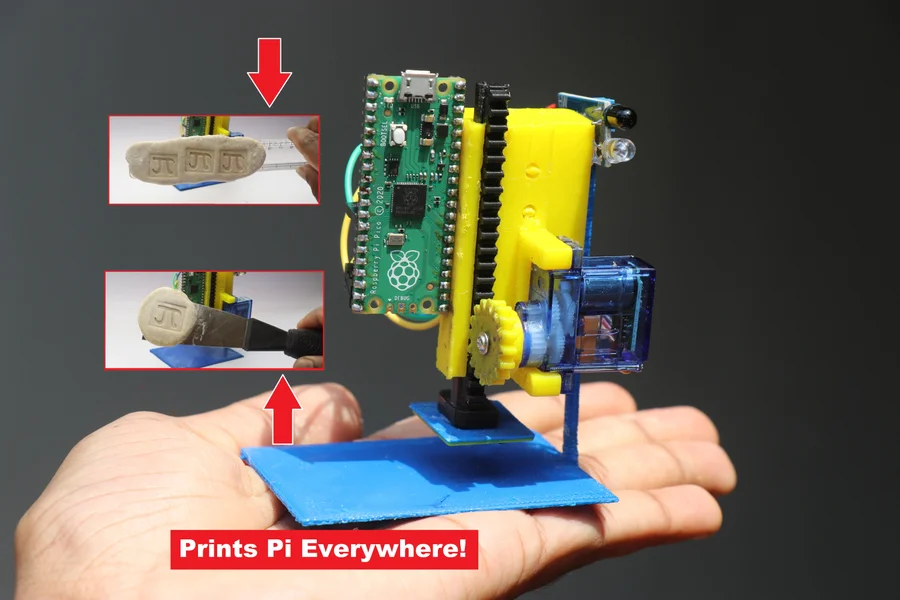
A compact stamping mechanism driven by a micro-servo and controlled by a Raspberry Pi Pico. The device uses an IR trigger to actuate a slider that presses a custom stamp onto dough, paper, or fabric. MicroPython runs the motion logic, keeping the hardware footprint minimal and the build accessible.
**To learn more about the above project, click on the link below:
**Project link: Micro stamping machine with pico
Crypta glass
A heads-up display built into ordinary glasses that provides a floating overlay, basic voice input, and an onboard camera for first-person recording. The tiny screen sits on an adjustable arm, three navigation buttons control menus, and the system is powered and housed in slim 3D-printed enclosures attached to the frame.
**Project link: Crypta Glass
Dual-mode quadcopter tank
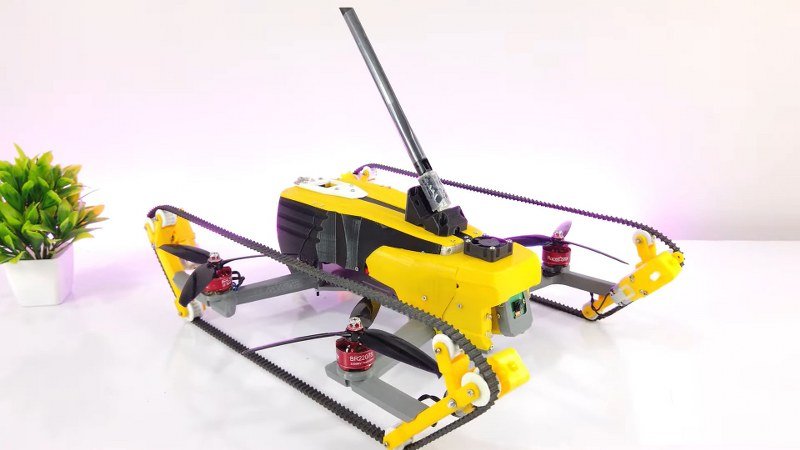
This innovative dual-mode quadcopter is capable of both aerial flight and ground mobility, seamlessly combining the functionalities of a drone and a tank. Its chassis, 3D-printed using PLA filament, offers a lightweight yet robust frame, ensuring durability and precise component alignment.
The quadcopter features four brushless motors with propellers, managed by an electronic speed controller to deliver stable lift and agile maneuverability. For ground movement, it employs four geared DC motors controlled by an L298N motor driver, paired with a pulley system to drive track belts for tank-like motion.
This design exemplifies versatility and efficiency, showcasing a creative approach to multi-functional robotics.
**To learn more about the above project, click on the link below:
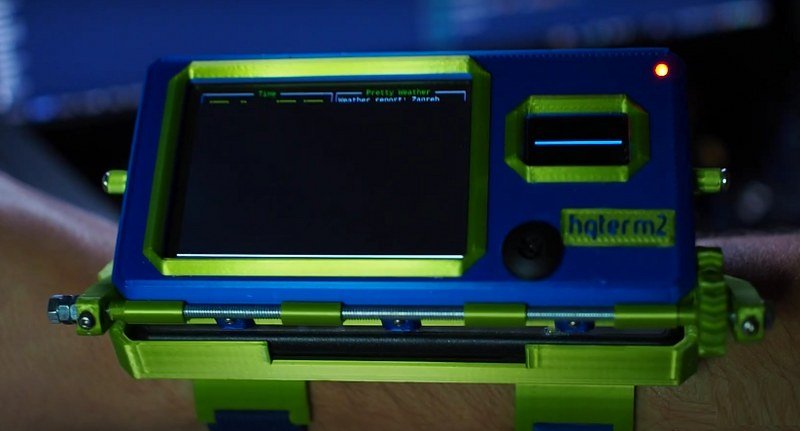
LED World Clock

An innovative project that takes a simple wall clock to the next level. Along with time and date, it also shows the weather of the current location. For fun purposes, a snake game is also programmed in this clock. This time, every five minutes, the clock updates itself; moreover, you can see the display in random words spread across the clock.
**To learn more about the above project, click on the link below
Cutie Pie Tablet

It’s a smart tablet powered by the Raspberry Pi. An easy and convenient way to give your imagination, the power to be accessed from anywhere. It has a wider display, a portable handle, and a long battery life, therefore, you can use this tablet even when traveling. Despite all this, the compatibility of the original Pi environment is maintained.
**To learn more about the above project, click on the link below
Sense Hat

A simple and innovative project to display any information on an 8×8 LED matrix. It can also provide the temperature, pressure, and humidity readings of a location. In addition, the gyroscope and five-way joystick can be used to control and also play games like Snakes, Tetris, Flappy Astronauts, and other shooting games.
**To learn more about the above project, click on the link below
6 Screen deck
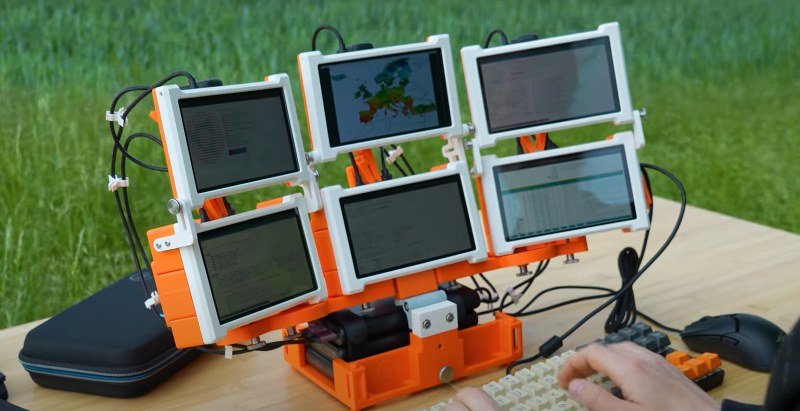
If you are obsessed with the number of screens in a cyberdeck, then you must try this one. This cyberdeck has not two, not three, but six different screens that make it very special.
The deck is based on a modular 3D-printed framework that makes it easy to carry around. Driving the six displays are three Raspberry Pi 4 Model B single-board computers, giving the deck an interesting capability not often seen.
The single six-display system can be split into three dual-display systems, each with a dedicated Raspberry Pi and capable of independent operation. With three 26,500 mAh power banks and support for 30 amp-hour solar-charged battery packs, this deck has the potential for true off-grid use.
**To learn more about the above project, click on the link below:
Home Security System

It’s a simple and economical project to protect your house from theft or robbery. This project detects when a door is tried to open, if the user does not input the correct pin in a given period, it raises an alarm along with an e-mail notification sent to the owner of the house. In conclusion, this project keeps you safe at an economic rate.
**To learn more about the above project, click on the link below
Analog Music Player

It’s a cool project that gives the feel of an old electronic boom box with a modern Raspberry Pi controller. Interestingly, this music player has actual buttons to play/pause a song, switch to the next song, mute, repeat, and dim. It has a potentiometer to adjust the volume and a motorized fader that moves from left to right as the song plays. How cool is that?
**To learn more about the above project, click on the link below
Geiger Counter

An interesting project that counts the radiation level along with a ticking sound as we bring any radioactive material close to the Geiger counter. Moreover, even after turning the power is OFF, the meter retains the counts. Furthermore, We can turn The ticking sound ON/OFF via the toggle switch provided in it.
**To learn more about the above project, click on the link below
Micro Quadruped Project

This project demonstrates two modes of controlling a quadruped robot. The first mode also called ‘Trot Gait’ involves the motion of two legs at a time. The second mode also called ‘Walk Gait’ involves a swing of one leg at a time with body shift in between for balance. you can control both these modes via the keyboard.
**To learn more about the above project, click on the link below:
Inspirational Messenger

A simple and creative project that displays a random motivational quote every morning. In fact, In addition to that, you can see any message or remainder on the display at the predefined time. Since the device is connected to the cloud, you can download the required information to the device.
**To learn more about the above project, click on the link below:
Cryptocurrency Hardware Wallet

With this simple project, we can store, transact bitcoins, and also do other cryptocurrency assets. First of all, we create a wallet along with a private key. Along with that, we require a PIN to enter the wallet. The numbers are rearranged in the display every time the user logs in.
**To learn more about the above project, click on the link below:
Cryptocurrency Hardware Wallet
GOTO Telescope

Firstly, we will use an ordinary 8-inch telescope along with the Raspberry Pi telescope to find the exact location of any celestial body in space. Secondly, through push buttons and a toggle switch, we will select a particular planet, star, or constellation from the monitor screen and the telescope will automatically track it across the sky.
**To learn more about the above project, click on the link below:
Playing Atari 2600 with hands

Love Atari games? Well, with the Raspberry Pi 4, you can enhance your experience because you can play the OG Atari 2600 with just your hands. Fulfill the game’s potential by getting rid of the “stick” in the “joystick” and just having fun.
Additionally, this paid tribute to the likes of the Python code, and computer vision libraries with the way that it has a hand-to-electricity signal, giving you that joystick control without the actual stick.
**To learn more about the above project, click on the link below:
Mini Raspberry Pi Server

For this project, a mini raspberry pi server comes with a built-in UPS and stats display, isn’t that neat? This cool project can ultimately help your media streaming or NAS, as well as home automation and security.
The OLED display on the front shows performance stats of the Pi such as input voltage, current consumption, and battery status This Pi server can be powered using two lithium-ion batteries, USB C, or micro USB board, all managed through a tiny UPS board.
**To learn more about the above project, click on the link below:
Ball balancing robot
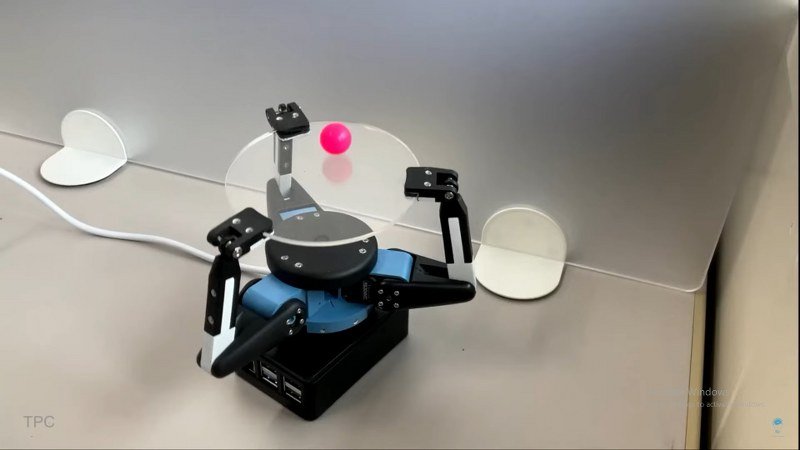
This is ball-balancing robot which operates using a combination of computer vision and real-time feedback control. Beneath the glass plate, a camera continuously monitors the position of the ball.
The captured images are processed to determine the exact coordinates of the ball. An algorithm evaluates the deviation of the ball from the center of the plate, and based on this information, commands are sent to the motors to adjust the platform’s orientation. This closed-loop system ensures that the ball remains centered on the plate at all times, preventing it from falling off.
**To learn more about the above project, click on the link below:
Raspberry Pi 4 Laptop

One effective approach to maximize the capabilities of the new Raspberry Pi 4 is to create a laptop. While it may not bear the brand of a Mac or Lenovo, it presents a noteworthy endeavor. Powered by a rechargeable battery and made using a 3D printer, CNC routing, and Linux, this mini laptop may not outshine your current laptop but you can easily do some simple tasks like surfing the internet, watching YouTube videos, editing documents, and even play some cool games.
It may not be that powerful but its portability, form factor, and slick design just make you wanna build it right now.
**To learn more about the above project, click on the link below:
Interactive Animated Pumpkins

Who says pumpkins are only in vogue during Halloween? Certainly not with this project! Arguably one of the most fascinating ones available, these animated squashes are exceptional! First, one must craft pumpkins employing a 3D printer, and the remaining functionality is executed through a Raspberry Pi and an affordable projector.
DIY Machines elaborates on the process for creating these charming singing pumpkins in their instructional video, so I highly recommend taking the time to peruse it!
**To learn more about the above project, click on the link below:
Vintage Arcade Gaming Station

This vintage arcade gaming station is very easy to build. With just two pushbuttons and a joystick, it gives you an excellent gaming experience. This project uses magnetic and 3D Hall sensors with an audio amplifier to really juice out that vintage and retro feel.
The housing for the console is made using wood and laser-cut sheets. After finishing the assembly of components and housing just Write the Arcade Gaming Station Image file to the SD card, put it into the Raspberry Pi, and start it up to play.
**To learn more about the above project, click on the link below:
Smart Mirror Touchscreen

With this project, you could make a smart mirror that is not just a touchscreen but also functions as some sort of central interface for your home to control your appliances. Not only will it show you your face but also some stock market updates; now, isn’t that the dream?
On top of that it has a face recognition feature that you can interact with. Yes, you can create your unique profile with it and customize it according to your needs.
**To learn more about the above project, click on the link below:
Internet-controlled RC Car

We have discussed gaming stations, smart mirrors, and laptops, but arguably the most captivating of all these projects is an automobile. Yes, a car!
If you happen to possess a remote-controlled car at your disposal, you can undoubtedly harness the capabilities of the internet and the Raspberry Pi 4 to maximize its potential. SurrogateTV employed its proprietary television platform, Surrogate. tv, to establish an internet connection for the car, enabling near-real-time remote control.
**To learn more about the above project, click on the link below:
Arcade gaming machine

A notable project on this list is the ability to construct a retro arcade gaming machine on this device! We’ve all engaged in this endeavor at some juncture, seeking faster processing speeds and enhanced performance, but this will unequivocally evolve into your preferred choice.
Moreover, with the Raspberry Pi 4, it remains a straightforward endeavor, devoid of the necessity for any actual programming skills to initiate it. So, there’s that!
**To learn more about the above project, click on the link below:
Raspberry Pi Spectrometer

Down to our next project, we have this ultra-cool DIY Spectrometer! To give you a little science recap, a spectrometer is used to measure wavelengths of light spectra or you know, light.
To measure the light wavelength using pi, a diffraction grading spectroscope is placed infront of the pi camera with a zoom lens. The heat sink at the back keeps the temperature of the pi cam to a suitable limit.
This complete setup is then powered by the Raspberry Pi 4 board. The dedicated Python software for this spectroscope can be easily downloaded from the GitHub repository, a link to which you can find under the description of the original video
**To learn more about the above project, click on the link below:
AutoBill

This project focuses on wholly computerizing the checkout system for an “amazing shopping experience.” Using this project, there is minimized human interaction which was initially made to lessen physical interactions for employees’ safety during the pandemic.
This checkout system is amazing because it was built to just identify items placed using a weight sensor, which is automatically added to the cart and the bill becomes generated, all with the wonders of the Raspberry Pi 4.
**To learn more about the above project, click on the link below:
4-Bay NAS
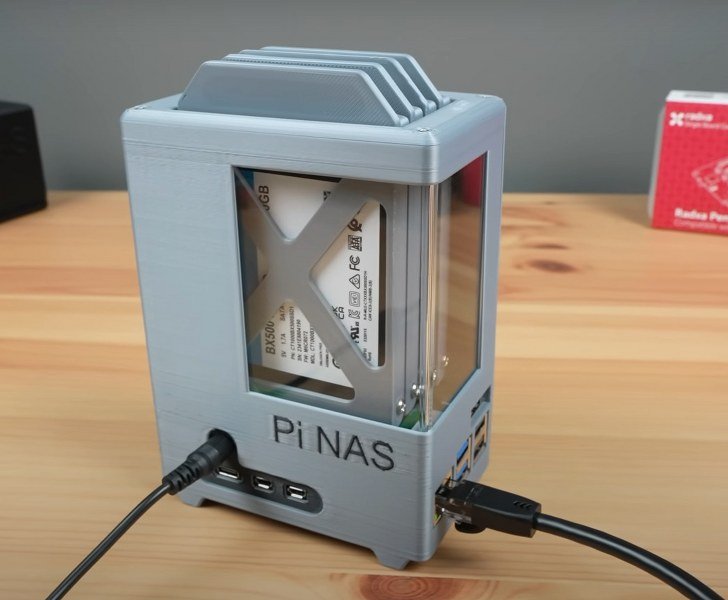
A compact network-attached storage (NAS) device was created using a SATA HAT to connect external drives, utilizing four of the five available slots.
Before mounting the SATA HAT, a cooling fan was installed on top of the Raspberry Pi. To enhance the design, an enclosure was created using Fusion 360 and 3D printed in aluminum-colored PLA.
For optimal airflow and to keep the drives cool, a 40mm 5V fan was incorporated on the side. Additionally, a window was included in the design, adding a stylish and functional touch to the enclosure.
**To learn more about the above project, click on the link below:
Digital Dashboard for Smart Homes

Having a smart dashboard at your home becomes essential when you need to keep track of all your activities. Apart from viewing just time, time, and weather updates, you can schedule and see the upcoming events for the day. It even allows you to cast YouTube videos to a window, inside the display.
In this way, you can easily get entertained, without losing the important notification or information from the display. The display can be pulled from the wall and can be adjusted to any angle according to your convenience. This feature comes in handy when you are at another section of your house doing some work.
**To learn more about the above project, click on the link below:
Digital Dashboard for Smart Homes
midi controller

This is a midi controller made using Raspberry Pi Pico. You can even use this as a macro pad, to simplify your tasks while working on a PC. The arcade buttons are placed inside a 3D-printed case, which gives it an aesthetic look. The pico is programmed using CircuitPython.
It’s easy to use and can be a great addition to your music studio or live performances. The buttons are mapped to different notes, which can be played back using any MIDI-compatible software or hardware.
**To learn more about the above project, click on the link below:
Copper Heatsink Test

Although some people agree that the Raspberry Pi 4 does not need any heatsink, with how it is designed, some circumstances require a bit of cooling.
When the Raspberry Pi 4 was tested by running at its full speed without a heatsink or any cooling device, the max temperature reached 70 degrees Celsius, while on the handbrake test, the temperature reached 74 degrees.
Well, this may not sound as alarming but imagine watching a video with its full quality capacity, and then it shuts down (it could) without warning. It’s better to be safe than sorry. With the heat sink, the max temperature was 58 degrees, and in the handbrake, it was 60 degrees. Not to mention, it is easy to connect the heatsink.
**To learn more about the above project, click on the link below:
Viewing YouTube on Super-8 Film Viewer

Turning old gadgets into modern, usable devices gives people a satisfying experience. For instance, take this Super-8 Film viewer of the 1960s, which is turned into the Boost Box 0.1.
You will also require an LCD screen, a Raspberry Pi 4, and a speaker to make it work. But once assembled, you can view any video you want that is offered by YouTube, which is a vast improvement from the original purpose of the machine that showed one roll of Super 8 film at a time. Not only that but the device can also be connected to any Bluetooth speaker.
**To learn more about the above project, click on the link below:
Viewing YouTube on Super-8 Film Viewer
IOT Led Matrix Info Beamer

Ever imagine building your own LED Beamer? Well, with Pi Zero, which has WiFi, it is possible. The Ikea Lamp Sprida is a great choice for an LED beamer because of its optic. This hack will allow you to display short messages on the wall using the lamp.
You can use it as an alarm clock to display the time or as an info system for a smart home. All you need is a few supplies and some basic knowledge of electronics. Keep in mind that the projection visibility varies according to the distance and the ambient lighting. So, make sure to run out some tests before settling for the one.
**To learn more about the above project, click on the link below:
Raspberry Pi Oscilloscope

Previously, all oscilloscopes were based on analog cathode-ray tubes, but today’s digital oscilloscopes provide a slew of useful features. Jeremy Cook has made an oscilloscope using a Raspberry Pi 4, a Diligent Analog Discovery 2, and an old monitor.
The Analog Discovery 2 is a USB device that takes electrical signals and analyzes them, all of which are sent to a connected computer. With this, you can see all kinds of information about your circuit waveforms.
It even allows you to generate the waveforms at the same time while using the scope probes. Great for experimentation, right?
**To learn more about the above project, click on the link below:
Haunted Jack in the Box

A jack-in-the-box is one of the most frightening toys available. It’s always scary, no matter what time of year it is. Sean Hodgins took it a step further by automating it and making it work on its own. He used a 100:1 DC motor to turn the crank from the inside, and a Pi camera to detect victims in the vicinity.
Once the camera locks on to a face, the box cranks itself and eventually ejects the jester. As the spring takes most of the space inside the box, the electronics are housed in a custom 3D-printed base with a hole cut out for the camera’s eye.
This might not sound scarier, but imagine you are home alone and someone does this prank with you.
**To learn more about the above project, click on the link below:
Raspberry Pi Home Assistant Hub

Do you also have several apps from where you are controlling devices and sensors in your home? Also, interfacing across platforms and between brands isn’t usually available.
So, you can use the home assistant software to control all of your home assistant devices. The project uses a laser engraver and cutting machine, but it’s not a must.
A ZigBee gateway is added to the hub. Once set up, you can scan your network to find all of your compatible smart home devices and then start building dashboards, automation, and routines to control them.
**To learn more about the above project, click on the link below:
Raspberry Pi Home Assistant Hub
Internet Speed Monitoring Device

If you’re interested in monitoring how your download speed, upload speed, and ping are affected over time, then you must try out this project. This can also help you to find out at what times your network may be at its peak capacity or if you’re suffering from a degraded internet connection.
For this, you’ll have to create a device and add variables. Rename the variables and give them the corresponding unit. After that, install the libraries, and modify the code. Once completed, you can easily monitor the internet speed on the connected devices.
**To learn more about the above project, click on the link below:
Internet Speed Monitoring Device
Smart Indoor Gardener

This project demonstrates how easily you can build a smart indoor Gardner within minutes. Each block that you see here consists of a connector at its back. Inside it lies a miniature circuit board housed by an SLA 3D printed enclosure.
It can either be a clock, a control pad, a joystick, or a display. It even omits the requirement of connecting wires. After putting all the blocks on the magnetic base, let’s test the smart Gardner. So, whether it be observing the readings, or controlling the circuit, this has got you all covered.
**To learn more about the above project, click on the link below:
AI stethoscope

The coder’s cafe team transformed a regular stethoscope by adding smart AI technology, enabling heart health tracking from anywhere.
This enhanced stethoscope not only lets you listen to your heartbeat but also allows easy connection with your doctor, providing a comprehensive view of your heart health, all from the comfort of home. Inside the device, a stethoscope is connected to a Raspberry Pi via a sound card powered by a 100 mA Lithium Polymer battery.
The device offers two modes: analysis mode, where AI examines the heartbeat for potential issues, and stream mode, where the heartbeat sound is streamed directly to the doctor.
**To learn more about the above project, click on the link below:
Pi5 mini cyberdeck
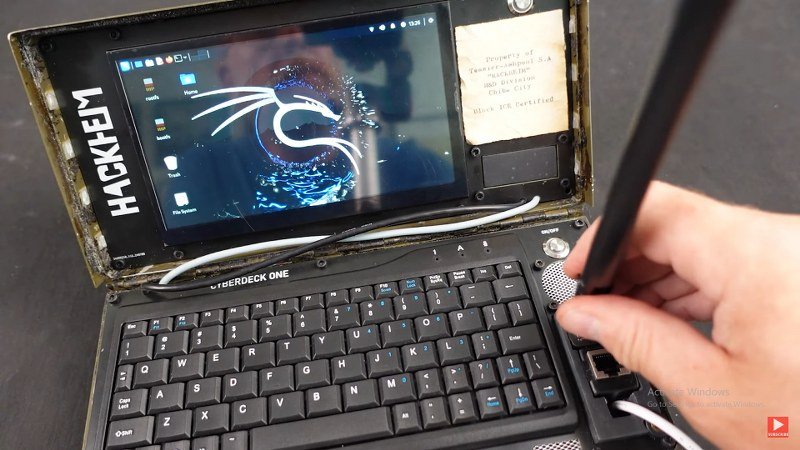
The Pi5 Mini Cyberdeck is housed in a vintage 1953 New Old Stock enclosure, which at first glance resembles an old toolbox.
However, within this retro exterior lies a high-performance modern computing setup. The system features a Raspberry Pi 5 with 8 GB of RAM, paired with a Poni base and a 500 GB NVMe SSD for storage.
A 7-inch LCD screen provides the display, while cooling is managed with an aluminum heatsink and a 30 mm fan to vent the metal enclosure. Currently powered by an external supply, the design also includes space for a power bank, offering flexibility for portable use.
**To learn more about the above project, click on the link below:
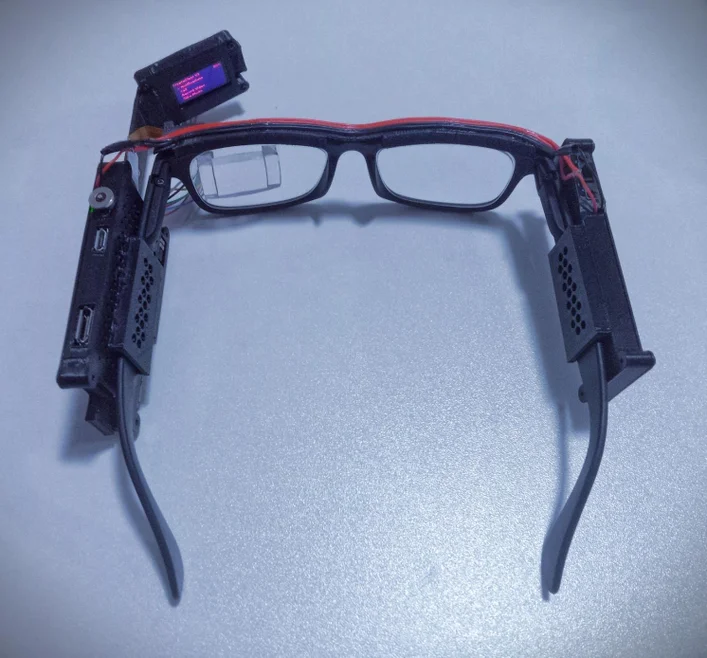
Sign language translator glasses

Innovating in the field of assistive technology, a wearable device has been developed to help individuals with speech impairments communicate more effectively.
The device, designed as a pair of spectacles, detects hand symbols and translates them into audible speech in real time. The spectacle frame is 3D-printed using PLA filament, combining functionality with a visually appealing design, though ergonomics are not the primary focus.
A small camera embedded at the center of the frame captures hand gestures, which are processed by a machine learning model. The model identifies the gestures and converts them into spoken words via an integrated speaker. This project offers a practical and impactful solution to a significant real-world challenge.
**To learn more about the above project, click on the link below:
Sign language translator glasses
Raspberry pi racecar dashboard
This project will guide you in creating a digital dashboard for your car, using just a Raspberry Pi, a compatible LCD, and a few additional components like a cooling fan, power converter, push buttons, and wires.
With this setup, you can enhance your vehicle with a customizable digital display that provides real-time monitoring of critical aspects of your car’s performance. From keeping tabs on speed and temperature to monitoring engine parameters, you’ll have all the essential information readily available.
Once powered, the dashboard comes to life in approximately 30 seconds, ensuring you can access vital data without delay, perfectly aligning with your needs and preferences.
**To learn more about the above project, click on the link below:
Raspberry pi racecar dashboard
Google calendar progress bar
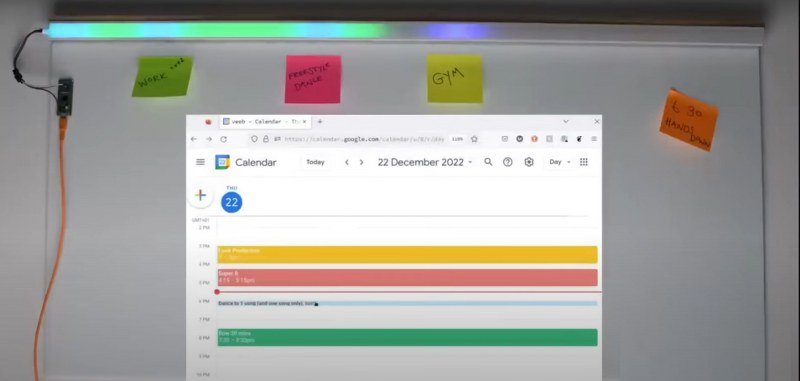
If you’re tired of just getting reminders on your phone and want something cooler to track your upcoming events, this LED progress bar is the perfect project for you.
All you need are a Raspberry Pi Pico W and a colorful 5V addressable LED strip. As you tackle your tasks, this smart LED bar keeps you updated on how much of the workday has already passed.
Moreover, it changes colors to match your schedule, helping you know when it’s time to switch tasks. And guess what? When it’s time to finish, the LED bar puts on a beautiful rainbow light, adding a splash of joy to your daily grind.
**To learn more about the above project, click on the link below:
Timelapse camera
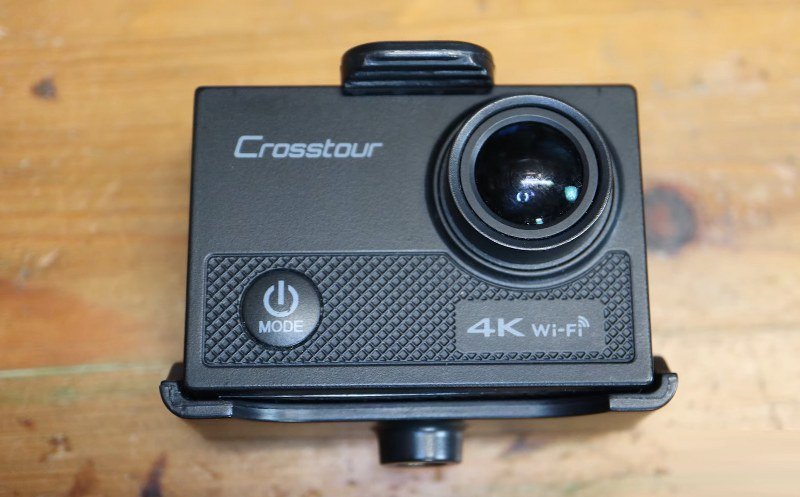
A DIY timelapse camera was created using a Pi Camera and a Raspberry Pi as an alternative to replacing a damaged camera.
The project featured a Pi 5 connected to a HyperPixel display using two GPIO extenders, allowing enough space for a cooling fan to circulate air around the Pi.
A wide-angle lens was attached to the camera, which was connected to the Pi via a camera cable. All components were housed in a 3D-printed enclosure, giving the project a clean and polished look.
**To learn more about the above project, click on the link below:
Home temperature monitoring system
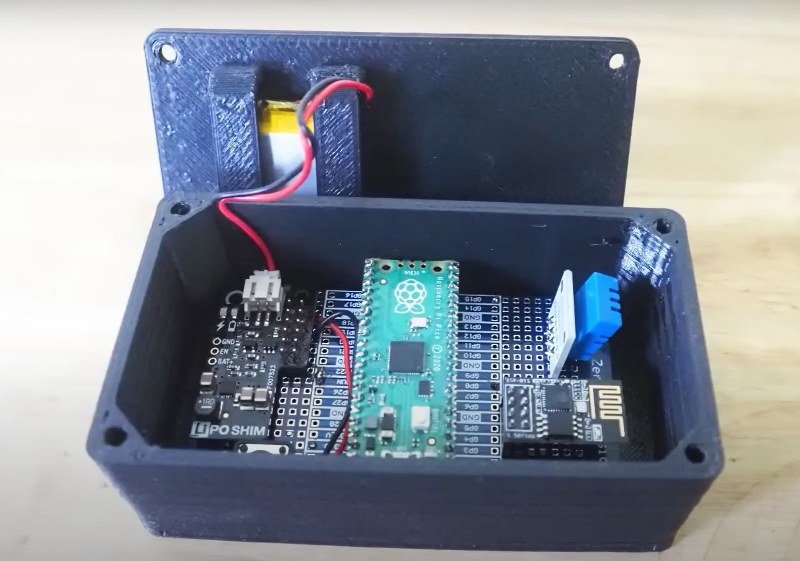
Smart homes are equipped with various sensors that can give you complete temperature readings of your house, but if you’re looking for an affordable option, this monitoring system with remote sensors and a centralized dashboard is all you need.
Each sensor includes a 1200 milliamp-hour pouch cell and a Pimoroni LiPo Shim that can power the Raspberry Pi Pico for a long time. The Influx database takes time-based data from sensors like temperature, humidity, and battery status, which can be viewed on a Grafana dashboard.
**To learn more about the above project, click on the link below:
Home temperature monitoring system
Wifi multiplug
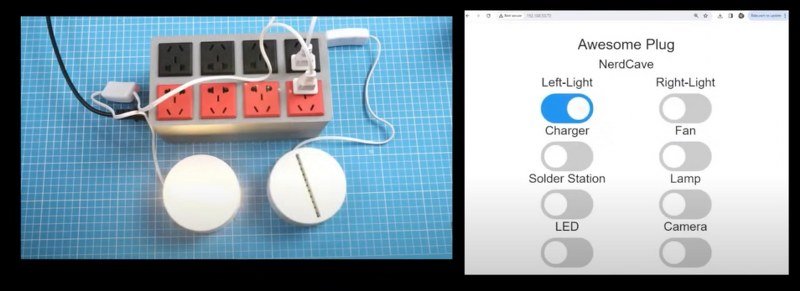
This smart plug, made using a Raspberry Pi Pico W, allows you to control all the outlets using your Wi-Fi and features a total of eight outlets, each of which can be individually operated using a web browser.
Inside the 3D-printed enclosure of this smart plug lies a relay module board, an AC-to-DC converter module, a Pico W, power sockets, wires, and connectors. All these components are connected in an organized manner, and to minimize tangled connections, a PCB is utilized.
**To learn more about the above project, click on the link below:
2 in 1 cyberdeck

Cyberdecks are not considered cool until they can do something like this—a wrist-wearable dual-mode cyberdeck that switches between display mode and full terminal mode with just a tap on the screen.
Built on the Raspberry Pi Zero W, it features a 3.5-inch SPI TFT screen, an additional 1-inch OLED screen, a Bluetooth keyboard, a Pi camera, and a thermal camera. These add-ons make the cyberdeck both functional and unique.
Tapping the screen again activates the camera to capture a live feed. Overall this is less of a practical for field use, and more of a fun, cyberpunk-inspired prop.
**To learn more about the above project, click on the link below:
Art making typewriter
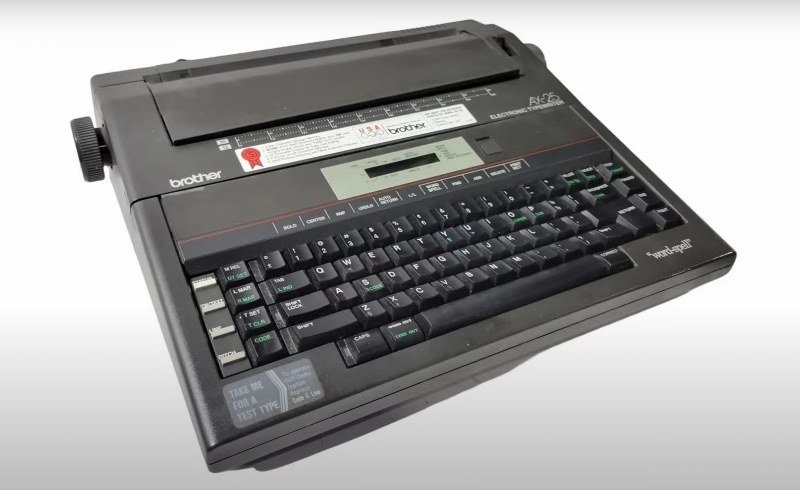
Artillect transformed an old 1980s typewriter into a retro-style computer terminal that prints everything as ASCII art. The typewriter keyboard works by using a matrix of rows and columns to detect key presses, and Artillect cleverly used an Arduino to simulate those presses by controlling the matrix.
The Arduino tricks the typewriter into typing specific characters. Connected to a Raspberry Pi running in headless mode, the Arduino converts text or commands sent via serial connection into key presses, allowing the typewriter to print them as terminal output. Instead of pixels, the output appears on paper as ASCII art.
**To learn more about the above project, click on the link below:
Tiny turntable
This remote-controlled turntable, designed for precise object rotation, was made using a Raspberry Pi Pico W. It operates using a stepper motor and a gear system, with the larger gear fixed to the center of a bearing and the smaller gear connected to the motor shaft.
The entire mechanism is housed in a 3D-printed base. Through a web server, the turntable can be controlled either fully or in small increments for precise movements.
This ensures accuracy and control while recording stop-motion videos, making it an essential tool for your workbench.
**To learn more about the above project, click on the link below:
D-day computer
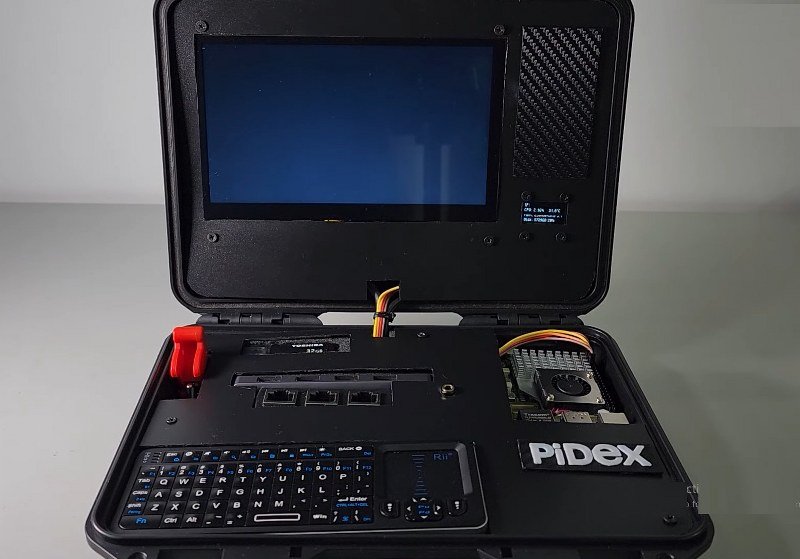
In this project, a doomsday portable computer was created and housed in a rugged, waterproof case for a tough, durable appearance.
Inside, it features a backlit keyboard, connecting ports, a headphone jack, and two displays—a small OLED display in the bottom-right corner showing the Pi’s stats and a 7-inch LCD screen serving as the primary monitor. Powered by a Pi 5, the system delivers smooth, glitch-free performance.
A power bank beneath the keyboard powers the deck, with all wiring neatly concealed using foam and plastic sheets. Portable solar panels add convenience by enabling on-the-go charging.
**To learn more about the above project, click on the link below:
Possessed portrait
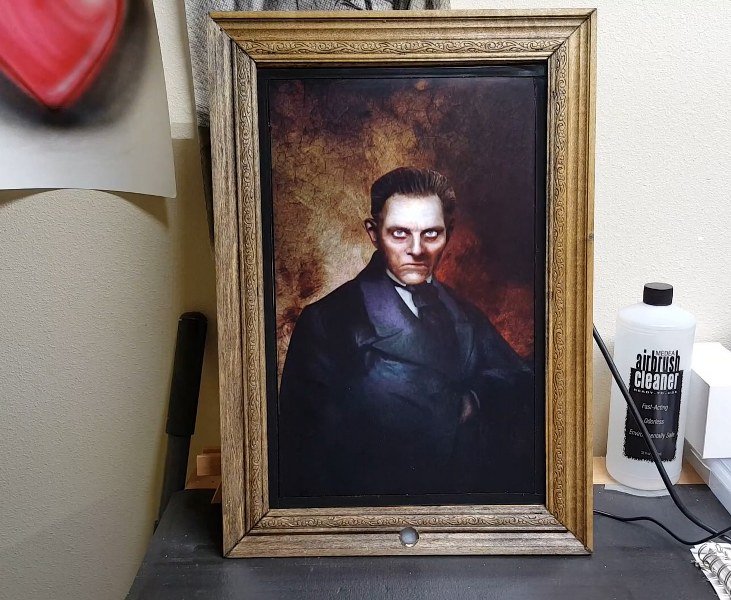
This project transforms a wooden-framed LCD screen into a spooky surprise. At first glance, it appears to be a regular portrait displaying a still image.
However, hidden at the bottom is a motion sensor that detects movement. When someone approaches, a spooky video starts playing on the screen.
Once the video ends, the display seamlessly returns to the still image without requiring any adjustments. Three eerie characters were created—so which one gave you the biggest fright?
**To learn more about the above project, click on the link below:
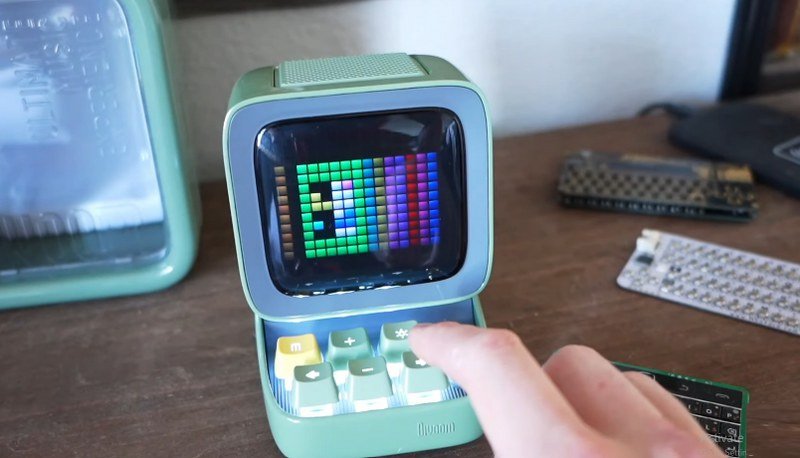
LCD 3″5 little laptop
This mini desktop computer is compact enough to hold in your hand but powerful enough to handle all your computing needs. It features a 3-inch LCD screen, an 8,000 milliamp-hour battery, and a foldable Bluetooth keyboard.
The components stay neatly organized with mounting brackets, and the Raspberry Pi sits securely within an aluminum frame topped with clear acrylic to protect the LCD screen. With all necessary parts, this project is easy to assemble and packs a punch in a tiny package.
**To learn more about the above project, click on the link below:
3D Printer Motion & Status Tracker
To address issues with a 3D printer’s movements when unattended, a budget-friendly IoT device was created using a Raspberry Pi Pico and a HuskyLens AI camera.
The device monitors the printer’s X, Y, and Z axis movements, detecting shifts or jams that could result in faulty prints. Since the printer lacked Wi-Fi, there was no warning system for such malfunctions.
The Raspberry Pi Pico communicates detected movements to a Telegram bot, providing real-time updates and notifications of potential issues, ensuring timely intervention and improved print reliability.
**To learn more about the above project, click on the link below:
3D Printer Motion & Status Tracker
DIY controller
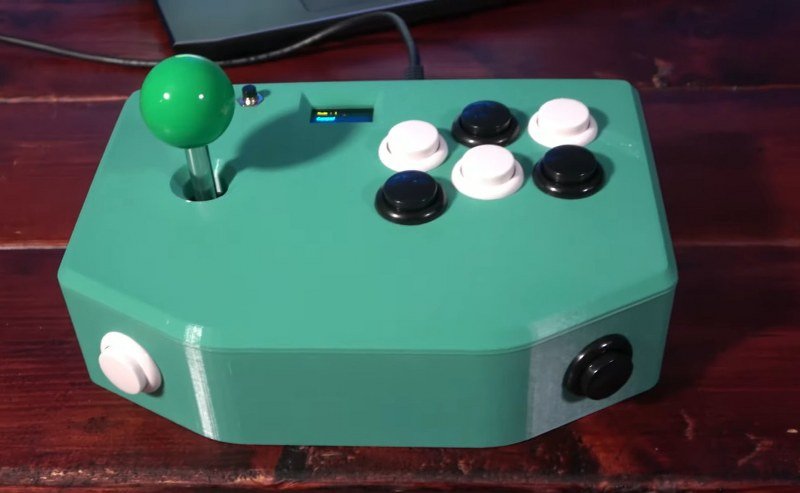
This DIY arcade controller, while complex and potentially challenging for beginners, is made more accessible thanks to a detailed tutorial.
A custom PCB was designed for the project, along with a custom case to house it. The board features six arcade buttons and a joystick, with a tiny OLED screen at the top.
Beyond playing games, the controller can also function as a keyboard and mouse. This versatile project not only enhances the gaming experience but also adds a stylish touch to any workbench.
**To learn more about the above project, click on the link below:
DIY Cyberdeck
A product intended for review was transformed into a tiny cyberdeck, showcasing creativity and technical skill. Despite the challenge of fitting all components into a small case, a fully functional portable deck was successfully created.
The project involved disassembling the original product and integrating a keyboard, a display, and a Raspberry Pi. A curved cover was crafted using thermoformed plastic for added aesthetic appeal.
Although there were setbacks, including a cracked display and a damaged Raspberry Pi, the result was a unique and visually striking mini PC.
**To learn more about the above project, click on the link below:
Multifunctional control knob
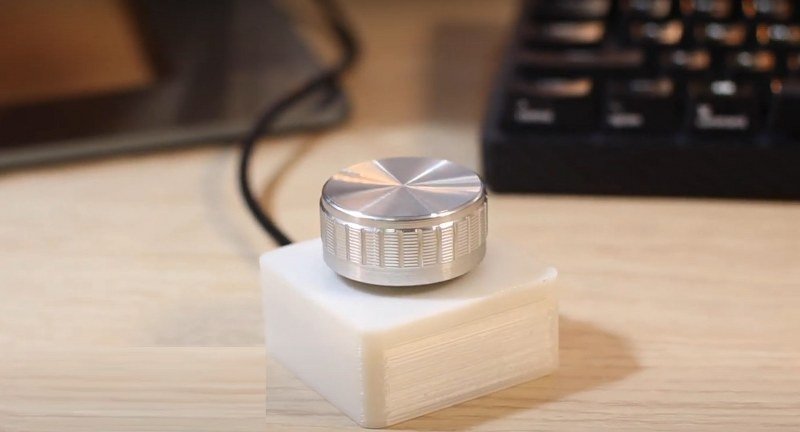
If you regularly work on your computer, you might know how some shortcuts can save you time. Various shortcut keypads are available online, but this one is simple to build and use.
This multifunctional control knob uses a rotary encoder to help you scroll horizontally while editing a video. However, it can also be used to control other features like brightness and volume.
By pressing the encoder, you can switch between modes, and by modifying the code, you can simulate the button in any way you like. The electronics are enclosed inside a square 3D printed case, with the knob placed at the top.
**To learn more about the above project, click on the link below:
TVA Cyberdeck
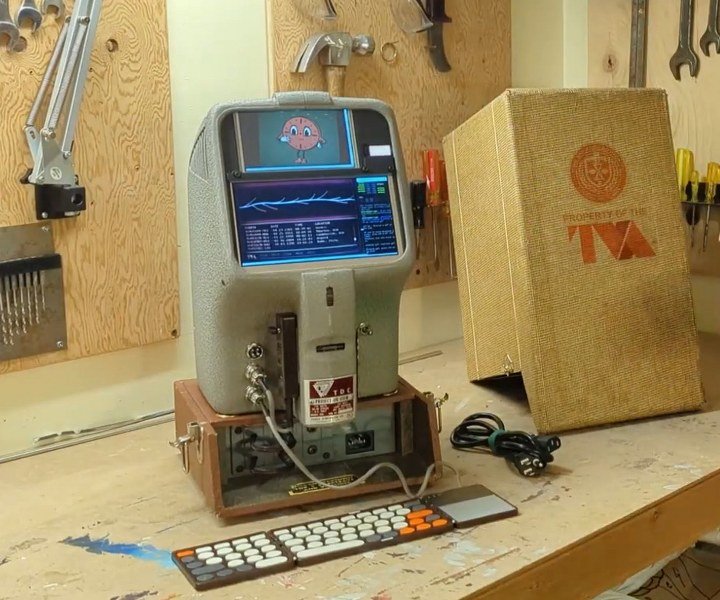
If you loved watching Loki and Marvel’s Universe, you’ll adore this cute TVA Cyberdeck. The idea to make this started with an old slide viewer, but now it’s a charming tech piece, thanks to some creative work.
Encased in a sturdy shell, the P deck features dual LCD touch screens, including a 5-inch touch display and a 7-inch standard display for seamless multitasking.
It’s equipped with Wi-Fi and Ethernet capabilities, allowing access to the internet from any location. SD card readers and USB ports provide easy data transfer, and the foldable keyboard adds a touch of elegance to the deck.
**To learn more about the above project, click on the link below:
Face changing mask

A face-changing projection mask was designed to transform appearances by projecting various faces, including celebrities, fictional characters, or animations.
The setup includes a 3D-printed mask, a Raspberry Pi, a compact DLP projector, and a battery pack. The mask features a mount to hold the tiny projector, which connects to the Raspberry Pi.
This system allows users to display different videos and images on the mask, making it an innovative way to alter appearances and embody various personas.
**To learn more about the above project, click on the link below:
ZBS cyberdeck
This is the most compact cyberdeck on our list. Made using two different parts—the screen and the keyboard—it features a hinge, allowing the keyboard to fold down and cover the device.
Behind the 3.5-inch screen lies a Raspberry Pi Zero W, neatly enclosed inside a 3D printed frame. The cyberdeck runs on two 18,650 batteries placed behind the panel, just below the screen.
The keyboard fits into the case using magnetic phone mounts, and it’s a Bluetooth keyboard that simplifies the overall design and reduces the number of connecting wires.
**To learn more about the above project, click on the link below: