Last updated on April 29th, 2025 at 11:13 am
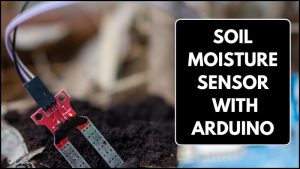
A Soil Moisture Sensor is widely used in agriculture, gardening, and home automation to monitor soil hydration levels. It helps determine whether plants need watering by measuring the soil’s moisture content. In this tutorial, we will explore how a soil moisture sensor works and how to interface it with an Arduino to create an automatic plant watering system.
Check out this industrial soil moisture sensor for better precision and quality.
What is a Soil Moisture Sensor?

A Soil Moisture Sensor measures the water content in the soil by detecting changes in electrical resistance. Dry soil has high resistance, while moist soil has lower resistance, allowing the sensor to provide an analog or digital output representing the moisture level.

Note: There is another type of soil moisture sensor with a probe and circuit module combined into one PCB.
Table of Contents
Soil moisture sensor pinout

A typical soil moisture sensor module consists of two parts: the probe (which goes into the soil) and the sensor board.
The pinout is as follows:
- VCC – Power supply (3.3V to 5V)
- GND – Ground
- A0 – Analog output (provides moisture level as a voltage value)
- D0 – Digital output (HIGH or LOW depending on threshold)
Key specifications
Below is a table with the key specifications of a typical soil moisture sensor module:
| Parameter | Typical Specification |
|---|---|
| Operating Voltage | 3.3V – 5V DC |
| Output Signal | Analog (0), Digital (HIGH/LOW) |
| Required Current | <20mA |
| Probe Material | Corrosion-resistant metal |
| Detection Range | 0% – 100% Soil Moisture |
Construction

The Soil Moisture Sensor consists of two main parts:
1. Probe
The probe is inserted into the soil to measure moisture levels. It detects soil resistance, which varies with water content. More water means lower resistance, while dry soil has higher resistance. The probe type can be:
- Resistive Probe – Uses two exposed metal electrodes, which can corrode over time.
- Capacitive Probe – Uses a non-corrosive capacitor-based design, making it more durable.
2. Electronic Module
The module processes signals from the probe and provides both analog and digital outputs. It includes:
- LM393 Comparator – Converts the analog signal into a digital HIGH/LOW output based on a threshold.
- Potentiometer – Adjusts the sensitivity of the digital output (DO). Turning it clockwise increases sensitivity, while counterclockwise decreases it.
- Power LED – Indicates that the module is powered.
- Status LED – Lights up when the soil moisture level exceeds the set threshold.
How Does a Soil Moisture Sensor Work?
The soil moisture sensor works based on the principle of electrical conductivity. The two probes act as electrodes and are inserted into the soil, allowing a small electrical current to pass through.
Since water is a good conductor of electricity, the resistance between the probes decreases as the moisture level increases. Conversely, dry soil has higher resistance, limiting the flow of current.
The sensor module converts this resistance into an analog voltage, where a higher moisture level results in a higher voltage, and a lower moisture level produces a lower voltage. The Arduino reads this voltage and compares it with a predefined threshold.
If the soil is too dry and the voltage falls below the threshold, the Arduino can trigger an action, such as activating a water pump to irrigate the plant. If the moisture level is sufficient, the system remains off, ensuring efficient water usage.
Soil Moisture Sensor with Arduino
To interface the sensor with an Arduino, follow these steps:
1. Make the circuit connections as shown below.
- VCC pin to 5V pin on Arduino
- GND pin to GND
- Analog pin to A0 on Arduino

2. Upload this program to your Arduino board
// Pin definitions
const int soilMoisturePin = A0;  // Soil moisture sensor analog pin

void setup() {
  // Initialize components
  Serial.begin(9600);
  Serial.println("Soil Moisture Sensor Initialized");
}

void loop() {
  // Read soil moisture sensor value
  int soilValue = analogRead(soilMoisturePin);
  Serial.print("Soil Moisture Value: ");
  Serial.println(soilValue);
  delay(500);  // Wait before the next reading
}
3. Open the Serial Monitor on your Arduino IDE to check the moisture level. Dry soil gives higher values, moist soil gives medium values, and wet soil gives lower values.
4. Insert the probe into dry soil, note the readings, then gradually add water and observe how the values change. A properly functioning sensor will show decreasing values as moisture increases.
5. Using a screwdriver, adjust the settings of the ‘sensitivity potentiometer’. Turning it clockwise makes it more sensitive
Smart Plant Watering Project
Now let’s build an automatic plant watering system that detects soil dryness and activates a pump to water the plant.
Components required:
- Arduino UNO
- Soil Moisture Sensor
- 2 CH-Relay module
- Water pump (5V or 12V)
- Jumper wires
- Power supply/Battery
- Tubing for Water Flow
Circuit diagram
Connect the components as shown below:


1. Sensor module connections:
VCC → 5V (Arduino)
GND → GND (Arduino)
A0 (Analog Output) → A0 (Arduino)
2. Relay module connections (Assuming a 2-channel relay module):
VCC → 5V (Arduino)
GND → GND (Arduino)
IN1 (Relay control pin) → Digital Pin 9 (Arduino)
3. Water Pump and Power Supply:
Pump Terminal 1 → Relay NO (Normally Open) Contact
Pump Terminal 2 → Battery Positive (+)
Relay Common (COM) Terminal → Battery Negative (-)
Arduino program:
// Pin definitions
const int soilMoisturePin = A0;  // Soil moisture sensor analog pin
const int pumpPin = 9;           // Pump pin
const int threshold = 600;      // Moisture threshold (adjust based on testing)

void setup() {
  // Initialize components
  pinMode(pumpPin, OUTPUT);
  Serial.begin(9600);

  Serial.println("Soil Moisture Sensor Initialized");
}

void loop() {
  // Read soil moisture sensor value
  int soilValue = analogRead(soilMoisturePin);
  Serial.print("Soil Moisture Value: ");
  Serial.println(soilValue);

  if (soilValue > threshold) {    // Dry soil condition
    digitalWrite(pumpPin, HIGH);  // Turn on pump
    Serial.println("Status: DRY");
  } else {                       // Sufficient moisture
    digitalWrite(pumpPin, LOW);  // Turn off pump
    Serial.println("Status: WET");
  }

  delay(500);  // Wait before the next reading
}
Program Explanation
const int soilMoisturePin = A0;  // Soil moisture sensor analog pin
const int pumpPin = 9;           // Pump pin
const int threshold = 600; // Moisture threshold (adjust based on testing)- soilMoisturePin (A0): Reads analog values from the soil moisture sensor.
- pumpPin (9): Controls the water pump to irrigate the plant when needed.
- threshold (600): Defines the soil moisture level that determines when watering should occur. This value should be calibrated based on the sensor readings for your specific soil and environment.
void setup() {
  // Initialize components
  pinMode(pumpPin, OUTPUT);
  Serial.begin(9600);
Serial.println("Soil Moisture Sensor Initialized");
}- pinMode(pumpPin, OUTPUT): Configures the pump pin as an output.
- Serial.begin(9600): Starts serial communication at a baud rate of 9600 for debugging and monitoring.
- Serial.println(“Soil Moisture Sensor Initialized”): Prints a message to the Serial Monitor indicating that the sensor is ready.
void loop() {
  // Read soil moisture sensor value
  int soilValue = analogRead(soilMoisturePin);
  Serial.print("Soil Moisture Value: ");
Serial.println(soilValue);- Reads the analog value from the soil moisture sensor using analogRead().
- Displays the current soil moisture value in the Serial Monitor.
  if (soilValue > threshold) {    // Dry soil condition
    digitalWrite(pumpPin, HIGH);  // Turn on pump
    Serial.println("Status: DRY");
  } else {                        // Sufficient moisture
    digitalWrite(pumpPin, LOW);  // Turn off pump
    Serial.println("Status: WET");
  }
1. If soilValue is greater than the threshold (soil is dry):
- Activates the pump to water the plant.
- Prints “Status: DRY” to the Serial Monitor.
2. If soilValue is below the threshold (soil has enough moisture):
- Turns off the pump to stop watering.
- Prints “Status: WET” to the Serial Monitor.
delay(500); // Wait before the next readingDelays for 500 milliseconds (0.5 seconds) before taking the next reading. This helps prevent excessive sensor readings and allows the system to function efficiently.
How it works?
- The moisture sensor continuously measures the soil’s moisture level.
- If the soil is too dry, the system:
- Activates the pump to water the plant.
- If the soil is moist enough, the system:
- Deactivate the pump to prevent overwatering.
- The process repeats every 500 milliseconds, keeping the plant at an optimal moisture level.