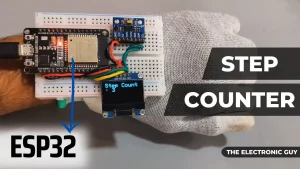
This project is a step counter that tracks steps with an Adafruit ADXL345 accelerometer sensor. The step count is displayed on an Adafruit SSD1306 OLED screen, and a web server allows remote monitoring and step count reset. It’s a versatile solution for tracking physical activity that can be easily customized for a variety of applications.
Table of Contents
Watch the video tutorial below(Project No. 1):
How it works?
Here is the step-by-step working of the project:
- The Adafruit ADXL345 accelerometer sensor continually detects acceleration data.
- When a significant change in acceleration is detected (indicating a step), the step count is increased.
- The current step count is presented in real-time on an Adafruit SSD1306 OLED screen.
- A web server is set up to provide remote access to the step count and offers the option to reset it.
- A debounce system avoids incorrect step detection by creating a delay between consecutive steps, ensuring precise step counting.
Components required
- ESP32
- ADXL345 Accelerometer Sensor
- 0.96-inch OLED Display
Introduction to ADXL345 accelerometer sensor
The ADXL345 is a flexible 3-axis accelerometer sensor that measures acceleration in three dimensions precisely. It has high resolution (up to 13-bit), a wide range of sensitivity options, and low power consumption, making it perfect for motion, tilt, and vibration detection in a variety of applications.
This sensor can communicate through I2C or SPI so it is suitable for use in microcontroller-based projects.
Given below is the pinout of the ADXL345 sensor

| Pin Name | Pin Description |
| GND | Ground Pin |
| VCC | Power Supply (3V to 6V) |
| CS | Chip Select Pin |
| INT1 | Interrupt 1 Output Pin |
| INT2 | Interrupt 2 Output Pin |
| SDO | Serial Data Output Pin |
| SDA | Serial Data Input & Output |
| SDL | Serial Communication Clock |
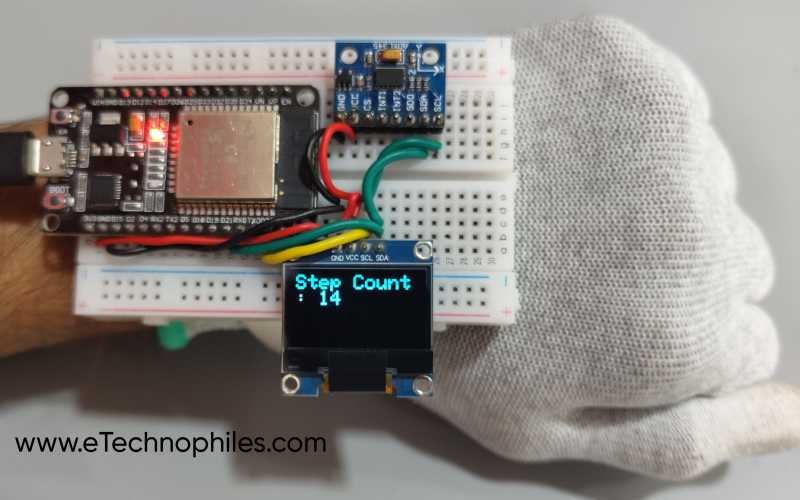
Circuit diagram
This is a simple circuit diagram of the step counter.

| OLED Pin | ESP32 Pin |
| VCC | 3V3 Pin |
| GND | GND of ESP32 |
| SDA | GPIO21 |
| SCL | GPIO22 |
| ADXL Pin | ESP32 Pin |
| VCC | 3V3 Pin |
| GND | GND of ESP32 |
| SDA | GPIO21 |
| SCL | GPIO22 |
We used a breadboard to connect the OLED and ADXL345 with ESP32 as shown below.
Program
Copy and paste the program given below to your Arduino IDE. Before uploading the program, select the correct board and port.
#include <Wire.h>
#include <Adafruit_Sensor.h>
#include <Adafruit_ADXL345_U.h>
#include <WiFi.h>
#include <WebServer.h>
#include <Adafruit_GFX.h>
#include <Adafruit_SSD1306.h>

#define SCREEN_WIDTH 128
#define SCREEN_HEIGHT 64
#define OLED_RESET -1

Adafruit_ADXL345_Unified accel = Adafruit_ADXL345_Unified(12345);
Adafruit_SSD1306 display(SCREEN_WIDTH, SCREEN_HEIGHT, &Wire, OLED_RESET);

const float threshold = 1.2; // Adjust this threshold for step detection sensitivity
const int bufferLength = 15; // Number of accelerometer readings in the buffer
float buffer[bufferLength];
int bufferIndex = 0;
int stepCount = 0;
bool stepDetected = false;

const unsigned long debounceDelay = 300; // Debounce delay in milliseconds
unsigned long lastStepTime = 0;

const char* ssid = "TCDEVLOPER2.4";
const char* password = "swastik@96";

WebServer server(80);

void handleRoot() {
  String html = "<!DOCTYPE html><html><head><title>Step Counter</title><style>body{font-family: Arial, sans-serif;background-color: #f9f9f9;margin: 0;padding: 0;}#container{width: 300px;margin: 50px auto;padding: 20px;background-color: #ffffff;border-radius: 10px;box-shadow: 0 4px 8px rgba(0, 0, 0, 0.1);}h1{text-align: center;color: #333333;}.info{text-align: center;font-size: 24px;color: #555555;margin-bottom: 20px;}.btn{display: block;width: 100%;padding: 10px;text-align: center;color: #ffffff;background-color: #007bff;border: none;border-radius: 5px;font-size: 18px;cursor: pointer;transition: background-color 0.2s ease;}.btn:hover{background-color: #0056b3;}#footer{text-align: center;color: #888888;position: fixed;bottom: 20px;left: 0;right: 0;}</style></head><body><div id=\"container\"><h1>Step Counter</h1><p class=\"info\">Step count: <span id=\"step-count\">" + String(stepCount) + "</span></p><button class=\"btn\" onclick=\"resetCount()\">Reset Count</button></div><div id=\"footer\"><p>IP Address: <span id=\"ip-address\">Loading...</span></p></div><script>function updateStepCount(count){document.getElementById(\"step-count\").innerText=count;}function updateIpAddress(ip){document.getElementById(\"ip-address\").innerText=ip;}function resetCount(){var xhr=new XMLHttpRequest();xhr.open(\"GET\",\"/reset\",true);xhr.onreadystatechange=function(){if(xhr.readyState==4&&xhr.status==200){var response=JSON.parse(xhr.responseText);updateStepCount(response.stepCount);}};xhr.send();}function getIpAddress(){var xhr=new XMLHttpRequest();xhr.open(\"GET\",\"https://api.ipify.org?format=json\",true);xhr.onreadystatechange=function(){if(xhr.readyState==4&&xhr.status==200){var response=JSON.parse(xhr.responseText);updateIpAddress(response.ip);}};xhr.send();}window.onload=function(){getIpAddress();setInterval(function(){location.reload();}, 5000);};</script></body></html>";
  server.send(200, "text/html", html);
}

void handleReset() {
  stepCount = 0;
  String response = "{\"stepCount\":" + String(stepCount) + "}";
  server.send(200, "application/json", response);
}

void updateOledDisplay() {
  display.clearDisplay();
  display.setTextSize(2);
  display.setTextColor(SSD1306_WHITE);
  display.setCursor(0, 0);
  display.print("Step Count: ");
  display.print(stepCount);
  display.display();
}

void setup() {
  Serial.begin(115200);
  Wire.begin();

  if (!accel.begin()) {
    Serial.println("Could not find a valid ADXL345 sensor, check wiring!");
    while (1);
  }

  accel.setRange(ADXL345_RANGE_16_G);

  display.begin(SSD1306_SWITCHCAPVCC, 0x3C);
  display.display();
  delay(2000);
  display.clearDisplay();

  WiFi.begin(ssid, password);
  while (WiFi.status() != WL_CONNECTED) {
    delay(1000);
    Serial.println("Connecting to WiFi...");
  }
  Serial.println("Connected to WiFi");
  Serial.print("IP Address: ");
  Serial.println(WiFi.localIP());

  server.on("/", HTTP_GET, handleRoot);
  server.on("/reset", HTTP_GET, handleReset);
  server.begin();

  delay(2000); // Pause for 2 seconds
}

void loop() {
  server.handleClient();

  sensors_event_t event;
  accel.getEvent(&event);

  float accelerationX = event.acceleration.x;
  float accelerationY = event.acceleration.y;
  float accelerationZ = event.acceleration.z;

  float accelerationMagnitude = sqrt(accelerationX * accelerationX +
                                     accelerationY * accelerationY +
                                     accelerationZ * accelerationZ);

  buffer[bufferIndex] = accelerationMagnitude;
  bufferIndex = (bufferIndex + 1) % bufferLength;

  // Detect a step if the current magnitude is greater than the average of the buffer by the threshold
  float avgMagnitude = 0;
  for (int i = 0; i < bufferLength; i++) {
    avgMagnitude += buffer[i];
  }
  avgMagnitude /= bufferLength;

  unsigned long currentMillis = millis();

  if (accelerationMagnitude > (avgMagnitude + threshold)) {
    if (!stepDetected && (currentMillis - lastStepTime) > debounceDelay) {
      stepCount++;
      stepDetected = true;
      lastStepTime = currentMillis;

      Serial.println("Step detected!");
      Serial.print("Step count: ");
      Serial.println(stepCount);

      // Update OLED display with step count
      updateOledDisplay();
    }
  } else {
    stepDetected = false;
  }
}
Webserver
After uploading the program, open the serial monitor and set the baud rate to ‘115200’. An IP address will be displayed on the monitor. Copy the IP and paste it into your browser.
Note: The ESP32 and the device from which you are accessing the web server should be connected to the same WiFi network
The web server page will look like this:

Program Explanation
Library and sensor/display setup:
#include <Wire.h>
#include <Adafruit_Sensor.h>
#include <Adafruit_ADXL345_U.h>
#include <WiFi.h>
#include <WebServer.h>
#include <Adafruit_GFX.h>
#include <Adafruit_SSD1306.h>
These lines include necessary libraries for communication, sensor handling, Wi-Fi connectivity, web server functionality, and OLED display control.
Sensor and display initialization:
Adafruit_ADXL345_Unified accel = Adafruit_ADXL345_Unified(12345);
Adafruit_SSD1306 display(SCREEN_WIDTH, SCREEN_HEIGHT, &Wire, OLED_RESET);
These lines initialize the Adafruit ADXL345 accelerometer sensor and the Adafruit SSD1306 OLED display with appropriate parameters.
Constants and Variables:
const float threshold = 1.2; // Threshold for step detection sensitivity
const int bufferLength = 15; // Number of accelerometer readings in the buffer
float buffer[bufferLength];
int bufferIndex = 0;
int stepCount = 0;
bool stepDetected = false;

const unsigned long debounceDelay = 300; // Debounce delay in milliseconds

const char* ssid = "TCDEVLOPER2.4";
const char* password = "swastik@96";
These lines define variables and constants used for step detection, debounce control, and Wi-Fi network credentials.
Make sure to replace the SSID and PASSWORD with the credentials of your Wifi network
Web server initialization:
WebServer server(80);
A WebServer instance is established to handle HTTP requests on port 80.
Root URL Handler:
void handleRoot() {
  // HTML code to create a web page displaying step count and a reset button
  // ...
  server.send(200, "text/html", html);
}
When visitors access the root URL (“/”), the handleRoot function provides an HTML page with the step count and a reset button.
Reset URL Handler:
void handleReset() {
  stepCount = 0;
  // JSON response with the updated step count
  // ...
  server.send(200, "application/json", response);
}
When the “/reset” URL is requested, the handleReset function resets the step count and returns a JSON response with the updated count.
OLED display update function:
void updateOledDisplay() {
  // Clear the OLED display and update step count display
  // ...
  display.display();
}
The function updateOledDisplay clears the OLED display and replaces it with the current step count.
Setup Function:
void setup() {
  // Initialize serial communication, I2C, and check sensor connectivity
  // ...

  // Set sensor range and initialize OLED display
  // ...

  // Connect to Wi-Fi
  // ...

  // Configure web server routes and start the server
  // ...

  delay(2000); // Pause for 2 seconds
}
- In the setup function, serial communication, I2C, and sensor connectivity are initialized.
- The sensor’s range is set, the OLED display is initialized, and Wi-Fi is connected.
- Web server routes for root and reset requests are configured, and the server is started.
Loop function:
void loop() {
  // Handle incoming HTTP requests via the web server
  // ...

  // Read accelerometer data and perform step detection
  // ...

  // Update OLED display with step count
  // ...
}
- The web server handles incoming HTTP requests in the loop function.
- Accelerometer data is read, and step detection logic is performed.
- The OLED display is updated with the current step count.
Conclusion
Finally, this project creates a step counter by combining an ESP32 microcontroller with an ADXL345 accelerometer sensor. It monitors the step count in real-time via a web interface, and the step count is displayed on an OLED display. The project demonstrates how sensor data, Wi-Fi connectivity, and web server capability can be combined to create a useful fitness monitoring application.