Last updated on March 14th, 2024 at 06:00 pm
The Arduino Portenta H7 is a powerful board designed to perform Industrial tasks where a lot of computational power is needed. And can be programmed using high-level languages. This board is suitable for larger Industrial, AI, and Machine learning projects by accessing the two 80 pins high-density connectors at the bottom. As well as for simple embedded projects like controlling motors, relays, etc. by accessing the onboard GPIO pins(breadboard friendly).
Arduino claims this to be the most powerful microcontroller board in the market.
Introduction to Arduino Portenta H7
Portenta H7 has a total of 84 digital pins(22 are breadboard friendly or through hole), out of which 8 are analog pins and 10 supports PWM. The board supports all kinds of interfaces like SPI, UART, I2C, I2S and CAN, etc.

Processing power: This board is capable of running machine learning projects and real-time low latency applications. Because of the dual-core STM32H7 processor that has a cortex M7 running at 480 MHz and a Cortex M4 running at 240 Mhz.
By comparing it with the most basic and popular Arduino board, the 8 bit Arduino Uno with 16MHz clock frequency, you can get the idea of how powerful Portenta H7 is.
Connectivity: It has an onboard wireless module also which allows you to manage WiFi(802.11b/g/n) and Bluetooth(5.1) connectivity at the same time. The WiFi interface can also be used as an access point that can handle up to 65 Mb per sec. And the onboard Bluetooth supports Bluetooth classic as well as BLE(Bluetooth low energy) operations.
GPU: Apart from this, it is possible to connect an external monitor to the board due to the presence of the STM32H747 processor’s on-chip GPU i.e., the Chrom-ART Accelerator. This setup can then be used as a dedicated embedded computer for simple tasks.
![Arduino Portenta H7 [ABX00042] - High-Performance Dual-Core Microcontroller Board with ARM Cortex-M7 & M4, Ideal for AI, Edge Computing, and IoT Projects](https://m.media-amazon.com/images/I/41IrtNgCViL.jpg)
Table of Contents
Programming: The Portenta H7 system supports multiple languages: including Arduino, MicroPython, and Javascript.
It also supports the TensorFlow library for low-power Machine learning applications.
Since the processor of the portenta H7 is ARM-based, developers designed it to support ARM Mbed OS Real-Time Operating System (RTOS) as well.
Portenta H7 gets its name from the STMicroelectronics STM32H7.
Portenta H7 is Customizable
Yes, the Portenta H7 is customizable. This means you can request the company to put a different set of memory configurations (SDRAM and FLASH), crypto chip or antenna, etc. on your board depending upon the customization option offered by the company. But in order for your request to be accepted, you must make a bulk order.
You may also request to omit some of the default functionalities altogether like wireless module, crypto chip, External SDRAM and Flash, Antenna, Ethernet, video output, and High-speed USB, etc. All of these features are optional but do come with the default H7 board.
Specs of Arduino Portenta H7

Given below are the specifications of the Arduino portenta H7 in detail:
Note: All the specs are of the default Portenta board(no customization). Optional under a feature means you have the option to omit that feature for your board.
| Specs | Detail |
|---|---|
| Processor | Dual-core STM32H747: Arm Cortex M7 @ 480 MHz and Cortex M4 @ 240 MHz |
| Clock Speed | M7: 480 MHz, M4: 240 MHz |
| Process. Memory(Internal) | 2MB Flash, 1MB RAM |
| Memory(External) (optional) | Default: 8MB of SDRAM and 16MB of Flash |
| Wireless module (optional) | Murata 1DX Dual WiFi 802.11b/g/n 65 Mbps and Bluetooth 5.1 BR/EDR/LE |
| Pins | • Digital I/O Pins: 84(High-Density Connectors) : 22 (on-board through-hole) • Analog : 8 • PWM : 10 |
| Communication | • 4 X UART(2 with flow control) • 3 X I2C • 1 X SPI, 1 X I2S • 1 X SDCard • 1 X CAN |
| TIMERS | • 22x timers and watchdogs |
| Secure element(crypto) (optional) | • NXP SE0502(default) • ATECC608(optional) |
| Camera Interface | • 8 bit (80 MHz max.) |
| GPU | • Chrom-ART graphical hardware Accelerator |
| USB Connector | • USB type C |
| Power | • Operating voltage: 3.3V • Input voltage: 5V |
| Current Ratings | • 8 mA per I/O pin • 2.95 μA in Standby mode |
| Input power options | • USB-C • Vin pin • Lipo battery connector |
| Operating temperature | • -40 TO + 85 °C (excl. Wireless module)  • -10 TO + 55 °C (incl. Wireless module) |
| Form Factor | 66.04 mm(length) x 25.40 mm(width) |
Board Layout of Arduino Portenta H7

Dual-core STM32H747 MCU:
The microcontroller used in Portenta H7 is a dual-core STM32H747 by STMicroelectronics. This microcontroller has two different processors inside: an Arm Cortex M7 running at 480 MHz and an ARM Cortex M4 running at 240 MHz.
Two different tasks can be run in parallel using the two cores. One core may run a Javascript program whereas the other core may run an Arduino Code. Also, the cores running separate programs can communicate with each other via a Remote Procedure Call mechanism.
It’s important to mention that all the on-chip peripherals are accessible to both processors. You have the option to select either of the cores while programming the board.
Memory:
Memory(Internal)
The Portenta H7’s STM32H747 has 2 MB of FLASH and 1MB of RAM
Memory(External)
The default Portenta H7 comes with an external memory: 8MB of SDRAM and 16MB of Flash.
As mentioned before, it’s possible to request a different memory set by referring to the table given below:
| Feature | Description | Feature Code |
| SDRAM | external SDRAM memory | 0 – None 1 – 8 MByte 2 – 16 MByte 3 – 32 MByte 4 – 64 MByte |
| FLASH | external QSPI Flash Memory | 0 – None 1 – 2 MByte (NOR) 5 – 16 MByte (NOR) 8 – 128 MByte (NAND) |
Wireless Module:
The Portenta H7 has Murata 1DX wireless module with WiFi and Bluetooth connectivity. This module has 802.11b/g/n (65 Mbps) WiFi and Bluetooth 5.1.
The wifi interface can also be used as an access point that can handle up to 65 Mb per sec. And the onboard Bluetooth supports Bluetooth classic as well as BLE(Bluetooth low energy) operations.
The wireless module comes with the default H7 configuration and is optional.
| Feature | Description | Feature Code |
| Wireless | Wireless Module | 0 – None W – Fitted |
Crypto IC:
Crypto IC NXP SE050C2 comes pre-installed with the default Portenta board. Although, you have the option to either omit, replace it with Crypto IC Microchip ATECC608, or onboard installation of both of them.
| Feature | Description | Feature Code |
| Wireless | Wireless Module | 0 – None W – Fitted |
Antenna:
The antenna works with both WiFi and Bluetooth. It is helpful in long-distance communications.
For the external antenna, you have the option to choose from an onboard ceramic antenna or the U.FL connector.
| Feature | Description | Feature Code |
| Antenna | Antenna option | 0 – None A – onboard ceramic antenna C – U.FL connector |
USB-C Port:
The onboard USB port has multiple uses. It can be used to:
- Supply power to the board from an external 5V charger
- Can be used to connect devices like a keyboard or mouse to the board and thus can act as a USB host.
- An external monitor can be connected to the port.
- Can be used to power the external devices when the board is powered through the Vin pin
Battery Connector:
The battery connector gives it the ability to be directly connected to a 3.7 V Lipo battery for use in a standalone project.
The middle terminal can be connected to a temperature sensor for temperature monitoring.
High Speed USB Phy:
High-Speed USB Phy(physical layer) IC allows the board to transfer and receive the data at the speed of up to 480 Mbps and can be used both as a host and as a device.
This IC is optional and does come with a default portenta H7.
| Feature | Description | Feature Code |
| HS USB | High-Speed USB PHY | 0 – None U – Fitted |
High Density Connectors:

The Arduino has introduced something new in the Portenta H7 board: two 80 pins high-density connectors. The high-density connectors expose all the on-chip peripherals that are not possible to access from the onboard GPIO through-hole pins.
This gives us, the user ability to either use portenta for small applications using onboard through-hole GPIO pins or for big projects by accessing the high-density connectors at the bottom of the board.
The high-density connector exposes:
- 1x 10/100 Ethernet with PHY
- 1x CAN
- 4x UART (2 with flow control)
- 3x I2C
- 1x SDCard
- 1x SPI
- 1x I2S
- 1x PDM input
- 2 lane MIPI DSI output
- 8 bit parallel camera interface
- 10x PWM outputs
- 8x ADC inputs with separate VREF
Power LED:
The board has a green power led which indicates the ON/OFF status of the board.
Inbuilt Programmable RGB LED:
The board has an inbuilt RGB LED connected to the digital pin 13. The individual colors of the built-in RGB LED can be accessed and controlled separately.
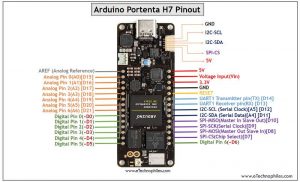
Arduino Portenta H7 Pinout:

Arduino Portenta H7 pinout shows that there are a total of 22 Digital I/O pins that are through-hole and breadboard friendly. Rest of the digital pins can be accessed from the two 80 pins high-density connectors at the bottom of the board.

So there are a total of 84 digital I/O pins. Out of which 8 are analog pins and 10 supports PWM. The board supports 1X SPI, 4X UART, 3X I2C, 1X I2S, and 1X CAN communication protocols.
Board has 5 V, 3.3 V, reset, and Ground pin, one each, available in front for easy access.
The high-density connectors have 10X Ground pin, 3X 3.3 V pin, 1X 5V pin, and 1X Reset pin.
Vin:
This pin is used to power the board. It is also called the primary voltage for IC’s present on the Arduino board. It can also be used to power the external devices(5V) connected to it when the board is powered through the USB directly.
Digital Pins:
There are 22 visible digital I/O pins in the front. The Arduino digital pins can read only two states: when there is a voltage signal and when there is no signal. This kind of input is usually called digital (or binary) and these states are referred to as HIGH and LOW or 1 and 0.
PWM Pins:
10 digital pins support PWM(Pulse Width Modulation) output. 7 out of these 10 are accessible in front starting with D0 and ending at D6.
Analog Pins:
The board consists of 8 analog input pins numbered from A0 to A7, 7 are provided in front of the board(A0-A6). This means we can connect up to 8 analog input sensors to the board. The function of Analog pins is to read the value of the analog sensor used in the connection. Each of these analog pins has an inbuilt ADC of resolution of 216 bits.
SPI Pins:
It stands for Serial Peripheral Interface. It is used by the microcontrollers to communicate with one or more peripheral devices quickly.
SPI pins on the board: D9(SCK), D10(MISO), D8(MOSI), D7(CS)
UART Pins:
Although there are 4 pairs of UART, only 1 pair is provided for a breadboard-friendly interface: D13(RX), D14(TX).
UART protocol requires two pins: RX and TX. These pins are used for serial communication. The TXD is used for transmitting the data, and RXD is used for receiving the data during serial communication. It also represents the successful flow of data from the computer to the board.
Other pins:
3.3V: The 3.3V pin works as the output regulated voltage of 3.3V.
Note: Portenta H7 only supports 3.3V logic. So applying 5V logic can damage the board.
5V: The 5V pin outputs 5v to the external components. The power source of 5V for the board is through the USB connector and the Vin pin.
GND (Ground pins): There is a total of 10 ground pins on the board but only 1 is provided in a through-hole format.
RST: It is used to add a Reset button to the connection.
AREF: This pin stands for analog reference. It provides the voltage reference at which the microcontroller is currently operating. Sending a signal to this pin does nothing.
How to Program Arduino Portenta H7?

There are multiple ways you can program the Portenta H7. Of course, Arduino IDE is one of the methods. It also supports high-level languages: MicroPython, and Javascript.
Due to machine learning applications, the TensorFlow library is supported.
Since the processor of the portenta H7 is ARM-based, developers designed it to support ARM Mbed OS Real-Time Operating System (RTOS) as well.
Portenta H7 gets its name from the STMicroelectronics STM32H7.
Schematic:
Download the official schematic of Portenta H7 from here.
Dimensions:
Dimensions of the Arduino Portenta H7 is: 66.04 mm X 25.40 mm

Mechanical Drawing
