Hello there! Ever wondered how to make a stopwatch with just an OLED display and a button? In this article, we’ll show you how to create a basic stopwatch using Arduino.
This project combines an Arduino, a small OLED display, and a pushbutton to create a working stopwatch. When you press the button, the stopwatch starts counting time in seconds displayed on the OLED screen. By pressing this button again, the stopwatch will stop. This timing will be tracked by the millis() function in Arduino. Using this simple logic, we can make a stopwatch using Arduino very easily.
Watch the project video given below:
Components Required
- Arduino Nano/Uno
- 0.96-inch OLED Display
- Push Button
Introduction to OLED Display
OLED displays come in a variety of sizes (128×64, 128×32, etc.) and colors (for example, white, blue, and dual-color OLEDs). Some feature an SPI interface, while other OLED displays have an I2C interface. Also, an OLED display, unlike a character LCD display, does not require a backlight because it generates its own light.
Pinout of 0.96 Inch I2C OLED Display

- GND- Ground
- VCC- Supply Pin
- SCL- Serial Clock Pin
- SDA- Serial Data Pin
Circuit Diagram
This is a Circuit Diagram of a stopwatch using Arduino.

Circuit connections:
| OLED Pin | Arduino Nano Pin |
| VCC | 5V Pin |
| GND | GND of Nano |
| SDA | A4 |
| SCL | A5 |
| Push Button | Arduino Nano Pin |
| One End | D9 |
| Other End | GND of Arduino Nano |
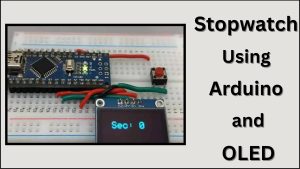
Physical connections
This is a physical connection image of the Stopwatch Project using Arduino Nano

Program
#include <Wire.h>
#include <Adafruit_GFX.h>
#include <Adafruit_SSD1306.h>

#define SCREEN_WIDTH 128 // OLED display width, in pixels
#define SCREEN_HEIGHT 64 // OLED display height, in pixels

#define OLED_RESET -1     // Reset pin # (or -1 if sharing Arduino reset pin)

Adafruit_SSD1306 display(SCREEN_WIDTH, SCREEN_HEIGHT, &Wire, OLED_RESET);

const int buttonPin = 2;  // The pin number of the pushbutton
volatile bool buttonPressed = false;
volatile bool isRunning = false;
volatile unsigned long startTime = 0;
volatile unsigned long elapsedTime = 0;

void buttonInterrupt() {
  buttonPressed = true;
}

void setup() {
  pinMode(buttonPin, INPUT_PULLUP);
  attachInterrupt(digitalPinToInterrupt(buttonPin), buttonInterrupt, FALLING);

  display.begin(SSD1306_SWITCHCAPVCC, 0x3C);
  display.display();
  delay(2000);
  display.clearDisplay();
  display.setTextSize(2);
  display.setTextColor(SSD1306_WHITE);
  display.setCursor(0, 0);
  display.println("TEG");
  display.display();
  delay(2000);
  display.clearDisplay();
  display.setTextSize(2);
  display.setTextColor(SSD1306_WHITE);
  display.setCursor(0, 0);
  display.println("STOPWATCH");
  display.display();
  delay(2000);
}

void loop() {
  if (buttonPressed) {
    if (!isRunning) {
      // Start the stopwatch
      startTime = millis();
      isRunning = true;
    } else {
      // Stop the stopwatch
      elapsedTime = millis() - startTime;
      isRunning = false;
    }

    buttonPressed = false;
  }

  display.clearDisplay();
  display.setTextSize(2);
  display.setTextColor(SSD1306_WHITE);
  display.setCursor(20, 20);

  if (isRunning) {
    unsigned long currentTime = millis();
    elapsedTime += currentTime - startTime;
    startTime = currentTime;
  }
  display.print("Sec: ");
  display.print(elapsedTime / 1000); // Display elapsed time in seconds
  display.display();
}
Program Explanation
Library and Display Setup:
#include <Wire.h>
#include <Adafruit_GFX.h>
#include <Adafruit_SSD1306.h>
These lines include the libraries required for communication and display control.
#define SCREEN_WIDTH 128
#define SCREEN_HEIGHT 64
#define OLED_RESET -1
These lines define constants for screen dimensions and the reset pin.
Adafruit_SSD1306 display(SCREEN_WIDTH, SCREEN_HEIGHT, &Wire, OLED_RESET);
This initializes the display object with the specified settings.
Button and Variables Setup:
const int buttonPin = 2;
volatile bool buttonPressed = false;
volatile bool isRunning = false;
volatile unsigned long startTime = 0;
volatile unsigned long elapsedTime = 0;
These lines define the pushbutton pin and volatile variables that will be used to control button pushes and timing.
Button Interrupt Function:
void buttonInterrupt() {
buttonPressed = true;
}
This function is triggered by a button press and sets the buttonPressed flag to true.
Setup Function:
void setup() {
  pinMode(buttonPin, INPUT_PULLUP);
  attachInterrupt(digitalPinToInterrupt(buttonPin), buttonInterrupt, FALLING);
These lines configure the button pin as an input with a pull-up resistor and attach the buttonInterrupt function to handle button presses.
  display.begin(SSD1306_SWITCHCAPVCC, 0x3C);
  display.display();
  delay(2000);
This section configures the OLED display and displays introduction messages.
Loop Function:
void loop() {
  if (buttonPressed) {
    if (!isRunning) {
      startTime = millis();
      isRunning = true;
    } else {
      elapsedTime = millis() - startTime;
      isRunning = false;
    }
    buttonPressed = false;
  }
This section of code handles the stopwatch logic. Depending on the current condition, pressing the button starts or stops the stopwatch.
  display.clearDisplay();
  display.setTextSize(2);
  display.setTextColor(SSD1306_WHITE);
  display.setCursor(20, 20);
This section prepares the OLED display for showing the stopwatch time.
  if (isRunning) {
    unsigned long currentTime = millis();
    elapsedTime += currentTime - startTime;
    startTime = currentTime;
  }
If the stopwatch is running, it calculates the current time and updates the elapsed time.
  display.print("Sec: ");
  display.print(elapsedTime / 1000);
  display.display();
Finally, the elapsed time in seconds is displayed on the OLED display.
Conclusion
In summary, this project creates a simple stopwatch using an Arduino, a pushbutton, and an OLED display. The stopwatch starts or stops when the button is pressed, and the elapsed time is displayed on the screen. This project demonstrates how to interface pushbutton and OLED display with Arduino.