This project involves building a DIY weather station with a BMP180 sensor and an Arduino Nano. It has a small OLED display that displays temperature, pressure, and altitude data. It’s an excellent project for electronics enthusiasts who want to create their own weather monitoring system.
In this project, the BMP180 sensor measures temperature, pressure, and altitude. The Arduino Nano takes this data and displays it on a 128×64 OLED screen. The setup initializes the components, and the loop continuously reads and updates the weather data displayed on OLED. This allows you to observe real-time weather conditions with your DIY weather station.
Watch the video to see the project in action:
Components Required
- Arduino Nano/Uno
- 0.96 inch OLED Display
- BMP180/BME180
Introduction to BMP180 sensor
Bosch’s BMP180 is a Digital Barometric Pressure Sensor. It is a piezoresistive MEMS device with ultra-low power consumption. It can monitor air pressure between 300 and 1100 hPa.
In addition to pressure, the BMP180 Sensor can monitor temperature from 0 to 650 degrees Celsius. You can calculate the height of the point by measuring the pressure (as they are connected).
It comes in a 7-pin LGA package and communicates with a microcontroller through I2C or SPI (only one is supported in the final sensor). The calibration of sensors is crucial. In order to produce acceptable results, a sensor must be properly calibrated. Fortunately, all Bosch BMP180 Barometric Pressure Sensors are factory calibrated and ready to use.
Pinout of BMP180 Sensor
This is a pinout of the BMP180 Sensor.

- GND- Ground
- VCC- Supply Pin
- SCL- Serial Clock Pin
- SDA- Serial Data Pin
Circuit Diagram
This is the circuit diagram of a DIY Weather Station project using BMP180 Sensor and Arduino Nano.

| OLED Pin | Arduino Nano Pin |
| VCC | 5V Pin |
| GND | GND of Nano |
| SDA | A4 |
| SCL | A5 |
| BMP180 Pin | Arduino Nano Pin |
| VCC | 5V Pin |
| GND | GND of Nano |
| SDA | A4 |
| SCL | A5 |
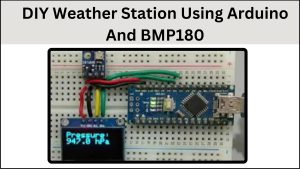
Physical connections
This is a physical connection image of DIY Weather Station.

Program
#include <Wire.h>
#include <Adafruit_GFX.h>
#include <Adafruit_SSD1306.h>
#include <Adafruit_BMP085.h>

Adafruit_BMP085 bmp;
Adafruit_SSD1306 display(128, 64, &Wire, -1);

void setup() {
  Serial.begin(9600);
  if (!bmp.begin()) {
    Serial.println("Could not find a valid BMP085 sensor, check wiring!");
    while (1) {}
  }
  display.begin(SSD1306_SWITCHCAPVCC, 0x3C);
  display.clearDisplay();
  display.setTextColor(WHITE);
}

void loop() {
  float temperature = bmp.readTemperature();
  float pressure = bmp.readPressure();
  float altitude = bmp.readAltitude();

  display.clearDisplay();
  display.setCursor(0, 0);
  display.setTextSize(2);
  display.print("Temperature: ");
  display.print(temperature, 1);
  display.println(" C");
  display.display();
  delay(1500);
  display.clearDisplay();
  display.setCursor(0, 0);
  display.setTextSize(2);
  display.print("Pressure: ");
  display.print(pressure/100, 1);
  display.println(" hPa");
  display.display();
  delay(1500);
  display.clearDisplay();
  display.setCursor(0, 0);
  display.setTextSize(2);
  display.print("Altitude: ");
  display.print(altitude, 0);
  display.println(" m");
  display.display();

  delay(1000);
}
Program Explanation
Include Libraries:
#include <Wire.h>
#include <Adafruit_GFX.h>
#include <Adafruit_SSD1306.h>
#include <Adafruit_BMP085.h>
These lines include the libraries required for I2C communication, graphics handling, OLED display management, and BMP085 sensor interface.
Initialize Objects:
Adafruit_BMP085 bmp;
Adafruit_SSD1306 display(128, 64, &Wire, -1);
These lines generate bmp objects for the BMP085 sensor and display objects for the OLED screen with appropriate settings.
Setup Function:
void setup() {
  Serial.begin(9600);
  if (!bmp.begin()) {
    Serial.println("Could not find a valid BMP0180 sensor, check wiring!");
    while (1) {}
  }
  display.begin(SSD1306_SWITCHCAPVCC, 0x3C);
  display.clearDisplay();
  display.setTextColor(WHITE);
}
- Serial.begin(9600) starts serial communication for debugging.
- The if (!bmp.begin()) statement checks if the BMP0180 sensor is connected and functioning. If not, it prints an error message and begins an endless loop.
- display.begin() initializes the OLED screen, clears any existing content, and sets the text color to white.
Loop Function:
void loop() {
  float temperature = bmp.readTemperature();
  float pressure = bmp.readPressure();
  float altitude = bmp.readAltitude();

  display.clearDisplay();
  display.setCursor(0, 0);
  display.setTextSize(2);
  display.print("Temperature: ");
  display.print(temperature, 1);
  display.println(" C");
  display.display();
  delay(1500);

  // (Similar blocks for Pressure and Altitude)

  delay(1000);
}
- The loop function reads temperature, pressure, and altitude data from the BMP180 sensor.
- It then clears the display, sets the text size and cursor position, and prints the temperature with one decimal place, followed by “C”. It then displays this on the OLED screen and waits for 1.5 seconds.
- Similar blocks are available for displaying pressure and altitude.
- The delay(1000) at the end of the loop adds a 1-second delay before repeating the process.
Conclusion
In short, this is a DIY weather station that uses a BMP180 sensor and an Arduino microcontroller to continually measure and show temperature, pressure, and altitude data. It gives a simple and effective method for creating a personalized weather monitoring system.