Want to take the Flappy Bird game to the next level? You can easily build it with an ESP32 microcontroller, a display, and a touch button. First, watch the project video below:
You control the bird in the game by using the touch button to pass through openings in obstacles.
The position of the bird and the movement of the obstacles are shown on the screen. The code also handles game sound effects and provides a “Press to start” screen, offering a basic yet interactive gaming experience.
Components required
- ESP32
- 0.96-inch OLED Display
- Touch Sensor/Button
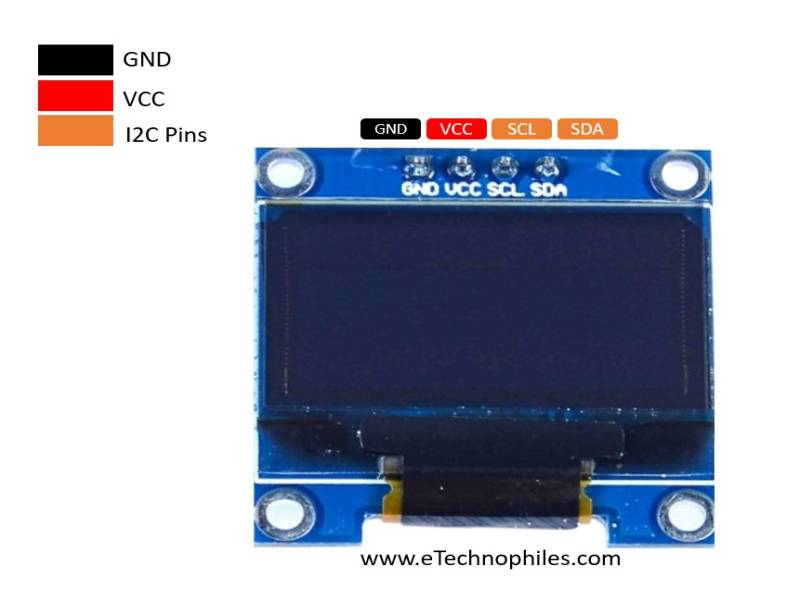
Pinout of 0.96 Inch I2c OLED display
This is a simple 0.96-inch I2C OLED display

- GND :- Ground
- VCC :- Supply Pin
- SCL :- Serial Clock
- SDA :- Serial Data
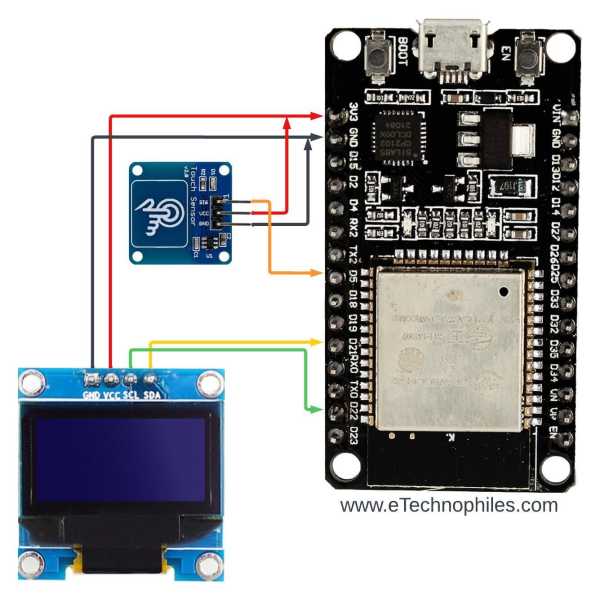
Circuit Diagram
This is the circuit diagram of the Flappy Bird game project.

| OLED Pin | ESP32 Pin |
| VCC | 3V3 Pin |
| GND | GND of ESP32 |
| SDA | GPIO21 |
| SCL | GPIO22 |
| Touch Button Pin | ESP32 Pin |
| VCC | 3V3 Pin |
| GND | GND of ESP32 |
| OUTPUT | GPIO5 |
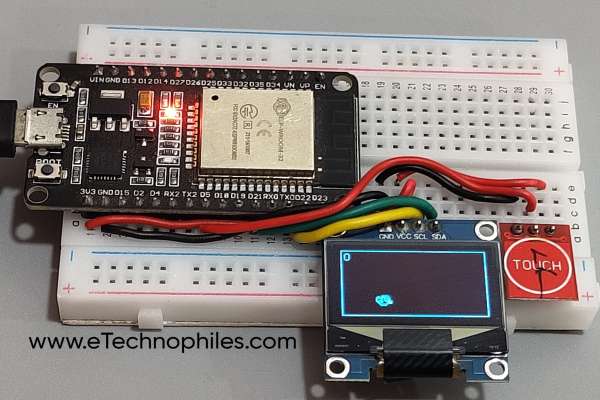
Physical Connections
The project is assembled on a breadboard, this is how it looks:

Program
#include <Wire.h>
#include "SSD1306Wire.h"
#include "images.h"
#include "fontovi.h"

SSD1306Wire  display(0x3c, 21, 22);

#define DEMO_DURATION 3000
typedef void (*Demo)(void);

float zidx[4];
int prazan[4];
int razmak = 32;
int sirinaProlaza = 30;

#define TOUCH_BUTTON_PIN 5

void setup() {
  Serial.begin(9600);
  Serial.println();
  Serial.println();

  pinMode(2, OUTPUT);
  pinMode(23, OUTPUT);
  pinMode(TOUCH_BUTTON_PIN, INPUT_PULLUP);

  display.init();

  for (int i = 0; i < 4; i++) {
    zidx[i] = 128 + ((i + 1) * razmak);
    prazan[i] = random(8, 32);
  }

  display.flipScreenVertically();
  display.setFont(ArialMT_Plain_10);
}

int score = 0;
int stis = 0;
float fx = 30.00;
float fy = 22.00;
int smjer = 0;
unsigned long trenutno = 0;

int igra = 0;
int frame = 0;
int sviraj = 0;
unsigned long ton = 0;

void loop() {
  display.clear();

  if (igra == 0) {
    display.setFont(ArialMT_Plain_16);
    display.drawString(0, 4, "Flappy ");
    display.drawXbm(0, 0, 128, 64, pozadina);
    display.drawXbm(20, 32, 14, 9, ptica);

    display.setFont(ArialMT_Plain_10);
    display.drawString(0, 44, "Press to start");
    delay(3000);

    if (digitalRead(TOUCH_BUTTON_PIN) == LOW) {
      igra = 1;
    }
  }

  if (igra == 1) {
    display.setFont(ArialMT_Plain_10);
    display.drawString(3, 0, String(score));

    if (digitalRead(TOUCH_BUTTON_PIN) == LOW) {
      if (stis == 0) {
        trenutno = millis();
        smjer = 1;
        sviraj = 1;
        stis = 1;
        ton = millis();
      }
    } else {
      stis = 0;
    }

    for (int j = 0; j < 4; j++) {
      display.setColor(WHITE);
      display.fillRect(zidx[j], 0, 6, 64);
      display.setColor(BLACK);
      display.fillRect(zidx[j], prazan[j], 6, sirinaProlaza);
    }

    display.setColor(WHITE);
    display.drawXbm(fx, fy, 14, 9, ptica);

    for (int j = 0; j < 4; j++) {
      zidx[j] = zidx[j] - 0.01;
      if (zidx[j] < -7) {
        score = score + 1;
        digitalWrite(23, 1);
        prazan[j] = random(8, 32);
        zidx[j] = 128;
      }
    }

    if ((trenutno + 185) < millis()) {
      smjer = 0;
    }

    if ((ton + 40) < millis()) {
      sviraj = 0;
    }

    if (smjer == 0) {
      fy = fy + 0.01;
    } else {
      fy = fy - 0.03;
    }

    if (sviraj == 1) {
      digitalWrite(23, 1);
    } else {
      digitalWrite(23, 0);
    }

    if (fy > 63 || fy < 0) {
      igra = 0;
      fy = 22;
      score = 0;
      digitalWrite(23, 1);
      delay(500);
      digitalWrite(23, 0);
      for (int i = 0; i < 4; i++) {
        zidx[i] = 128 + ((i + 1) * razmak);
        prazan[i] = random(8, 32);
      }
    }

    for (int m = 0; m < 4; m++) {
      if (zidx[m] <= fx + 7 && fx + 7 <= zidx[m] + 6) {
        if (fy < prazan[m] || fy + 8 > prazan[m] + sirinaProlaza) {
          igra = 0;
          fy = 22;
          score = 0;
          digitalWrite(23, 1);
          delay(500);
          digitalWrite(23, 0);
          for (int i = 0; i < 4; i++) {
            zidx[i] = 128 + ((i + 1) * razmak);
            prazan[i] = random(8, 32);
          }
        }
      }
    }
    display.drawRect(0, 0, 128, 64);
  }

  display.display();
}
Program explanation
Library and display setup
#include <Wire.h>
#include "SSD1306Wire.h"
#include "images.h"
#include "fontovi.h"

SSD1306Wire  display(0x3c, 21, 22);
This code includes I2C communication libraries and initializes an SSD1306Wire display object with its I2C address (0x3C) and SDA and SCL pins (21,22).
Game parameters and setup:
#define DEMO_DURATION 3000

float zidx[4];
int prazan[4];
int razmak = 32;
int sirinaProlaza = 30;
#define TOUCH_BUTTON_PIN 5
These lines declare various game parameters, including arrays for obstacle positions (zidx and prazan), spacing, and passage width. It also defines a touch button pin.
void setup() {
  Serial.begin(9600);
  Serial.println();
  Serial.println();
  pinMode(2, OUTPUT);
  pinMode(23, OUTPUT);
  pinMode(TOUCH_BUTTON_PIN, INPUT_PULLUP);
  display.init();
  // ... Initialize game parameters ...
}
The setup function initializes serial connectivity, sets pin modes for LEDs and the touch button, and also initializes the display, as well as initial obstacle placements and spacing.
Game state and logic:
int score = 0;
int stis = 0;
float fx = 30.00;
float fy = 22.00;
int smjer = 0;
unsigned long trenutno = 0;
int igra = 0;
int frame = 0;
int sviraj = 0;
unsigned long ton = 0;
These variables determine the game state as well as many aspects such as the player’s score, touch button state, player location, direction, and game event timers.
void loop() {
  display.clear();
  // ... Game logic ...
  display.display();
}
The loop function is where the main game logic occurs. It continuously clears the display, processes the game state, and updates the display accordingly.
Game states and actions:
The code has two main game states (igra):
- Title Screen (igra = 0): Displays the game title, waits for a button press, and then transitions to gameplay.
- Gameplay (igra = 1): It covers gameplay, obstacle movement, player input, collision detection, and scoring.
The game also uses a touch button (connected to TOUCH_BUTTON_PIN) to control the player’s actions.
Conclusion
In summary, this project uses an Arduino and an OLED display to construct a simple Flappy Bird-inspired game. It includes obstacle navigation, touch button control, and score monitoring in the gameplay. This shows how embedded systems can be utilized for game creation by displaying both hardware interface and game logic in a small Arduino-based application.
