Last updated on October 13th, 2023 at 05:58 pm
The continuity test is one of the most useful tests you can perform using a multimeter. There are a lot of practical applications of the continuity function: identifying broken wires/cables, loose connections, faulty circuits, fuses and reverse engineering electronics circuits.
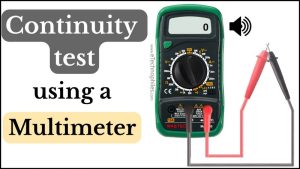
How do you perform a continuity test with a multimeter?
Set the multimeter in the continuity mode(sound symbol). Then, touch the ends of the wire or circuit under test with the multimeter probes in any order. If the multimeter produces a beep sound and displays a value very close to zero, then there is no break in the wire. The circuit is continuous in this case.
You can perform the continuity test using the resistance function as well. Both methods are explained in detail here.
| Multimeter Function | Circuit is continuous | Not continuous |
| Continuity | Beep sound | No sound(‘OL’) |
| Resistance | Close to 0. Bw 0 and 1Ω | Resistance> 1Ω |
Table of Contents
Why do we do a continuity test?
Continuity in a circuit means there is a continuous path for electric current to flow between two points with very low resistance in between. In other words, the circuit is closed, and there is no break in between.
In the image below, the fuse is intact as there is no break in between. Of course, there will be some resistance, but it is only a few ohms. That’s why we say there is continuity in the circuit.

In the second case, when the fuse is blown, the multimeter shows a very high resistance or OL(open loop). This means there is a break in the circuit, and we say there is no continuity. (More details on how to test a fuse here).

Using the continuity test, we can identify faults in switches, fuses, electrical connections, conductors, and other components. Essentially, this test helps ensure that connected points in a circuit remain connected while also identifying any unintended connections between points that should not be linked.
Steps to perform continuity test with a multimeter
There are two ways to test continuity using a multimeter. Either using the continuity mode or the resistance mode. Follow these steps for continuity function:
Step 1: Insert the red probe into the mAVΩ socket and the black probe into the COM port.
Step 2: Set the multimeter in the continuity mode. Use the rotary dial to select the function with the sound symbol. Some multimeters have diode test mode and continuity mode as a single function. Select the diode function with a diode symbol if you have such a multimeter.

Step 3: Touch the ends of the probes together. The multimeter should produce a beep sound, indicating the continuity. This means that the multimeter is in working condition.
Step 4: Switch off the power to the circuit. Take out the component under test from the circuit if possible.
Step 5: Touch one probe to one end of the component/wire and the second probe to the other end of the component/wire.

If there is no continuity, then the multimeter will not produce sound and display OL or Open Loop. This means the wire is broken or the component is faulty and needs to be replaced. If there is continuity, the multimeter will produce a beep sound.
Continuity mode also measures resistance but produces a beep sound when the value is less than a certain level. This level required to activate the beeper can differ between meters, but the majority will signal continuity when the resistance value falls within the range of 0 to 50 ohms.
How to test continuity using the resistance mode?
Set the multimeter knob to the resistance mode, usually represented with the (Ω) symbol. In the ideal state, the multimeter displays “1” or “OL”. Touch the probes together. The multimeter should display “0” in this case, indicating 0 resistance.
There are different resistance ranges on a multimeter, usually 200Ω, 2kΩ, 20kΩ, 200kΩ and 2MΩ. You must select the lowest range for accurate results(200Ω in this case).
Touch the ends of the component/wire with the probes just like before and note down the resistance value displayed by the multimeter.

If there is continuity and the wire/component is in good condition, the multimeter will display a resistance value close to 0 ohms. If there is no continuity and the component is faulty, the multimeter will display OL or Open Loop.
The resistance varies between load or non-load components. Components such as switches, thermostats, or fuses are non-load components that provide an unrestricted path for the electricity to pass through. These typically have a resistance reading between 0 and 1 ohms.
But components such as solenoids, motors, and heating elements are load components. They need a specific resistance value to function correctly, which is usually more than 1 ohm. So they require a different type of test for continuity.