Last updated on July 18th, 2023 at 10:25 pm
If you have a pile of transformers waiting to be tested, then this blog post is what you are looking for- A detailed, step-by-step guide on testing a transformer with a multimeter.
So how do you test a transformer with a multimeter?
To test a transformer, set the multimeter to resistance mode and check the resistance of primary and secondary wiring. If the multimeter displays some finite value, then the transformer is in working condition. It is damaged if the reading is “OL” or “1”.
Note: In this article, we are taking the example of a step-down transformer. So the primary winding will always have a higher voltage than the secondary winding.
Table of Contents
What is a Transformer?

A Transformer is an electrical device that converts the high-voltage AC to low-voltage AC(Step Down Transformer). Or it converts the low-voltage AC to high-voltage AC(Step Up Transformer). A transformer is able to do this conversion based on the principle of Faraday’s law of electromagnetic induction.
The Transformer primarily consists of two coils known as windings; Primary winding and Secondary winding. These windings are usually wound around a core that is made of ferromagnetic material.
When an AC flows through the primary winding, it generates an alternating magnetic field in the core. This alternating field then induces an alternating voltage in the secondary winding. Depending upon the number of turns of the secondary winding, this voltage can be higher or lower than the primary.
Note: The primary winding is the coil where the input source voltage is connected, and the secondary winding is where the load is connected.
How to identify the primary and secondary of a transformer?

| Winding type | Color | Label | Resistance |
|---|---|---|---|
| Primary(a.c mains) | Red | 220 V, 110 V | Higher |
| Secondary | Blue/Green,Yellow | 5V, 12V, 12-0-12 | Lower |
To identify the transformers’ primary and secondary wires, there are two ways:
The first method is to visually inspect the transformer for the label, where the manufacturer has mentioned the input and output voltage. A step-down transformer’s primary winding has a higher voltage rating, whereas a step-up transformer has a lower secondary winding voltage.
You can also look at the color of the wires to identify primary(220V/110V) and secondary windings. Transformer’s primary wire is usually red in color, and the secondary can be either blue, green, or yellow.
The second method is to use a multimeter to measure the resistance of the primary and secondary windings. The resistance of the primary winding has higher resistance than the secondary winding in the case of a step-down transformer.
Note: Identifying the primary and secondary sides is important. By any chance, if you accidentally connect the secondary side to the AC mains voltage, the transformer can melt and get damaged.
Primary and Secondary voltage test
In this method, you have to check the voltage at the primary and secondary windings.
In general, you only need to test the output side of the transformer, but we recommend testing the voltage of both the primary and secondary.
Note: Don’t forget to pull out the transformer from the circuit before testing. And this test is only for step-down transformers rated for 110/220V AC(depending on your AC mains voltage).
Step 1: Connect the transformer to the wall outlet

Connect the primary side of the transformer to the wall outlet. First, turn off the outlet switch. Then insert the transformer’s wires into the socket.
Step 2: Set the multimeter dial to the AC voltage mode
- Insert the red probe into the mAVΩ socket and the black probe into the COM port.
- Depending on your location and the voltage of the outlet, adjust the multimeter knob to either 200 V or 750 V with a “V~” symbol on your multimeter. If you have a 120V outlet, set the multimeter knob to 200V AC. However, if you have a 230V outlet, set it to 750V AC.
Step 3: Measure voltage at the primary side

Switch on the outlet and very carefully measure the voltage at the input/primary side of the transformer (you should get 230V or 120V AC). If the measured value is not close to this, then there is something wrong with the outlet or power line.
Step 4: Measure the voltage at the secondary side.

Set the multimeter knob to 200 V AC. While the transformer is powered on, test the voltage at the secondary winding. The measured voltage should be close to the rated step-down voltage of the transformer.
If we take the example of a 12V transformer, you should get 12V to 14 V on the secondary side.
Note: This is not a safe way to test a transformer. So we recommend the resistance mode test to test the transformer. It’s a safer and more reliable way to get the job done.
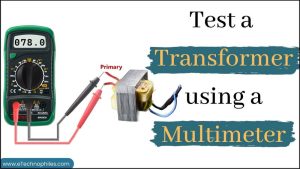
How to test a transformer using the resistance mode?
To test a transformer using the resistance mode, you have to measure the resistance of the primary and secondary windings. This measured value should be within the expected resistance value of the windings.
The main advantage of this test is that you perform it while the transformer is disconnected from the power supply.
Step 1: Select the resistance function.
Set the multimeter knob to the resistance mode, usually represented with the (Ω) symbol. In the ideal state, the multimeter displays “1” or “OL”. Touch the probes together. The multimeter should display “0” in this case.
There are different resistance ranges on a multimeter, usually 200Ω, 2kΩ, 20kΩ, 200kΩ and 2MΩ. You must select the lowest range for accurate results(200Ω in this case).

Note: If you have an auto-ranging multimeter, then simply select the resistance mode. It automatically adjusts the range depending on the resistance.
Step 2: Measure the resistance of primary and secondary
Touch the ends of the primary winding with the ends of the probes.

The multimeter will display a finite resistance value in case the primary winding of the transformer is intact.
If it displays “OL” or “1”, select the next lowest range(2kΩ in this case). If it again displays “OL” or “1”, select the next lowest range(in this case, 20kΩ). If the result does not change, you can be sure that the winding is damaged and the transformer is no longer in working condition.

Note: The resistance of a primary winding in a step-down transformer can go up to 3kΩ, so always switch to the higher resistance ranges while testing.
Now measure the resistance of the secondary winding following the same set of rules. Please note that the resistance of the secondary winding is usually very low, so select the 200Ω range.


| Winding type | Range(Ω) | Resistance | Conclusion |
|---|---|---|---|
| Primary | 200 Ω | Finite | Working |
| 20 kΩ | Infinite(“OL”/”1”) | Damaged | |
| Secondary | 200 Ω | Finite | Working |
| 200 Ω | “OL”/”1” | Damaged |
In the case of an auto-ranging multimeter, if the value displayed is finite, the winding is intact. It is damaged if the displayed value is “OL” or “1”.