When you’re dealing with home wiring, fixing faulty machines, or working on DIY electronic projects, knowing how much current is flowing through the circuit may be needed for troubleshooting.
And using a digital multimeter for measuring current is the easiest method. Learn how to do the same from this step-by-step guide.
So how do you measure current using a multimeter?
To measure the current, select the DC/AC current function with the appropriate range. Then connect the red probe to the port labeled VΩmA and the black probe to the common (COM) port. Finally, connect the multimeter in series with the circuit and observe the current value displayed.
Note: Most generic multimeters have more than one port to measure current, but high-range multimeters like the Fluke 106, 107, and 115 multimeters have this dedicated “A” (amp) port for measuring current.
Simple steps for measuring current using a multimeter

To simplify the current measurement process using a multimeter, just ask yourself this question:
Is the expected current less than 200mA? If yes, select the ‘mAVΩ’ port and choose the lowest range(200µA in this range). If the multimeter displays ‘OL,’ select the next range, and so on. You will definitely get a finite current value in the 200mA range.
Is the expected current might be more than 200mA? If yes, select the ’10A’ port and choose the 200mA range. If the multimeter displays ‘OL,’ select the 10A range.
Table of Contents
Alternating current (AC) vs direct current (DC)
When learning about current, you will encounter two primary types: alternating current (AC) and direct current (DC).
Fun fact! Where do you think the Australian rock band AC/DC got their name from? Of course! “alternating current/direct current” The band’s founders, Malcolm and Angus Young, felt that the name represented the raw energy and power of their music. Now, back to the topic!
Alternating current changes its magnitude and polarity periodically. AC current is mostly used for power distribution in electrical grids, from which the power is delivered to our households.
AC current allows efficient transmission of electricity over long distances and can be used to power a lot of applications. The voltage and current in AC systems periodically reverse, thus creating a sinusoidal waveform, which we are all familiar with.
Direct current flows in a single direction without any fluctuations. A battery is a common source of DC current, and it can be used to power electronic circuits and low-voltage applications.
DC can also be generated using a rectifier circuit, which can be used to power amplifiers and other electronic devices. ATX power supplies, phone chargers, and laptop chargers rectify and convert AC to DC to operate.
How to measure AC/DC current using a multimeter!
To measure AC or DC current with a multimeter, set the dial to the corresponding current (AC or DC) mode and connect the meter in series with the circuit.
Step 1: Insert the probes into the appropriate multimeter port.
Connect the black probe to the “COM” port of the multimeter. And for measuring a current of less than 200 mA, connect the red probe to the mAVΩ port.

For current above 200 mA, connect the red probe to the dedicated “10A” (amp) port of the multimeter.
There is a 200mA fuse connected in series with the mAVΩ port. If the current exceeds 200mA, this fuse might blow. So if you think the current in the circuit that you are measuring might be more than 200mA, switch the probe to the “10A” port.

Note: The maximum current that you can measure with the mAVΩ port is mentioned on the port itself. In most cases, the value is either 200 mA or 250 mA. It really depends on the multimeter that you have.
Some high-end multimeters, like Fluke, have only one port for measuring current. So you need to connect the red probe to that port regardless of the value of the current.
Step 2: Set the multimeter dial to the current measurement mode.

To set the multimeter to the current measurement mode, adjust the dial to the “A” symbol and select the appropriate range. In most multimeters, there are 5 ranges- 200µ, 2m, 20m, 200m, and 10A.

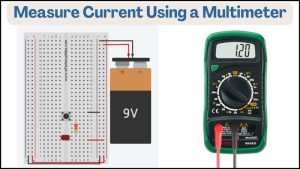
In the example circuit above, the current should be around 1.2 amperes. So, the appropriate current range is 10A, and the red probe should be connected to the 10 A port.

To measure AC current, you should move the dial to AC mode, represented by the (~A) symbol on your multimeter.
Step 3: Connect the multimeter in series with the circuit.
To measure current, you need to connect the multimeter in series with the circuit. So create an open circuit within the circuit and place the multimeter probes in series with it. The circuit current then flows through the multimeter in order for it to measure it.
Connect the multimeter’s black probe to one point of the open circuit and the red probe to the other point, as shown below.

In the circuit given above, by Ohm’s law, the current should be 12v/10Ω = 1.2A. And the multimeter is also displaying the same value.
Step 4: Measure the current
Once the multimeter is in series, double-check for any loose connections, and then connect the power supply to the circuit. The display of the multimeter will show the current value. If it shows ‘OL’ or ‘1’, select the next higher range, and so on.
Step 5: Disconnect the supply and remove the probes.
Once the measurement process is finished, disconnect the multimeter from the circuit and reconnect the part that was disconnected in Step 4.
Please note that inserting the red probe into the appropriate port is as important as choosing the right range. Both go hand in hand. To make this process simple and easy to follow, just keep in mind these points:
- Is the expected current less than 200mA? If yes, select the ‘mAVΩ’ port and choose the lowest range(200µA in this range). If the multimeter displays ‘OL,’ select the next range, and so on. You will definitely get a finite value in the 200mA range.
- Is the expected current might be more than 200mA? If yes, select the ’10A’ port and choose the 200mA range. If the multimeter displays ‘OL,’ select the 10A range.
If you follow these rules while measuring current, you will never face any problems.
So these were the steps that you need to follow to measure the current using a multimeter. Make sure you connect the multimeter in series and choose an appropriate current range. Measuring DC current wrong can only damage your multimeter, but AC can give you a painful shock. So always follow safety precautions while measuring current.