Last updated on March 27th, 2024 at 01:38 pm
NRF24L01 is a single-chip radio transceiver that uses the 2.4 – 2.5 GHz ISM band worldwide. Transceiver means the same module can be used as a transmitter or receiver.
The power consumption of the module is very low, only 9.0mA at an output power of -6dBm and 12.3mA in RX mode which is even less than an LED. Its maximum range is up to 100 meters if used in an open space with an antenna. NRF24L01 pinout and specifications are given below.

Table of Contents
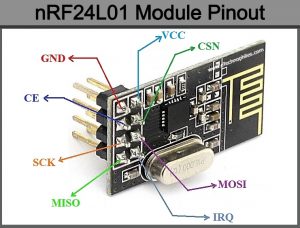
Pinout

| Pin No. | Pin Name | Pin Specifications |
| 1 | VCC | This pin is used to supply power to the module. Voltage can range from 1.9 to 3.9 volts. So, we can connect it directly to the 3.3V output of our Arduino. |
| 2 | CSN (Chip Select Not) | It is an active-LOW pin and is normally kept HIGH. We need to keep this pin high except when we are sending the device an SPI command or receiving data on the SPI bus from the micro-controller. |
| 3 | MOSI (Master Out Slave In) | It is SPI input to the nRF24L01. It is used to receive data from the microcontroller |
| 4 | IRQ | It is an interrupt pin that alerts the master when new data is available to process. |
| 5 | MISO (Master In Slave Out) | It is SPI output from the nRF24L01. It is used to send data to the microcontroller |
| 6 | SCK (Serial Clock) | It accepts clock pulses provided by the SPI bus master. |
| 7 | CE (Chip Enable) | It is the enable pin of the module it is used to select the mode of the nRF24L01 which are either transmit or receive, depending upon which mode it is currently in. |
| 8 | GND | It is the Ground Pin. It is usually marked by enclosing the pin in a square so it can be used to identify the other pins. |
NOTE: Don’t connect the VCC pin directly to the 5V pin of Arduino. Use a 3.3 V regulator.
Specifications
Given below are the specifications of the nRF24L01 module in the table.
| Frequency Range | 2.4 GHz ISM Band |
| Maximum Air Data Rate | 2 Mb/s |
| Modulation Format | GFSK |
| Max. Output Power | 0 dBm |
| Operating Supply Voltage | 1.9 V to 3.6 V |
| Max. Operating Current | 13.5mA |
| Min. Current(Standby Mode) | 26µA |
| Logic Inputs | 5V Tolerant |
| Communication Range | 800+ m (line of sight) |
The transceiver module consists of a fully integrated frequency synthesizer, a crystal oscillator, an amplifier, a demodulator, a modulator, and an Enhanced ShockBurst protocol engine.
Features
- True single-chip GFSK transceiver
- Complete OSI Link Layer in hardware
- Enhanced ShockBurst™ protocol.
- Auto ACK (acknowledgment) & retransmit.
- Address and CRC (Cyclic Redundancy Check) computation.
- Data rate 1 or 2Mbps (normal condition)
- Digital interface (SPI) speed 0-8 Mbps
- 125 RF channel operation
- Short switching time enables frequency hopping
- Fully RF compatible with nRF24XX
- 5V tolerant signal input pads
- 20-pin package (QFN20 4x4mm)
- Uses ultra-low-cost +/- 60 ppm crystal
- Uses low-cost chip inductors and 2-layer PCB
- Power supply range: 1.9 to 3.6 V
Working of the NRF24L01 transceiver module
The nRF24L01 transceiver module sends and receives the data on a certain frequency called Channel. While connecting two or more transceiver modules to communicate with each other, they need to be on the same channel. This channel frequency lies in the 2.4 GHz ISM band or between 2.400 to 2.525 GHz (2400 to 2525 MHz).
Each channel occupies a bandwidth of less than 1MHz. It gives us precisely 125 possible channels with 1MHz spacing i.e, (2525 – 2400)/1 = 125 channels.
nRF24L01 module connection with Arduino
Since the operating voltage of the module ranges from 1.9 to 3.6V, you can connect the VCC pin to 3.3V directly. But the other pins of the module are 5V tolerant and can be connected to the Arduino pins directly.
The MOSI, MISO, and SCK are the SPI (Serial Peripheral Interface) pins and must be connected only to the SPI pins of Arduino. Different Arduino boards have different SPI pins. Below are the SPI pins of some popular Arduino boards:
| Arduino | MOSI | MISO | SCK |
| Arduino Uno | 11 | 12 | 13 |
| Arduino Nano | 11 | 12 | 13 |
| Arduino Mega | 51 | 50 | 52 |
The CSN and CE can be connected to any digital pin of Arduino. As they are used to set the module in either transmitter or receiver mode. The IRQ pin is optional and used only when the interrupt is required.
nRF24L01 transmitter connections
| nRF24L01 | Arduino UNO |
| VCC | 3.3V |
| GND | GND |
| SCK | D13 |
| MISO | D12 |
| MOSI | D11 |
| CSN | D7 |
| CE | D8 |
nRF24L01 receiver connections

**Image Source: Electronicwings
| nRF24L01 | Arduino UNO |
| VCC | 3.3V |
| GND | GND |
| SCK | D13 |
| MISO | D12 |
| MOSI | D11 |
| CSN | D7 |
| CE | D8 |
Application
- Wireless mouse, keyboard, joystick
- Keyless entry
- Wireless data communication
- Surveillance
- Alarm and security systems
- Home automation
- Automotive
- Telemetry
- Intelligent sports equipment
- Industrial sensors
- Toys
FAQs
How fast is nRF24L01?
It operates at a maximum data rate of 2 Mbps.
Can nRF24L01 transmit audio?
The module, with its limited bandwidth and data rate, isn’t optimized for transmitting audio. For high-fidelity audio transmission, other standards like Bluetooth or Wi-Fi are more suitable choices.
Is nRF24L01 a WiFi module?
No, it’s not a WiFi module. It’s a wireless transceiver module commonly used for short-range communication in applications such as wireless sensor networks and remote controls.