
Last updated on January 6th, 2026 at 11:40 am
The ultrasonic sensor also called “Ping Sensor” is used to detect the objects in front and measure the distance between the sensor and the object. In this post, I will show you how to simulate an HCSR04 ultrasonic sensor in Proteus and measure the distance.
Watch the video tutorial here:
How to add Ultrasonic Sensor Library to Proteus?
STEP 1: First of all download the library from the link given below:
HCSR04 ultrasonic sensor library
STEP 2: Download the file to the desktop
STEP 3: Unzip the .zip file to the desktop
STEP 4: You will obtain these three files:
(A) 1.UltrasonicTEP.LIB
2.UltrasonicTEP.IDX
(B) 3.UltraSonicTEP.HEX
STEP 5: Copy the first two files and paste them in:
“C:\Program Files (x86)\Labcenter Electronics\Proteus 7 Professional\LIBRARY”
Next Copy the “.HEX” file and paste it in:
“C:\Program Files (x86)\Labcenter Electronics\Proteus 7 Professional\BIN”
Note: In case you can’t find the Library folder in Proteus 8, first unhide the hidden items from the view menu. Then Go to—-> C:\ProgramData\Labcenter Electronics\Proteus 8 Professional\LIBRARY
STEP 6: Open proteus and click on “pick from libraries”
STEP 7: Search for “ultrasonic” in the components tab. You will see “ultrasonic sensor”. Select it and then place it anywhere on the front panel!
STEP 8: Double-click on the sensor and then click on the “Ultrasonic sensor.HEX” as shown in the figure BELOW.

STEP 9: Select the “UltraSonicTEP.HEX” file from BIN and hit enter as shown in the figure below.

STEP 10: Now you are good to go! You can start simulating the sensor right away.
How to use HCSR04 with Arduino in Proteus?
Follow the steps given below.
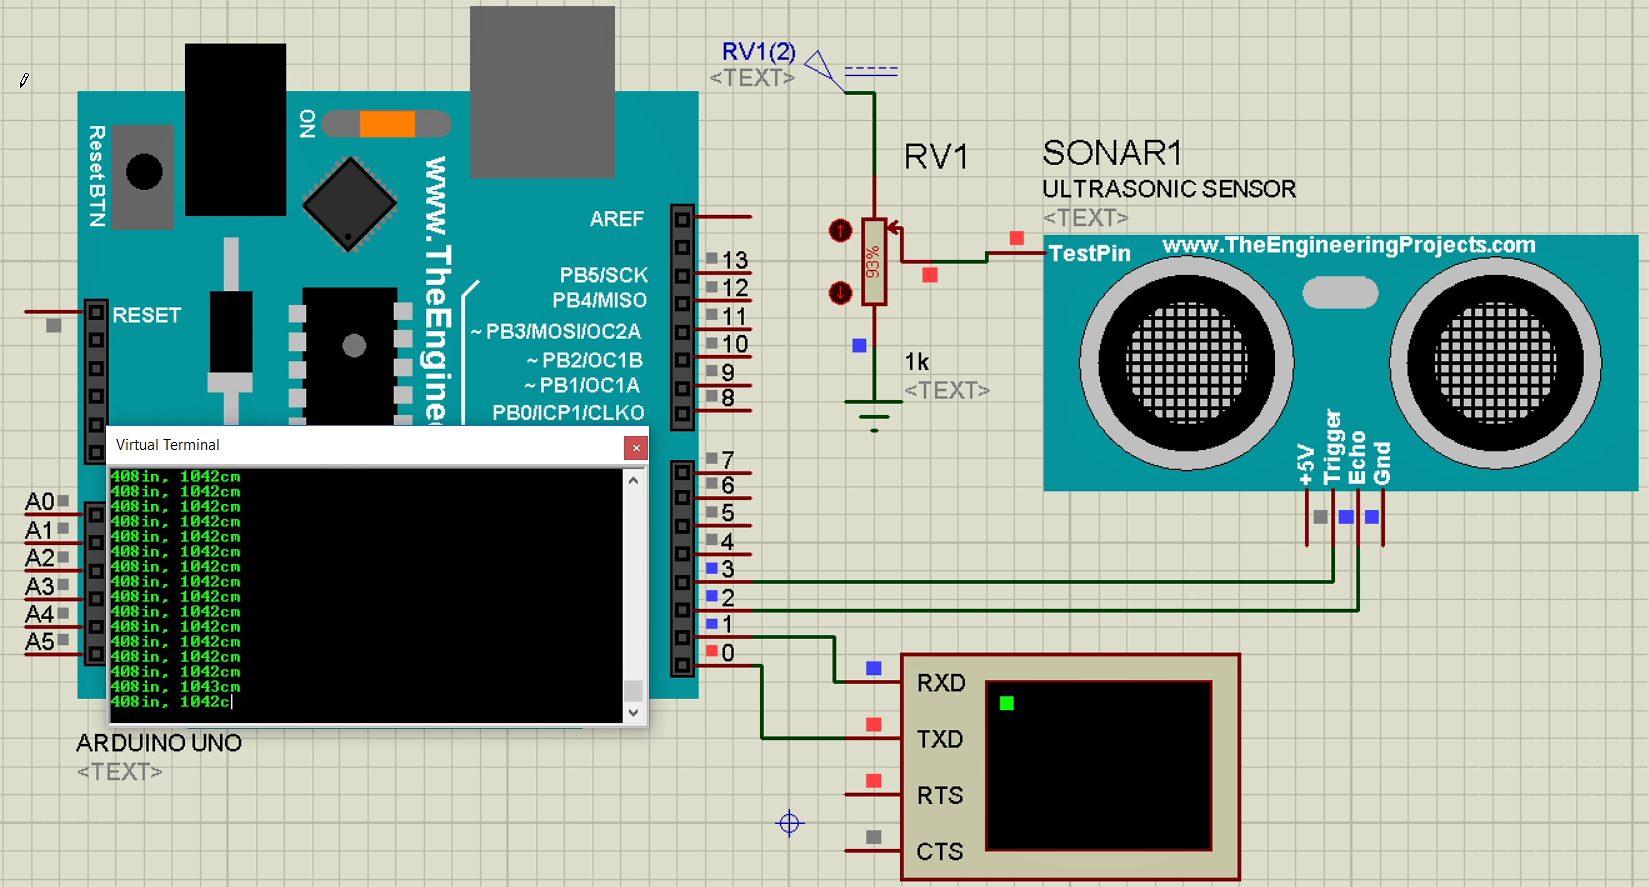
STEP 1: Place these components on the sheet and connect them as shown below.
- Arduino UNO
- Ultrasonic sensor
- Potentiometer(1K ohm)
- DC 5 V(from Generators section)
- Virtual terminal(from Instruments section)
- Ground(from Terminals section)

**Don’t have an Arduino library? Click here to download that library.
STEP 2: Copy this program to your Arduino IDE:
const int echoPin = 2; // Echo Pin of Ultrasonic Sensor
const int pingPin = 3; // Trigger Pin of Ultrasonic Sensor

void setup()
{
  Serial.begin(9600); // Starting Serial Communication
  pinMode(pingPin, OUTPUT); // initialising pin 3 as output
  pinMode(echoPin, INPUT); // initialising pin 2 as input
}
void loop()
{
  long duration, inches, cm;

  digitalWrite(pingPin, LOW);
  delayMicroseconds(2);

  digitalWrite(pingPin, HIGH);
  delayMicroseconds(10);

  digitalWrite(pingPin, LOW);

  duration = pulseIn(echoPin, HIGH); // using pulsin function to determine total time
  inches = microsecondsToInches(duration); // calling method
  cm = microsecondsToCentimeters(duration); // calling method

  Serial.print(inches);
  Serial.print("in, ");
  Serial.print(cm);
  Serial.print("cm");
  Serial.println();

  delay(100);
}

long microsecondsToInches(long microseconds) // method to covert microsec to inches
{
 return microseconds / 74 / 2;
}

long microsecondsToCentimeters(long microseconds) // method to covert microsec to centimeters
{
   return microseconds / 29 / 2;
}
Download the program from here.
STEP 3: Go to preferences

STEP 4: Check the ‘Compilation’ CheckBox

STEP 5: Click on verify (compile)

STEP 6: Then copy the HEX file path from the bottom corner as shown below.

STEP 7: Open the proteus window, and double-click on Arduino to open the settings. Paste the file path in the “Program File” section and click ok.

STEP 8: Double-click on the sensor and then click on the Ultrasonic sensor.HEX as shown in the figure.
STEP 9: Select “UltraSonicTEP.HEX” file from BIN and hit enter as shown in figure.
STEP 10: Run the simulation! Change the potentiometer’s wiper terminal position to test the distance value on the virtual terminal. As you can see in the picture below, the value of the distance gets printed on the serial monitor.
I got proteus 8.7 SP1 pro (legal) and try to simulate, I got this error :
mixed model PIC16EX.DLL failed to authorize – Product Key not found. [SONAR1]
Do you know tis error, can you help me
Thank you
Is this happening to every simulation file or just any particular??
Such a good article!