Last updated on March 22nd, 2024 at 05:48 pm
This article shows you how to add the microphone library for Proteus and test your audio using the microphone. The generated audio waveform can be seen on the oscilloscope in real-time.
Watch the video tutorial below:
Adding Microphone Library for Proteus
STEP 1: First of all download the library from the link given below:
Download the microphone library from here
STEP 2: Download the file to the desktop
STEP 3: Unzip the .zip file to the desktop
STEP 4: You will obtain these three files:
- Library
- Models
- Samples
STEP 5: Copy the library folder’s file and paste it in:
Go to “C:\Program Files (x86)\Labcenter Electronics\Proteus 7 Professional\LIBRARY“
Copy the Models folder’s file and paste it in:
Go to “C:\Program Files (x86)\Labcenter Electronics\Proteus 7 Professional\Models”
Copy the Sample folder’s file(Microphone demo) and paste it in:
Go to “C:\Program Files (x86)\Labcenter Electronics\Proteus 7 Professional\Samples“
Note: In case you can’t find the Library folder in Proteus 8, first unhide the hidden items from the view menu. Then Go to—-> C:\ProgramData\Labcenter Electronics\Proteus 8 Professional\LIBRARY
STEP 6: Open proteus and click on “pick from libraries”
STEP 7: Search for “Microphone” in the component section, you will see “Microphone”. Select it.


Read also: 1) Arduino library for proteus. 2) Ultrasonic sensor library.
How to use this microphone?
STEP 8: Go to help/Sample designs

STEP 9: Now open the folder: ‘Microphone Demo’ and then the file ‘Model’ :


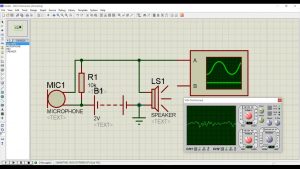
STEP 10: The picture given below shows the demo circuit of the microphone.

In this circuit, the following components are added:
- Microphone
- 10k resistor
- 2-volts Battery
- Speaker and
- Oscilloscope
This Proteus microphone will receive audio input from the laptop’s microphone. After this, the electrical signals are sent to the speaker where it gets converted back to the audio signal. And the connected oscilloscope shows the waveform of the converted electrical signal.
See the figure below to see the generated waveform:
