Last updated on March 26th, 2024 at 06:07 pm
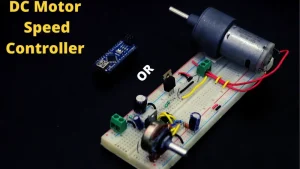
Hello everyone! today we are going to build a DC motor speed controller circuit capable of running 50 V, 15 A DC motor. The circuit diagram, working, and components used in building this project are explained in detail. This is the most complete DC motor speed controller you will find on the internet.
Watch the video tutorial below:
Features
- This speed controller takes input voltage anywhere between 6v to 50v.
- MAX. output current is 15A with the use of a proper heatsink,
- Have gate overvoltage protection and
- Protection against the flyback or voltage spikes.
After connecting the required voltage input and motor to the output terminal, the speed of the motor can be increased or decreased using a potentiometer.
Table of Contents
DC motor speed controller circuit diagram

Components required
- LM317 Voltage Regulator
- 555 timer
- IRF3205S n-channel Mosfet
- 330 uF capacitor(63V)
- 220 uF capacitor(63V)
- 47 uF capacitor(63V)
- 10nF ceramic capacitors X 3
- 1k resistors X 2
- 330-ohm resistor
- 6.2 Kohm resistor
- 100-ohm resistor
- 1n4007 diodes X 3
- 16 A Schottky diode
- 100k potentiometer
- 33-ohm Resistor
- 10V Zener Diode
Working of the controller
At first, this circuit may seem very complicated, so let’s simplify it. This circuit is divided into three main parts:
- Voltage regulator or step-down converter
- PWM generator.
- Switching circuit.
Now let’s understand each part one by one. I am using a bench power supply to power the circuit. And setting the voltage around 12V as an input voltage for the speed controller. I am using the oscilloscope to analyze the waveforms.
Switching circuit

The switching circuit is used to switch the output ON and OFF at a very high frequency. Here, a Mosfet is used to do the job.
Mosfet can switch the high output voltage connected between its drain and source if a threshold voltage is applied at its gate. This threshold voltage is generally much less than the voltage, Mosfet is capable of switching or the voltage between its drain and source.
Also as the voltage at the gate of the Mosfet is increased beyond its gate threshold voltage, more and more current flows through the Drain to the Source.
A word of caution here: The Threshold voltage is the voltage where the MOSFET starts to conduct a little bit. To make the MOSFET conduct enough to drive a significant load it needs some additional voltage also.
This way if a DC motor is connected between the gate and the source of the MOSFET, voltage across it and thus speed can be controlled by controlling the gate voltage. And to do so we need a variable voltage at the Gate. Now here comes the PWM generator to the rescue.
PWM generator circuit

The required variable voltage at the gate can be easily supplied by using a PWM voltage. PWM or pulse width modulation is a technique used to get any voltage between 0 and the maximum of the input voltage. This is achieved by switching the input voltage at a certain frequency and a certain duty cycle.
Suppose we have an input voltage of 5v. It can either be 5v or 0. Now if it is switched on and off with very high frequency, we get a square waveform.
Let’s say ON time is 50 % of the total time. This 50% is called the duty cycle of the PWM wave which gives us the final voltage of 2.5 volts. As this ON time or duty cycle increases, the overall voltage increases.
And when the duty cycle reaches 100% we get 5volts output. Similarly, when it is at 0%, we get 0volts output. This is called pulse width modulation as we are modulating the width of the pulse to get variable voltage.
Read more about PWM here

The speed controller circuit here generates the PWM wave by using a 555 timer IC. This IC provides the required variable voltage at the gate of the MOSFET by working in its astable mode.
Now there is a certain input voltage limit of the IC which is surely less than the voltage limit of this speed controller.
Hence to provide suitable working voltage to the 555 timer IC, a voltage regulator circuit is used which provides fixed voltage to the IC. LM317 voltage regulator is used in this circuit for this purpose.
Voltage regulator circuit
The voltage regulator used here is LM317. It provides a variable voltage between 1.25v to 37 volts. It is used here due to its several advantages over other voltage regulators such as Programmable output voltage, High output current, better line, and load regulation.

A 330 uF capacitor is connected across the input power terminals to smooth out the DC. Followed by a 330-ohm resistor in series with a 47uF capacitor forming a Low pass filter, which then powers the LM317 voltage Regulator.
This voltage regulator is programmed using two resistors(R3 and R2) to give a constant voltage of 9 volts.
It’s worth mentioning that, to produce this 9v output, the dropout voltage must be greater than 2.5 volts or the input voltage must be at least 11.5 volts. To get voltage output other than this you have to change these resistors’ values according to the frequency formula mentioned in the datasheet.
VO = VREF (1 + R2 / R1) + (IADJ × R2)
Download the LM317 datasheet from here
Here R2 is 6.2k and R1 is 1k. Since Iadj. is in the range of uA, just ignore it here. This gives us an output voltage of 9V. This 9V then powers the 555 timer. Here, we are using a 555 timer in its astable mode or as a PWM generator.

How 555 timer is generating the PWM signal?
Pin no. 1 of the IC is grounded. 2 and 6 are connected together, likewise 4 and 8. The 220 uF capacitor smooths out the incoming 9volts.
Now, 1K resistor, 2 1N4007 diodes, 100k potentiometer, and 10nF capacitor form an RC charging-discharging circuit causing a PWM output at the third pin of the 555 timer.
This PWM output controls the Gate of the Mosfet. If you want to know more about the 555 timer and how it generates the PWM wave then I suggest you go through the tons of excellent articles available online.

The most important aspect of the PWM wave is its frequency and here is the 555 timer frequency formula for the same. You can calculate the frequency of the PWM output by using online calculators also.
Frequency = 1.44 / (R1+2×R2) × C1 HZ
Placing the value of R1 (1kohm), Capacitance (around 7nF because of tolerance and other factors), and the potentiometer value which is approximately 91 Kohm in my case in the formula gives us a frequency of 1100Hz.
Now, of course, this is not accurate due to several other factors that affect the circuit. The actual frequency is 1.3khz which is almost constant for 0 to 100% duty cycle of PWM output.
This PWM output controls the Gate of the Mosfet connected through a 33-ohm resistor. IRF3205S can handle current up to 110 Ampere with a proper cooling system and enough gate voltage. The voltage limit between Drain and Source is 55v maximum. whereas, Gate to source voltage is 20v maximum.
The Source of the MOSFET is grounded and the Drain is connected to one terminal of the output whereas the other terminal is to 12v. This way the motor is connected between the +ve of the 12v supply and the Drain of the MOSFET.
Now to protect the MOSFET from voltage spikes caused by the motor, a Schottky diode is connected across the motor or between the Drain and +ve of the 12v supply.
Schottky diodes are generally preferred in flyback diode applications because they have the lowest forward drop (~0.2 V rather than >0.7 V for low currents) and are able to quickly respond to reverse bias (when the inductor is being re-energized) or in other words, Schottky diode have effectively instant reverse recovery time, hence suitable for high-frequency applications.

The potentiometer controls the speed of the motor. The PWM waveform generated by the 555 timer is drawn on the oscilloscope. Measurements like duty cycle and Vpk-pk can also be measured.
Important points
For overvoltage protection, use a Zener diode between the gate and the source of the Mosfet as specified in the schematic.
The Motor I am controlling here is rated at 12v and takes up to 2A at maximum load which is not that big of a load. Hence 1khz PWM frequency is fine here but for big motors, the frequency must be above 15 kHz. To adjust the PWM frequency, either change the potentiometer value or the capacitor to get the desired frequency output. So keep that in mind when using big loads.
I want to use 24v 10 ampere motor what changes I can do please reply
Hi Ranjan,
This circuit will work for this motor as well. Just make sure you are giving 24 Volts to the circuit.
Hi there,
I was looking at your circuit. My team and I are building a 400 lb car. We were needing to make a motor controller purchasing some arduino microcontroller. I wondered if our motor houses 3kW along with ___ amps and 48v battery.
Is your circuit still okay to use or do you have some recommendations for upgrading this circuit with holdup to our motor.
Thanks
Hi locklin,
Great to hear that you are building your own electric car.
Can you please tell us more about the specs of this motor?
Hello Brother iam having issues with the connection I can’t make the circuit from the circuit diagram somehow my potentiometer doesn’t work can u plz Send Some Pictures the Breadboard from All Point oF Views would be really helpful
Hi Shayan,
You can watch the video if you are facing a diagram issue.